
Related Manuals for Graymills SWF3343


Summary of Contents for Graymills SWF3343
- Page 1 Tempest Front-Load Spray Washer Models SWF3343 Operations and Maintenance Instructions Graymills Corporation 2601 S. 25th Ave., Broadview, IL 60155 www.graymills.com 795-47309 1 of 16 5/30/2024...
- Page 2 SHIPPING INFO Unpacking and Inspection You should inspect your equipment for possible shipping damage. Thoroughly check the equipment for any damage that might have occurred in transit, such as broken or loose wiring and components, loose hardware, and mounting screws, etc. In the Event of Shipping Damage According to the contract terms and conditions of the Carrier, the responsibility of the Shipper ends at the time and placement of shipment.
- Page 3 INTRODUCTION The Tempest SWF Front-Load spray wash cabinet offers hands-off cleaning that can be applied to simple and complex parts. It is designed for: • Easy fixturing • Frustration-free field service and repair • Rapid cleanup between jobs. Standard Features: •...
-
Page 4: Safety Warnings / Cautions
Read all the SAFETY INSTRUCTIONS on the machine and those in the manual BEFORE installing or using this equipment. Keep this manual handy for reference/training. You will find various types of safety information on the following pages and on the labels attached to Graymills equipment. The following Safety Statements explain their meaning. -
Page 5: General Description
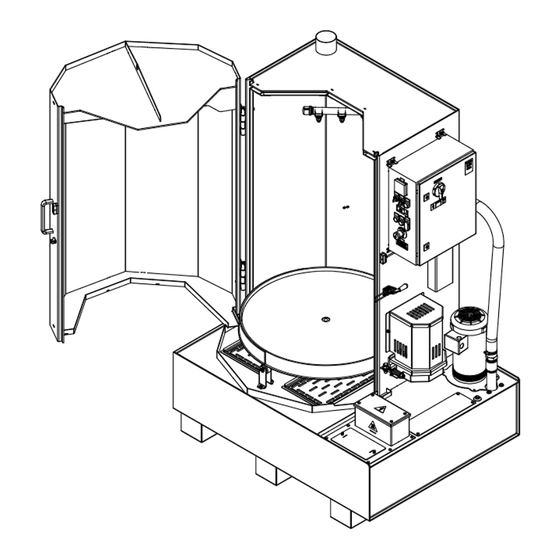
1Ph, 60 Hz, models with “-J” suffix operate at 230VAC, 3Ph, 60Hz, models with “-Y” suffix operate at 460VAC, 3Ph, 60 Hz, and models with “-Z” suffix operate at 575VAC, 3Ph, 60Hz electrical supply. Graymills offers cleaning fluids for most of the cleaning problems found in plants and maintenance shops. Either of the following products work well in these parts cleaners. - Page 6 FEATURES 795-47309 6 of 16 5/30/2024...
- Page 7 Pump (Item # 1) The parts washer is outfitted with a three horsepower, high speed centrifugal-style pump; a critical component responsible for generating the high-pressure and flow spray within the cabinet. Heater Box (Item # 2) The heater box is a crucial component of the parts washer, housing three heating elements controlled by a digital thermostat int the control box.
- Page 8 Spray Manifold (Item # 3) The spray manifold serves as the distribution network for the cleaning fluid, directing it to all the removable saddles and nozzles responsible for cleaning the parts within the parts washer. It features an adjustable arm, typically positioned upright, which can be pivoted down and secured with its chain to accommodate shorter parts.
- Page 9 Chip and Drain trays (Item # 5) Located beneath the turntable, the chip and drain trays play a critical role in maintaining the cleanliness and functionality of the machine. These trays serve as a barrier, minimizing evaporation and allowing fluid to drain back into the tank while effectively straining out large particulate matter.
- Page 10 Automatic Water Fill (Optional – Field Upgradable) (Item # 9) If your machine is equipped with an Automatic Water Fill (AWF) system, it includes a solenoid valve located immediately in front of the pump. Connect to a fresh water source via the ¼” NPT port. The AWF system is designed to maintain the fluid level within a 2”...
-
Page 11: Installation
Cleaning or Replacing the Filter: If the filter is dirty or damaged, replace the bag-style filter media. Replacing the O-Ring: Before reassembling, ensure the large o-ring under the cap is properly seated. If the o-ring appears worn or damaged, replace it with a new one to prevent leaks. Reassembly: Replace the filter housing cap and securely tighten the collar using the t-bolt. -
Page 12: Machine Operation
Alternatively, fluid can be poured into the floor of the cabinet through chip trays if necessary. Fluid can also be evacuated either via the 1.5” NPT floor drain or through the cover plate opening with an evacuation pump. https://www.graymills.com/evacc-service-pumps.html Loading parts External surfaces of the machine may be hot. - Page 13 Semi-Annual Shut the machine down and allow it to cool to a safe level before draining fluid. • Graymills recommends that fluid be fully drained from the machine and replaced at least semi-annually to maintain optimal performance. • Fluid can be drained via the drain plug located on the right front floor of the machine (Item # 15).
-
Page 14: Troubleshooting
TROUBLESHOOTING CONDITION POSSIBLE CAUSE CORRECTION Water level too low (PB1 will be lit) Add fluid and press PB1 Pump doesn’t run Pump motor overload is tripped Reset overload in control box Clogged nozzles Clean nozzles Low pressure at nozzles Clogged filter Replace filter element Door not closed Close and latch door... -
Page 15: Replacement Parts
REPLACEMENT PARTS DESCRIPTION PART NUMBER Drive Wheel (3/4” ID) 597-46133 Magnetic Safety Switch 770-95098 Nozzle Tip (3 GPM) 739-95109 Nozzle Saddle (1/4” NPT) 739-95133 Turntable Roller 574-46039 Turntable Center Block 597-46021 Pump Impeller kit 401-35373 Door Latch 769-95015 Low-Level Float Switch 770-93918-81 780-95004 (230V 1ph) Heater... -
Page 16: Warranty Information
Buyer must give Graymills prompt notice of any defect or failure. If you believe you have a Warranty claim, contact Graymills at (773) 477-4100. Any return material must have an RMA number on the outside of the package and shipping prepaid or shipment will be refused. Graymills will promptly examine the material and determine if it is defective and within the Warranty period.
Need help?
Do you have a question about the SWF3343 and is the answer not in the manual?
Questions and answers