Table of Contents
Advertisement
Available languages
Available languages
Quick Links
Advertisement
Table of Contents

Related Manuals for PNI DMR R45


Summary of Contents for PNI DMR R45
- Page 1 PNI DMR R45 Portable DMR radio / DMR преносимо радио / Tragbares DMR-Radio / Radio portatil DMR / Radio portable DMR / DMR hordozható rádió / Radio portatile DMR / Draagbare DMR-radio / Przenośne radio DMR Statie radio portabila DMR...
- Page 2 Contents User manual ..........Български ............ 14 Deutsch ............Español ............39 Français ............51 Magyar ............63 Italiano ............75 Nederlands ........... Polski ............. Romana ............111...
- Page 3 Safety warnings • DO NOT operate the radio without a suitable antenna attached, as this may damage the radio and may also cause RF exposure limits to be exceeded. A suitable antenna is an antenna supplied with this radio by the manufacturer or an antenna specifically authorized by the manufacturer.
-
Page 4: Basic Features
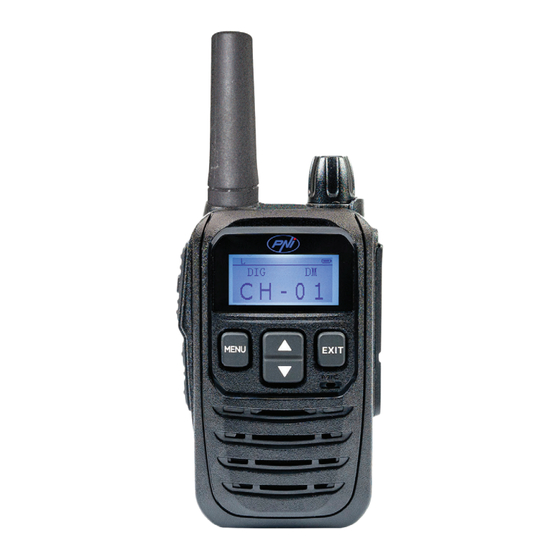
(RF) spectrum to allow remote communications between two or more users. RF energy, when used improperly, can cause biological damage. • All PNI radios are designed, manufactured and tested to ensure they meet RF exposure levels set by law. • These instructions are important because they inform users about exposure to RF energy and provide simple procedures for controlling it. - Page 5 • Record function: function available only in digital mode • Digital color code: 0 - 15 • Energy saving function • Voice prompt • Scramble function • PRI function (function available only in analog mode) • CALL function (function available only in analog mode) Introduction to keys and functions 1.
- Page 6 When the battery is charging, the LED lights up red. When the » battery is fully charged, the LED lights up green. 3. Radio on/off button and volume control 4. PTT button. Press to transmit, release the key to receive. 5.
-
Page 7: Charging The Battery
When transmitting, speak into the microphone in a normal » tone of voice. 13. Loudspeaker 14. and 15. Headphone connector 2 pins PNI-K 16. USB C port for battery charging. 17. Contact pins for the office charger. Instructions for use... - Page 8 To turn on the radio, turn the knob on the top of the radio clockwise. The screen will light up. Continue turning the knob in both directions until you reach the desired volume level. To turn off the radio, turn the knob counterclockwise until you hear a click.
- Page 9 Code Num The color code for the call is displayed only for digital channels and the same color code is used for interoperability. Scan Off, On Zones Zone change: Zone 1 (digital channel), Zone 2 (analog channel) Bluetooth Switch, connect/disconnect, clear pairing information, check Bluetooth status PRI Channel...
- Page 10 02. Scan Scanning can be activated in two ways: - through the menu (MENU - Scan): select the On option. You will hear the voice prompt “Scanning on”. The radio automatically returns to the main interface. On the screen, in the upper right corner, the Scan icon appears.
- Page 11 06. Record Select the On option to activate the recording function. You will hear the voice prompt “On”. On the screen, in the upper right corner, the R icon appears. Any voice message sent or received will be recorded. To listen to a recording, access the “Record File” option, select the file, select the “Play”...
-
Page 12: Technical Specifications
11. Brightness Select the screen brightness level. 3 levels are available. 12. Backlight Select the length of time the screen’s backlight will stay on. Options: Infinite (light always on), 5s, 10s, 15s, 30s, 45s, 60s, 120s, 180s, 240s, 300s. 13. Version The current software version will be displayed on the screen. - Page 13 Analog ≤1.5A (H)/0.8A (L) Emission current Digital ≤0.8A(H)/0.4A(L) Standby current 0.15A 14KΦF3E@20kHz FM modulation 11KΦF3E@12.5kHz 16KΦF3E@25kHz Modulation distortion 12.5KHz(date and voice): 7K60FXW Modulation noise ≥40dB@25KHz / ≥35dB@ 12.5KHz Adjacent channel power ≤-60dB@12.5KHz Audio rejection ‘+1~-3dB Receiver Analog sensitivity 0.2 µV@12dB SINAD Digital sensitivity 0.25uV(BER: 5%) Adjacent channel selectivity...
-
Page 14: Предупреждения За Безопасност
Предупреждения за безопасност • НЕ работете с радиото без прикрепена подходяща антена, тъй като това може да го повреди и може също така да доведе до превишаване на границите на радиочестотно излагане. Подходяща антена е антена, доставена с това радио от производителя, или антена, специално одобрена от... - Page 15 комуникация между двама или повече потребители. RF енергията, когато се използва неправилно, може да причини биологични щети. • Всички радиостанции PNI са проектирани, произведени и тествани, за да се гарантира, че отговарят на нивата на излагане на RF, определени от закона. •...
- Page 16 Основни характеристики • Батерия: 3.7V 2000mAh • Честотен обхват: 446.00625 - 446.19375 MHz • Разстояние между каналите: 12.5KHz • Мощност на предаване: 0.5W • Аналогов дозвуков (38 CTCSS) и цифров дозвуков (104 CDCSS) и обратен цифров дозвуков (104 CDCSS обратен) •...
- Page 17 Въведение в клавишите и функциите 1. Антена 2. LED индикатор Когато радиото излъчва, светодиодът свети в червено. » Когато радиото приема, светодиодът свети в зелено. Когато батерията се зарежда, светодиодът свети » в червено. Когато батерията е напълно заредена, светодиодът свети в зелено. 3.
- Page 18 5. Многофункционален ключ 1 (Monitor / Scan) Натиснете продължително бутона, за да активирате » функцията Монитор. Натиснете дългия клавиш отново, за да деактивирате функцията Монитор. Забележка: функцията за наблюдение на канала е достъпна само в аналогов режим. Натиснете за кратко клавиша, за да активирате »...
- Page 19 Когато излъчвате, говорете в микрофона с нормален » тон на гласа. 13. Високоговорител 14. и 15. Конектор за слушалки 2 пина PNI-K 16. USB C порт за зареждане на батерията. 17. Контактни изводи за офис зарядното. Инструкции за употреба Зареждане на батерията...
- Page 20 Забележка: Не използвайте и двата метода на зареждане едновременно. Докато зареждате батерията, LED индикаторът на радиото ще свети в червено. Когато батерията е напълно заредена, LED индикаторът светва в зелено. Включете и изключете радиото и контрол на силата на звука За...
- Page 21 МЕНЮ • Натиснете за кратко бутона MENU, за да влезете в менюто. • Натиснете клавишите Нагоре и Надолу, за да се придвижвате през подменютата. • Натиснете бутона MENU, за да влезете в желаното подменю. • Натиснете клавишите Нагоре и Надолу, за да навигирате през...
- Page 22 Tone set Изкл., Вкл Изкл., Вкл., Ниво на чувствителност Power Save Изкл., Ниво 1, Ниво 2, Ниво 3 Изключено, 30s, 60s, 90s, 120s, 150s, 180s Brightness Ниво 1, Ниво 2, Ниво 3 Backlight Винаги включен, 5s, 10s, 15s, 30s, 45s, 60s, 120s, 180s, 240s, 300s Firmware Показва...
- Page 23 мултифункционалния клавиш 1. 03. Zones Изберете целевата област. След като изберете зоната, радиото автоматично ще се върне към основния интерфейс и ще остане на канала на избраната зона. Зона 1 (цифров канал), Зона 2 (аналогов канал). 04. Bluetooth Изберете опцията Вкл., за да активирате функцията Bluetooth. Ще...
- Page 24 За да изтриете всички записи, изберете опцията „Изтриване на всички“. 07. Tone Set Изберете опцията Вкл., за да активирате звука при докосване на клавишите, или Изкл., за да деактивирате функцията. 08. Vox Изберете опцията Вкл. или Изкл., за да активирате или деактивирате...
-
Page 25: Технически Спецификации
12. Backlight Изберете продължителността от време, за което подсветката на екрана ще остане включена. Опции: Безкрайно (светлината винаги е включена), 5s, 10s, 15s, 30s, 45s, 60s, 120s, 180s, 240s, 300s. 13. Version Текущата версия на софтуера ще се покаже на екрана. Технически... - Page 26 14KΦF3E@20kHz FM модулация 11KΦF3E@12.5kHz 16KΦF3E@25kHz Модулационно 12.5KHz(date and voice): 7K60FXW изкривяване Модулационен шум ≥40dB@25KHz / ≥35dB@ 12.5KHz Мощност на съседен ≤-60dB@12.5KHz канал Отхвърляне на аудио ‘+1~-3dB Приемник Аналогова 0.2 µV@12dB SINAD чувствителност Дигитална 0.25uV(BER: 5%) чувствителност Селективност на съседен ≤-60dB@12.5KHz канал...
- Page 27 Sicherheitswarnungen • Betreiben Sie das Radio NICHT ohne eine geeignete Antenne, da dies das Radio beschädigen und auch dazu führen kann, dass die Grenzwerte für die HF-Exposition überschritten werden. Eine geeignete Antenne ist eine vom Hersteller mit diesem Radio gelieferte Antenne oder eine vom Hersteller ausdrücklich autorisierte Antenne.
- Page 28 Hochfrequenzspektrum (RF), um die Fernkommunikation zwischen zwei oder mehr Benutzern zu ermöglichen. Bei unsachgemäßer Anwendung kann HF-Energie biologische Schäden verursachen. • Alle PNI-Funkgeräte werden entwickelt, hergestellt und getestet, um sicherzustellen, dass sie die gesetzlich festgelegten HF- Expositionswerte einhalten. • Diese Anweisungen sind wichtig, da sie Benutzer über die Exposition gegenüber HF-Energie informieren und einfache Verfahren zu...
- Page 29 • Sendeleistung: 0.5W • Analoger Unterschall (38 CTCSS) und digitaler Unterschall (104 CDCSS) und umgekehrter digitaler Unterschall (104 CDCSS Inverse) • Kanäle: 99 • Kontakte: 256 • CALL-Funktion / VOX-Funktion / Scanfunktion • Aufnahmefunktion: Funktion nur im Digitalmodus verfügbar • Digitaler Farbcode: 0 - 15 •...
- Page 30 1. Antenne 2. LED-Anzeige Wenn das Radio sendet, leuchtet die LED rot. Wenn das Radio » empfängt, leuchtet die LED grün. Wenn der Akku geladen wird, leuchtet die LED rot. Wenn der » Akku vollständig geladen ist, leuchtet die LED grün. 3.
- Page 31 12. Mikrofon Sprechen Sie beim Senden mit normaler Stimme in das » Mikrofon. 13. Lautsprecher 14. und 15. Kopfhöreranschluss 2 Pins PNI-K 16. USB-C-Anschluss zum Laden des Akkus. 17. Kontaktstifte für das Büroladegerät. Gebrauchsanweisung Die Batterie aufladen Der Akku kann auf zwei Arten aufgeladen werden: 1.
- Page 32 Radios an. 2. Legen Sie das Radio in das Büroladegerät. Stecken Sie das USB-C- Kabel in den USB-C-Anschluss des Tischladegeräts. Schließen Sie das USB-Kabel an den 230V-5V-Adapter an. Stecken Sie den Adapter in eine Steckdose. Hinweis: Verwenden Sie nicht beide Lademethoden gleichzeitig. Während der Akku geladen wird, leuchtet die LED-Anzeige am Radio rot.
- Page 33 LED-Anzeige leuchtet auf und zeigt an, dass die Einstellungen auf die Werkswerte zurückgesetzt wurden. Anschließend schaltet sich das Radio ab und startet automatisch neu. MENÜ • Drücken Sie kurz die MENÜ-Taste, um in das Menü zu gelangen. • Drücken Sie die Auf- und Ab-Tasten, um durch die Untermenüs zu navigieren.
- Page 34 Record Aufnehmen, Aufnahmen anhören, Aufnahmen löschen Tone set Aus an Aus, Ein, Empfindlichkeitsstufe Power Save Aus, Stufe 1, Stufe 2, Stufe 3 Aus, 30er, 60er, 90er, 120er, 150er, 180er Brightness Ebene 1, Ebene 2, Ebene 3 Backlight Immer an, 5 Sek., 10 Sek., 15 Sek., 30 Sek., 45 Sek., 60 Sek., 120 Sek., 180 Sek., 240 Sek., 300 Sek Firmware...
- Page 35 03. Zones Wählen Sie den Zielbereich aus. Nach Auswahl der Zone kehrt das Funkgerät automatisch zur Hauptschnittstelle zurück und verbleibt auf dem Kanal der ausgewählten Zone. Zone 1 (digitaler Kanal), Zone 2 (analoger Kanal). 04. Bluetooth Wählen Sie die Option Ein, um die Bluetooth-Funktion zu aktivieren. Sie hören die Sprachansage „Ein“.
- Page 36 07. Tone Set Wählen Sie die Option „Ein“, um den Ton beim Berühren der Tasten zu aktivieren, oder „Aus“, um die Funktion zu deaktivieren. 08. Vox Wählen Sie die Option „Ein“ oder „Aus“, um die Funktion zu aktivieren oder zu deaktivieren, und die Option „Stufe“, um die Empfindlichkeitsstufe auszuwählen.
-
Page 37: Technische Spezifikationen
13. Version Die aktuelle Softwareversion wird auf dem Bildschirm angezeigt. Technische Spezifikationen Frequenzbereich 446.00625 - 446.19375 MHz 25KHz (Wide Band) Kanalabstand 12.5KHz (Narrow Band) Kanäle 99 channels Digitale Gruppen*Kanäle 16*32 Frequenzstabilität ±1ppm Betriebstemperatur -26°C ~ +80°C Betriebsspannung 3.7V DC Batterie 2000mAh 138x60x30mm (Antenne im Größe... - Page 38 Nachbarkanalleistung ≤-60dB@12.5KHz Audio-Ablehnung ‘+1~-3dB Empfänger Analoge Empfindlichkeit 0.2 µV@12dB SINAD Digitale Sensibilität 0.25uV(BER: 5%) Nachbarkanalselektivität ≤-60dB@12.5KHz Intermodulation ≥65dB Falsche Ablehnung ≥70dB Audio-Ablehnung +1 ~ -3dB Audioverzerrungen <3% Audioleistung ≥0.5W Lärm ≥40dB@25 KHz/≥35dB @12.5KHz Benutzerhandbuch...
-
Page 39: Advertencias De Seguridad
Advertencias de seguridad • NO opere la radio sin una antena adecuada conectada, ya que esto puede dañar la radio y también puede causar que se excedan los límites de exposición a RF. Una antena adecuada es una antena suministrada con esta radio por el fabricante o una antena específicamente autorizada por el fabricante. - Page 40 La energía de RF, cuando se utiliza incorrectamente, puede causar daños biológicos. • Todas las radios de PNI están diseñadas, fabricadas y probadas para garantizar que cumplan con los niveles de exposición a RF establecidos por la ley.
- Page 41 • función VOX • Función de escaneo • Función de grabación: función disponible sólo en modo digital • Código de color digital: 0 - 15 • Función de ahorro de energía • Mensaje de voz • función de codificación • Función PRI (función disponible solo en modo analógico) •...
- Page 42 Cuando la radio recibe, el LED se ilumina en verde. Cuando la batería se está cargando, el LED se ilumina en rojo. » Cuando la batería está completamente cargada, el LED se ilumina en verde. 3. Botón de encendido/apagado de radio y control de volumen 4.
- Page 43 Al transmitir, hable por el micrófono en un tono de voz normal.. » 13. altavoz 14. y 15. Conector de auriculares 2 pines PNI-K 16. Puerto USB C para carga de batería. 17. Pines de contacto para el cargador de oficina..
- Page 44 Mientras se carga la batería, el indicador LED de la radio estará rojo. Cuando la batería está completamente cargada, el indicador LED se vuelve verde. Encendido y apagado de la radio y control de volumen To turn on the radio, turn the knob on the top of the radio clockwise. The screen will light up.
- Page 45 • Presione la tecla MENÚ para confirmar la selección o presione la tecla SALIR para regresar al menú principal. • Presione la tecla EXIT para salir del menú.. Menu Indicador Opciones Code Num El código de color de la llamada se muestra solo para canales digitales y se utiliza el mismo código de color para la interoperabilidad.
- Page 46 Firmware Muestra la versión actual del firmware. 01. Code Num Configuración de código de color para canales digitales. 02. Scan El escaneo se puede activar de dos maneras: - a través del menú (MENÚ - Escanear): seleccione la opción Activado. Escuchará...
- Page 47 superior derecha, aparece el icono de Bluetooth. Seleccione la opción Conectar para conectar, Desconectar para desconectar y Emparejar Borrar para eliminar todos los emparejamientos. 05. PRI Channel Seleccione el canal prioritario. Opciones: Ninguna, 01-99. Nota: función disponible sólo en modo analógico. 06.
-
Page 48: Especificaciones Técnicas
09. Power Save Seleccione el nivel de ahorro de batería. Hay 3 niveles disponibles. 10. TOT Seleccione la duración máxima de transmisión. Opciones: Desactivado, 30s, 60s, 90s, 120s, 150s, 180s. Si excede la duración preestablecida, la transmisión se interrumpirá automáticamente y escuchará un pitido de advertencia.. - Page 49 Grupos digitales*canales 16*32 Estabilidad de frecuencia ±1ppm Temperatura de -26°C ~ +80°C funcionamiento Tensión de funcionamiento 3.7V DC Batería 2000mAh Tamaño 138x60x30mm (antena incluida) Peso 150 g (con batería y antena) Transmisor Poder de emisión 0.5W Analógico ≤1.5A (H)/0.8A (L) Corriente de emisión Digital ≤0,8 A (alto)/0,4 A (largo) Actual en espera...
- Page 50 Distorsiones de audio <3% Potencia de audio ≥0.5W Ruido ≥40dB@25 KHz/≥35dB @12.5KHz Manual de usuario...
-
Page 51: Avertissements De Sécurité
Avertissements de sécurité • NE PAS utiliser la radio sans une antenne appropriée fixée, car cela pourrait endommager la radio et pourrait également entraîner le dépassement des limites d’exposition aux RF. Une antenne appropriée est une antenne fournie avec cette radio par le fabricant ou une antenne spécifiquement autorisée par le fabricant. -
Page 52: Caractéristiques De Base
L’énergie RF, lorsqu’elle est mal utilisée, peut provoquer des dommages biologiques. • Toutes les radios PNI sont conçues, fabriquées et testées pour garantir qu’elles respectent les niveaux d’exposition aux RF fixés par la loi. - Page 53 • Fonction VOX • Fonction de numérisation • Fonction d’enregistrement : fonction disponible uniquement en mode numérique • Code couleur numérique : 0 - 15 • Fonction d’économie d’énergie • Invite vocale • Fonction de brouillage • Fonction PRI (fonction disponible uniquement en mode analogique) •...
- Page 54 1. Antenne 2. Indicateur LED Lorsque la radio émet, la LED s’allume en rouge. Lorsque la » radio reçoit, la LED s’allume en vert. Lorsque la batterie est en charge, la LED s’allume en rouge. » Lorsque la batterie est complètement chargée, la LED s’allume en vert.
- Page 55 Lors de la transmission, parlez dans le microphone avec un ton » de voix normal. 13. Haut-parleur 14. et 15. Connecteur casque 2 broches PNI-K 16. Port USB C pour charger la batterie. 17. Broches de contact pour le chargeur de bureau. Manuel utilisateur...
-
Page 56: Charger La Batterie
Mode d’emploi Charger la batterie La batterie peut être chargée de deux manières : 1. Connectez le câble USB C directement au port USB C de la radio. 2. Placez la radio dans le chargeur de bureau. Branchez le câble USB C sur le port USB C du chargeur de bureau. - Page 57 Réinitialiser Allumez la radio en tournant le bouton situé sur le dessus de la radio. Dans les 5 premières secondes après le démarrage, appuyez simultanément sur la touche multifonction 1 et la touche multifonction 2. Le voyant LED vert s’allume pour indiquer que les réglages sont revenus aux valeurs d’usine.
- Page 58 Bluetooth Commutez, connectez/ déconnectez, effacez les informations d'appairage, vérifiez l'état Bluetooth PRI Channel AUCUN et 01-99 Record Enregistrement, écoute d'enregistrements, suppression d'enregistrements Tone set Éteint allumé Arrêt, Marche, Niveau de sensibilité Power Save Désactivé, Niveau 1, Niveau 2, Niveau 3 Désactivé, années 30, 60, 90, 120, 150, 180 Brightness...
- Page 59 - par le menu (MENU - Scan) : sélectionnez l’option On. Vous entendrez le message vocal « Numérisation activée ». La radio revient automatiquement à l’interface principale. Sur l’écran, dans le coin supérieur droit, l’icône Scan apparaît. La LED orange clignote et les chaînes sont affichées en permanence sur l’écran.
- Page 60 06. Record Sélectionnez l’option Activé pour activer la fonction d’enregistrement. Vous entendrez le message vocal « On ». Sur l’écran, dans le coin supérieur droit, l’icône R apparaît. Tout message vocal envoyé ou reçu sera enregistré. Pour écouter un enregistrement, accédez à l’option « Enregistrer un fichier », sélectionnez le fichier, sélectionnez l’option «...
-
Page 61: Spécifications Techniques
d’avertissement. 11. Brightness Sélectionnez le niveau de luminosité de l’écran. 3 niveaux sont disponibles. 12. Backlight Sélectionnez la durée pendant laquelle le rétroéclairage de l’écran restera allumé. Options : Infini (lumière toujours allumée), 5s, 10s, 15s, 30s, 45s, 60s, 120s, 180s, 240s, 300s. 13. - Page 62 Poids 150g (avec batterie, antenne) Émetteur Puissance d'émission 0.5W Analogique ≤1,5A (H)/0,8A (L) Courant d'émission Numérique ≤0,8A(H)/0,4A(L) Courant en veille 0.15A 14KΦF3E@20kHz Modulation fm 11KΦF3E@12.5kHz 16KΦF3E@25kHz Distorsion de modulation 12.5KHz(date and voice): 7K60FXW Bruit de modulation ≥40dB@25KHz / ≥35dB@ 12.5KHz Puissance du canal adjacent ≤-60dB@12.5KHz Rejet audio...
-
Page 63: Biztonsági Figyelmeztetések
Biztonsági figyelmeztetések • NE működtesse a rádiót megfelelő antenna nélkül, mert ez károsíthatja a rádiót, és a rádiófrekvenciás sugárzási határértékek túllépését is okozhatja. A megfelelő antenna a gyártó által a rádióhoz mellékelt antenna vagy a gyártó által kifejezetten engedélyezett antenna. •... -
Page 64: Alapvető Funkciók
(RF) spektrumban, hogy lehetővé tegye két vagy több felhasználó közötti távoli kommunikációt. A rádiófrekvenciás energia, ha nem megfelelően használják, biológiai károsodást okozhat. • Minden PNI rádiót úgy terveztek, gyártanak és teszteltek, hogy megfeleljenek a törvényben meghatározott RF-expozíciós szinteknek. • Ezek az utasítások azért fontosak, mert tájékoztatják a felhasználókat a rádiófrekvenciás energiának való... - Page 65 • Csatornák: 99 • Elérhetőségek: 256 • CALL funkció • VOX funkció • Scan funkció • Felvétel funkció: a funkció csak digitális módban érhető el • Digitális színkód: 0-15 • Energiatakarékos funkció • Hangutasítás • Scramble funkció • PRI funkció (a funkció csak analóg módban érhető el) •...
- Page 66 1. Antenna 2. LED visszajelző Amikor a rádió sugároz, a LED pirosan világít. Amikor a rádió » veszi, a LED zölden világít. Amikor az akkumulátor töltődik, a LED pirosan világít. Amikor » az akkumulátor teljesen feltöltődött, a LED zölden világít. 3.
- Page 67 12. Mikrofon Adáskor normál hangon beszéljen a mikrofonba. » 13. Hangszóró 14. és 15. Fejhallgató csatlakozó 2 érintkezős PNI-K 16. USB C port az akkumulátor töltéséhez. 17. Az irodai töltő érintkezői. Használati útmutató Az akkumulátor töltése Az akkumulátort kétféleképpen lehet feltölteni: 1.
- Page 68 asztali töltő USB C portjához. Csatlakoztassa az USB kábelt a 230V-5V adapterhez. Helyezze be az adaptert egy konnektorba. Megjegyzés: Ne használja egyszerre mindkét töltési módot. Az akkumulátor töltése közben a rádió LED-je pirosan világít. Amikor az akkumulátor teljesen feltöltődött, a LED jelzőfény zöldre vált. Kapcsolja be és ki a rádiót és a hangerőszabályzót A rádió...
- Page 69 MENÜ • Nyomja meg röviden a MENU gombot, hogy belépjen a menübe. • Az almenük közötti navigáláshoz nyomja meg a Fel és Le gombokat. • Nyomja meg a MENU gombot a kívánt almenübe való belépéshez. • Nyomja meg a Fel és Le billentyűket a lehetőségek közötti navigáláshoz.
- Page 70 Kikapcsolva, 30-as, 60-as, 90-es, 120-as, 150-es, 180-as Brightness 1. szint, 2. szint, 3. szint Backlight Mindig bekapcsolva, 5s, 10s, 15s, 30s, 45s, 60s, 120s, 180s, 240s, 300s Firmware Megjeleníti az aktuális firmware verziót 01. Code Num Színkód beállítása digitális csatornákhoz. 02.
- Page 71 (digitális csatorna), 2. zóna (analóg csatorna). 04. Bluetooth A Bluetooth funkció aktiválásához válassza a Be lehetőséget. Hallani fogja a „Be” hangüzenetet. A képernyő jobb felső sarkában megjelenik a Bluetooth ikon. Válassza a Csatlakozás a csatlakozáshoz, a Kapcsolat bontása a kapcsolat bontásához és a Pair Clear opciót az összes párosítás törléséhez.
- Page 72 08. Vox Válassza a Be vagy Ki lehetőséget a funkció engedélyezéséhez vagy letiltásához, és a Level opciót az érzékenységi szint kiválasztásához. 3 szint áll rendelkezésre. 09. Power Save Válassza ki az akkumulátor megtakarítási szintjét. 3 szint áll rendelkezésre. 10. TOT Válassza ki a sugárzás maximális időtartamát.
- Page 73 Műszaki adatok Frekvenciatartomány 446.00625 - 446.19375 MHz 25KHz (Wide Band) Csatornatávolság 12.5KHz (Narrow Band) csatornák 99 channels Digitális csoportok*csatornák 16*32 Frekvencia stabilitás ±1ppm Üzemi hőmérséklet -26°C ~ +80°C Üzemi feszültség 3.7V DC Akkumulátor 2000mAh méret 138x60x30mm (antenna mellékelve) Súly 150g (akkumulátorral, antennával) Adó...
- Page 74 Analóg érzékenység 0.2 µV@12dB SINAD Digitális érzékenység 0.25uV(BER: 5%) Szomszédos csatorna ≤-60dB@12.5KHz szelektivitás Intermoduláció ≥65dB Hamis elutasítás ≥70dB Hang elutasítása +1 ~ -3dB Hangtorzítások <3% Audio teljesítmény ≥0.5W ≥40dB@25 KHz/≥35dB @12.5KHz Használati utasítás...
- Page 75 Avvertenze di sicurezza • NON utilizzare la radio senza un’antenna adatta collegata, poiché ciò potrebbe danneggiare la radio e potrebbe anche causare il superamento dei limiti di esposizione RF. Un’antenna adatta è un’antenna fornita con questa radio dal produttore o un’antenna specificatamente autorizzata dal produttore.
-
Page 76: Caratteristiche Di Base
(RF) per consentire comunicazioni remote tra due o più utenti. L’energia RF, se utilizzata in modo improprio, può causare danni biologici. • Tutte le radio PNI sono progettate, prodotte e testate per garantire che soddisfino i livelli di esposizione alle radiofrequenze stabiliti dalla legge. •... - Page 77 • Funzione VOX • Funzione di scansione • Funzione Record: funzione disponibile solo in modalità digitale • Codice colore digitale: 0 - 15 • Funzione di risparmio energetico • Comando vocale • Funzione di scramble • Funzione PRI (funzione disponibile solo in modalità analogica) •...
- Page 78 la radio riceve, il LED si illumina di verde. Quando la batteria è in carica, il LED si illumina di rosso. » Quando la batteria è completamente carica, il LED si illumina di verde. 3. Pulsante di accensione/spegnimento della radio e controllo del volume 4.
-
Page 79: Caricare La Batteria
Durante la trasmissione, parlare nel microfono con un tono di » voce normale. 13. Altoparlante 14. e 15. Connettore per cuffie 2 pin PNI-K 16. Porta USB C per la ricarica della batteria. 17. Pin di contatto per il caricatore da ufficio. Istruzioni per l’uso Caricare la batteria La batteria può... - Page 80 Collegare il cavo USB all’adattatore 230V - 5V. Inserire l’adattatore in una presa. Nota: non utilizzare entrambi i metodi di ricarica contemporaneamente. Durante la ricarica della batteria, l’indicatore LED sulla radio sarà rosso. Quando la batteria è completamente carica, l’indicatore LED diventa verde.
- Page 81 IL MENU • Premere brevemente il tasto MENU per accedere al menu. • Premere i tasti Su e Giù per navigare tra i sottomenu. • Premere il tasto MENU per accedere al sottomenu desiderato. • Premere i tasti Su e Giù per navigare tra le opzioni. •...
- Page 82 Power Save Spento, Livello 1, Livello 2, Livello Spento, 30, 60, 90, 120, 150, 180 Brightness Livello 1, Livello 2, Livello 3 Backlight Sempre attivo, 5s, 10s, 15s, 30s, 45s, 60s, 120s, 180s, 240s, 300s Firmware Visualizza la versione corrente del firmware 01.
- Page 83 della zona selezionata. Cambio zona: Zona 1 (canale digitale), Zona 2 (canale analogico). 04. Bluetooth Selezionare l’opzione On per attivare la funzione Bluetooth. Si sentirà il messaggio vocale “On”. Sullo schermo, nell’angolo in alto a destra, appare l’icona Bluetooth. Selezionare l’opzione Connetti per connettersi, Disconnetti per disconnettersi e Cancella associazione per eliminare tutti gli abbinamenti.
- Page 84 08. Vox Selezionare l’opzione On o Off per abilitare o disabilitare la funzione e l’opzione Level per selezionare il livello di sensibilità. Sono disponibili 3 livelli. 09. Power Save Seleziona il livello di risparmio della batteria. Sono disponibili 3 livelli. 10.
-
Page 85: Specifiche Tecniche
Specifiche tecniche Intervallo di frequenze 446.00625 - 446.19375 MHz 25KHz (Wide Band) Spaziatura dei canali 12.5KHz (Narrow Band) canali 99 channels Gruppi*canali digitali 16*32 Stabilità della frequenza ±1ppm temperatura di esercizio -26°C ~ +80°C Tensione operativa 3.7V DC Batteria 2000mAh misurare 138x60x30mm (antenna inclusa) Peso... - Page 86 Selettività del canale ≤-60dB@12.5KHz adiacente Intermodulazione ≥65dB Falso rifiuto ≥70dB Rifiuto dell'audio +1 ~ -3dB Distorsioni audio <3% Potenza audio ≥0.5W Rumore ≥40dB@25 KHz/≥35dB @12.5KHz Manuale dell’utente...
- Page 87 Veiligheidswaarschuwingen • Gebruik de radio NIET zonder dat er een geschikte antenne is bevestigd, omdat dit de radio kan beschadigen en er ook voor kan zorgen dat de RF-blootstellingslimieten worden overschreden. Een geschikte antenne is een antenne die door de fabrikant bij deze radio wordt geleverd, of een antenne die specifiek door de fabrikant is goedgekeurd.
- Page 88 Wanneer RF-energie verkeerd wordt gebruikt, kan dit biologische schade veroorzaken. • Alle PNI-radio’s zijn ontworpen, vervaardigd en getest om ervoor te zorgen dat ze voldoen aan de door de wet vastgestelde RF- blootstellingsniveaus.
- Page 89 • Kanaalafstand: 12,5 kHz • Zendvermogen: 0.5W • Analoog subsonisch (38 CTCSS) en digitaal subsonisch (104 CDCSS) en omgekeerd digitaal subsonisch (104 CDCSS Inverse) • Kanalen: 99 • Contacten: 256 • CALL-functie • VOX-functie • Scanfunctie • Opnamefunctie: functie alleen beschikbaar in digitale modus •...
- Page 90 1. Antenne 2. LED-indicator Wanneer de radio zendt, brandt de LED rood. Wanneer de » radio ontvangt, brandt de LED groen. Wanneer de batterij wordt opgeladen, brandt de LED rood. » Wanneer de accu volledig is opgeladen, brandt de LED groen. 3.
-
Page 91: De Batterij Opladen
12. Microfoon Spreek tijdens het zenden met een normale stem in de » microfoon. 13. Luidspreker 14. en 15. Hoofdtelefoonconnector 2-pins PNI-K 16. USB C-poort voor het opladen van de batterij. 17. Contactpinnen voor de kantoorlader Gebruiksaanwijzing De batterij opladen De batterij kan op twee manieren worden opgeladen: 1. - Page 92 2. Plaats de radio in de kantoorlader. Steek de USB C-kabel in de USB C-poort van de bureaulader. Sluit de USB-kabel aan op de 230V - 5V-adapter. Steek de adapter in een stopcontact. Let op: Gebruik niet beide oplaadmethoden tegelijkertijd. Tijdens het opladen van de batterij is de LED-indicator op de radio rood.
- Page 93 MENU • Druk kort op de MENU-toets om het menu te openen. • Druk op de toetsen Omhoog en Omlaag om door de submenu’s te navigeren. • Druk op de MENU-toets om het gewenste submenu te openen. • Druk op de toetsen Omhoog en Omlaag om door de opties te navigeren.
- Page 94 Power Save Uit, Niveau 1, Niveau 2, Niveau 3 Uit, jaren 30, 60, 90, 120, 150, Brightness Niveau 1, Niveau 2, Niveau 3 Backlight Altijd aan, 5s, 10s, 15s, 30s, 45s, 60s, 120s, 180s, 240s, 300s Firmware Toont de huidige firmwareversie 01.
- Page 95 04. Bluetooth Selecteer de optie Aan om de Bluetooth-functie te activeren. U hoort de gesproken mededeling “Aan”. Op het scherm verschijnt in de rechterbovenhoek het Bluetooth-pictogram. Selecteer de optie Verbinden om verbinding te maken, Verbinding verbreken om de verbinding te verbreken en Koppelen Wissen om alle koppelingen te verwijderen.
- Page 96 08. Vox Selecteer de optie Aan of Uit om de functie in of uit te schakelen en de optie Niveau om het gevoeligheidsniveau te selecteren. Er zijn 3 niveaus beschikbaar. 09. Power Save Selecteer het batterijbesparingsniveau. Er zijn 3 niveaus beschikbaar. 10.
- Page 97 Technische specificaties Frequentiebereik 446.00625 - 446.19375 MHz 25KHz (Wide Band) Kanaalafstand 12.5KHz (Narrow Band) kanalen 99 channels Digitale groepen*kanalen 16*32 Frequentie Stabiliteit ±1ppm Bedrijfstemperatuur -26°C ~ +80°C Werkspanning 3.7V DC Accu 2000mAh maat 138x60x30mm (antenne inbegrepen) Gewicht 150 g (met batterijpakket, antenne) Zender Emissiekracht 0.5W...
- Page 98 Digitale gevoeligheid 0.25uV(BER: 5%) Aangrenzende ≤-60dB@12.5KHz kanaalselectiviteit Intermodulatie ≥65dB Valse afwijzing ≥70dB Audio-afwijzing +1 ~ -3dB Audiovervormingen <3% Audiokracht ≥0.5W Lawaai ≥40dB@25 KHz/≥35dB @12.5KHz Gebruikershandleiding...
-
Page 99: Ostrzeżenia Dotyczące Bezpieczeństwa
Ostrzeżenia dotyczące bezpieczeństwa • NIE WOLNO używać radia bez podłączonej odpowiedniej anteny, ponieważ może to spowodować uszkodzenie radia, a także przekroczenie limitów ekspozycji na częstotliwości radiowe. Odpowiednia antena to antena dostarczona wraz z radiem przez producenta lub antena specjalnie autoryzowana przez producenta. •... -
Page 100: Podstawowe Funkcje
(RF), aby umożliwić zdalną komunikację pomiędzy dwoma lub większą liczbą użytkowników. Niewłaściwie wykorzystywana energia RF może powodować szkody biologiczne. • Wszystkie radiotelefony PNI są projektowane, produkowane i testowane w celu zapewnienia, że spełniają określone przez prawo poziomy narażenia na działanie fal radiowych. •... - Page 101 • Kanały: 99 • Kontakty: 256 • Funkcja ZADZWOŃ • Funkcja VOX • Funkcja skanowania • Funkcja nagrywania: funkcja dostępna tylko w trybie cyfrowym • Cyfrowy kod koloru: 0 - 15 • Funkcja oszczędzania energii • Komunikat głosowy • Funkcja szyfrowania •...
- Page 102 1. Antena 2. Wskaźnik LED Kiedy radiotelefon nadaje, dioda LED świeci się na czerwono. » Gdy radiotelefon odbiera sygnał, dioda LED świeci się na zielono. Podczas ładowania akumulatora dioda LED świeci się na » czerwono. Gdy akumulator jest w pełni naładowany, dioda LED świeci na zielono.
- Page 103 12. Mikrofon Podczas nadawania mów do mikrofonu normalnym tonem » głosu. 13. Głośnik 14. i 15. Złącze słuchawek 2 piny PNI-K 16. Port USB C do ładowania baterii. 17. Styki ładowarki biurowej. Instrukcja użycia Ładowanie akumulatora Akumulator można ładować na dwa sposoby: 1.
- Page 104 2. Umieść radio w ładowarce biurowej. Podłącz kabel USB C do portu USB C ładowarki biurkowej. Podłącz kabel USB do zasilacza 230 V - 5 V. Włóż adapter do gniazdka. Uwaga: Nie używaj obu metod ładowania jednocześnie. Podczas ładowania akumulatora dioda LED w radiu będzie świecić na czerwono.
- Page 105 MENU • Aby wejść do menu, naciśnij krótko klawisz MENU. • Naciśnij klawisze „w górę” i „w dół”, aby poruszać się po podmenu. • Aby wejść do żądanego podmenu, naciśnij klawisz MENU. • Naciśnij klawisze „w górę” i „w dół”, aby poruszać się po opcjach. •...
- Page 106 Wyłączone, 30 s, 60 s, 90 s, 120 s, 150 s, 180 s Brightness Poziom 1, Poziom 2, Poziom 3 Backlight Zawsze włączone, 5 s, 10 s, 15 s, 30 s, 45 s, 60 s, 120 s, 180 s, 240 s, 300 s Firmware Wyświetla aktualną...
- Page 107 Strefa 1 (kanał cyfrowy), Strefa 2 (kanał analogowy). 04. Bluetooth Wybierz opcję Włącz, aby włączyć funkcję Bluetooth. Usłyszysz komunikat głosowy „On”. Na ekranie w prawym górnym rogu pojawi się ikona Bluetooth. Wybierz opcję Połącz, aby połączyć, Rozłącz, aby rozłączyć i Wyczyść parę, aby usunąć...
- Page 108 08. Vox Wybierz opcję Włącz lub Wyłącz, aby włączyć lub wyłączyć tę funkcję, oraz opcję Poziom, aby wybrać poziom czułości. Dostępne są 3 poziomy. 09. Power Save Wybierz poziom oszczędzania baterii. Dostępne są 3 poziomy. 10. TOT Wybierz maksymalny czas trwania transmisji. Opcje: Wył., 30 s, 60 s, 90 s, 120 s, 150 s, 180 s.
-
Page 109: Specyfikacja Techniczna
Specyfikacja techniczna Zakres częstotliwości 446.00625 - 446.19375 MHz 25KHz (Wide Band) Rozstaw kanałów 12.5KHz (Narrow Band) kanały 99 channels Grupy*kanały cyfrowe 16*32 Stabilność częstotliwości ±1ppm temperatura robocza -26°C ~ +80°C Napięcie robocze 3.7V DC Bateria 2000mAh rozmiar 138x60x30mm (antena w zestawie) Waga 150g (z akumulatorem i anteną) Nadajnik... - Page 110 Selektywność kanałów ≤-60dB@12.5KHz sąsiednich Intermodulacja ≥65dB Fałszywe odrzucenie ≥70dB Odrzucenie dźwięku +1 ~ -3dB Zniekształcenia dźwięku <3% Moc dźwięku ≥0.5W Hałas ≥40dB@25 KHz/≥35dB @12.5KHz Instrukcja obsługi...
- Page 111 Atentionari de siguranta • NU utilizati statia radio fara o antena adecvata atasata, deoarece acest lucru poate deteriora statia radio si, de asemenea, poate determina depasirea limitelor de expunere la RF. O antena adecvata este o antena furnizata impreuna cu aceasta statie radio de catre producator sau o antena autorizata in mod special de catre producator.
- Page 112 Energia RF, atunci cand este utilizata necorespunzator, poate provoca daune biologice. • Toate statiile PNI sunt proiectate, fabricate si testate pentru a se asigura ca indeplinesc nivelurile de expunere la RF stabilite de lege. •...
- Page 113 • Functie VOX (OFF, 1/2/3) • Functie Scanare canale • Functie Record (inregistrare): functie disponibila doar in modul digital • Cod culoare pentru canalele digitale: 0 - 15 • Functie economisire energie • Prompt vocal • Functie Scramble • Functie PRI (doar in modul analogic) •...
- Page 114 Cand statia emite, LED-ul se aprinde rosu. Cand statia » receptioneaza, LED-ul se aprinde verde. Cand acumulatorul se incarca, LED-ul se aprinde rosu. Cand » acumulatorul este complet incarcat, LED-ul se aprinde verde. 3. Buton de pornire/oprire statie si Control volum 4.
- Page 115 Cand emiteti, vorbiti inspre microfon cu un ton normal al vocii. » 13. Difuzor 14. si 15. Conector casti 2 pini PNI-K 16. Port USB C pentru incarcare acumulator. 17. Pini de contact pentru incarcatorul de birou. Instructiuni de utilizare...
- Page 116 Pe durata incarcarii acumulatorului, indicatorul LED de pe statie va fi rosu. Cand acumulatorul este complet incarcat, indicatorul LED devine verde. Pornire / Oprire statie radio si Control volum Pentru a porni statia radio, rotiti butonul din partea superioara a statiei in sensul acelor de ceasornic.
- Page 117 • Apasati tastele Sus si Jos pentru a naviga printre optiuni. • Apasati tasta MENU pentru a confirma selectia sau apasati tasta EXIT pentru a reveni la meniul principal. • Apasati tasta EXIT pentru a iesi din meniu. Meniu Indicator Optiuni Code Num Codul de culoare pentru apel este...
- Page 118 01. Code Num Setare cod culoare pentru canalele digitale. 02. Scan Scanarea poate fi activata in doua moduri: - prin meniu (MENU - Scan): selectati optiunea On. Veti auzi prompt- ul vocal “Scanning on“. Statia revine automat la interfata principala. Pe ecran, in coltul din dreapta sus, apare pictograma Scanare.
- Page 119 05. PRI Channel Selectati canalul prioritar. Optiuni: None, 01-99. Nota: funtie disponibila doar in modul analogic. 06. Record Selectati optiunea On pentru a activa functia de inregistrare. Veti auzi prompt-ul vocal “On“. Pe ecran, in coltul din dreapta sus, apare pictograma R.
- Page 120 10. TOT Selectati durata maxima de emisie. Optiuni: Off, 30s, 60s, 90s, 120s, 150s, 180s. Daca depasiti durata presetata, emisia va fi intrerupta automat si veti auzi un beep de avertizare. 11. Brightness Selectati nivelul de luminozitate a ecranului. Sunt disponibile 3 niveluri. 12.
- Page 121 Baterie 2000mAh Dimensiuni 138x60x30mm (antena inclusa) Greutate 150gr (baterie si antena incluse) Transmitator Putere de emisie 0.5W Analog ≤1.5A (H)/0.8A (L) Curent de emisie Digital ≤0.8A(H)/0.4A(L) Curent in standby 0.15A 14KΦF3E@20kHz Modulatie FM 11KΦF3E@12.5kHz 16KΦF3E@25kHz Distorsiune modulatie 12.5KHz(date si voce): 7K60FXW Zgomot modulatie ≥40dB@25KHz / ≥35dB@ 12.5KHz Putere canal adiacent...
-
Page 122: Ctcss Table
CTCSS Table Code No Code No Code Code 67.0 97.4 136.5 31 192.8 71.9 100.0 22 141.3 203.5 74.4 103.5 146.2 33 210.7 77.0 107.2 151.4 218.1 79.7 110.9 156.7 35 225.7 162.2 36 82.5 114.8 233.6 85.4 118.8 167.9 241.8 88.5 123.0... - Page 123 Zone 1. DMR channel and frequency list Channel Frequency (MHz) 446.00625 446.01875 446.03125 446.04375 446.05625 446.06875 446.08125 446.09375 446.10625 CH10 446.11875 CH11 446.13125 CH12 446.14375 CH13 446.15625 CH14 446.16875 CH15 446.18125 CH16 446.19375 Zone 2. PMR channels and frequency list Channel Frequency (MHz) CTCSS or DCS...
- Page 124 CH10 446.11875 CH11 446.13125 CH12 446.14375 CH13 446.15625 CH14 446.16875 CH15 446.18125 CH16 446.19375 CH17 446.00625 114.8 CH18 446.01875 114.8 CH19 446.03125 114.8 CH20 446.04375 114.8 CH21 446.05625 114.8 CH22 446.06875 114.8 CH23 446.08125 114.8 CH24 446.09375 114.8 CH25 446.10625 114.8 CH26 446.11875...
- Page 125 CH42 446.11875 192.8 CH43 446.13125 192.8 CH44 446.14375 192.8 CH45 446.15625 192.8 CH46 446.16875 192.8 CH47 446.18125 192.8 CH48 446.19375 192.8 CH49 446.00625 131.8 CH50 446.01875 131.8 CH51 446.03125 131.8 CH52 446.04375 131.8 CH53 446.05625 131.8 CH54 446.06875 131.8 CH55 446.08125 131.8 CH56...
- Page 126 CH74 446.11875 151.4 CH75 446.13125 151.4 CH76 446.14375 151.4 CH77 446.15625 151.4 CH78 446.16875 151.4 CH79 446.18125 151.4 CH80 446.19375 151.4 CH81 446.00625 173.8 CH82 446.01875 173.8 CH83 446.03125 173.8 CH84 446.04375 173.8 CH85 446.05625 173.8 CH86 446.06875 173.8 CH87 446.08125 173.8 CH88...
- Page 127 Programming cable PNI PSR230 for PNI DMR R45 radio:...
- Page 128 EU Simplified Declaration of Conformity ONLINESHOP SRL declares that DMR portable radio PNI DMR R45 complies with the RED 2014/53/UE. The full text of the EU declaration of conformity is available at the following Internet address: https://www.mypni.eu/products/9480/download/certifications Опростена декларация за съответствие на ЕС...
- Page 129 Egyszerűsített EU Megfelelési Közlemény ONLINESHOP SRL kijelenti azt, hogy a DMR hordozható rádió PNI DMR R45 megfelel az RED 2014/53/UE irányelvnek. Az EU- megfelelőségi nyilatkozat teljes szövege a következő internetes címen érhető el: https://www.mypni.eu/products/9480/download/certifications Dichiarazione UE di conformità semplificata ONLINESHOP SRL dichiara che il Radio portatile DMR PNI DMR R45 è...
Need help?
Do you have a question about the DMR R45 and is the answer not in the manual?
Questions and answers