Sound Devices ASTRAL A20-SuperNexus User Manual
16 to 32-channel, hexversity rack mount receiver with spectraband and nexlink technology
Hide thumbs
Also See for ASTRAL A20-SuperNexus:
- User manual (9 pages) ,
- Quick start manual (7 pages) ,
- User manual (130 pages)

Related Manuals for Sound Devices ASTRAL A20-SuperNexus


Summary of Contents for Sound Devices ASTRAL A20-SuperNexus
- Page 1 ASTRAL ® A20-SuperNexus 16 to 32-Channel, HexVersity Rack Mount Receiver with SpectraBand and NexLink Technology User Guide v1.00...
-
Page 2: Table Of Contents
Table of Contents Welcome to the A20-SuperNexus Key Features SpectraBand Tuning Bands HexVersity Digital Wireless Modulation NexLink Wireless Transmitter Control GainForward Safety Information Architectural Overview Panel Views Powering Quick Start Navigating the A20-SuperNexus User Interface RX Views Menus TX List RF Menu Antenna Modes Antenna Pair Settings... - Page 3 A20-Outpost-NL (Coming Soon) A20-Monarch Antenna NexLink Status Alerts Frequency Band Restrictions Connector Pin Assignments A20-SuperNexus Specifications A20-Monarch Specifications Note on RF Interference Servicing the A20-SuperNexus Warranty Legal Notices Declaration of Conformity SuperNexus User Guide...
-
Page 4: Welcome To The A20-Supernexus
Welcome to the A20-SuperNexus The A20-SuperNexus is an ultra-high performance, 16 to 32-channel wireless microphone receiver in 1RU rackmount chassis. It features 16 independent, HexVersity channels that can be expanded to 32 channels via software license. The A20-SuperNexus features NexLink, an innovative concept in wireless microphone receivers: full remote control of microphone transmitters via an integrated, long distance 2.4 GHz link. -
Page 5: Spectraband
SpectraBand The A20-SuperNexus incorporates SpectraBand, a technology that enables the A20-SuperNexus to tune over a super wide range of 169-1525 MHz. This 169-1525 MHz global range is divided into multiple tightly-filtered frequency ranges called ‘filter ranges’. The sharp attenuation at either end of a filter range significantly reduces out of band interference resulting in excellent range and performance. Available filter ranges vary by country. -
Page 6: Digital Wireless Modulation
Digital Wireless Modulation Long Range and Standard Modulation The Astral wireless products offer two proprietary digital modulation schemes that provide unbeatable range, unrivaled audio quality, and very low latency. Long Range or Standard modulation can be selected on a per-receiver-channel basis. The modulation setting must match between the Astral transmitter and the A20-SuperNexus in order for the transmitted signal to be received and decoded. Intermodulation Immunity Because the Astral series transmitter design is inherently resistant to intermodulation, multiple Astral digital wireless transmitters can be used simultaneously on nearby adjacent frequencies without significant worry of intermodulation interference. -
Page 7: Safety Information
Safety Information All the safety and operating instructions should be read before the product is operated. WARNING: To reduce the risk of fire or electric shock or damage, do not expose this product to rain or moisture. The product should not be exposed to dripping or splashing or be used near water (e.g. in a bathroom, a kitchen, wet basement or near a swimming pool etc…) Similarly, do not place objects containing liquids on this product as care should be taken to prevent objects and liquids from entering the product. -
Page 8: Architectural Overview
Architectural Overview The A20-SuperNexus builds upon the existing A20-Nexus’ new approach to professional audio receiver design, allowing tuning from 169MHz all the way to 1525MHz, with some significant additions. The first thing to note about the A20-SuperNexus architecture is there are six independent RF signal paths – one for each antenna input – which all operate simultaneously. This allows for a number of significant advances over the existing A20-Nexus' two antenna paths. - Page 9 Block Diagram SuperNexus User Guide...
-
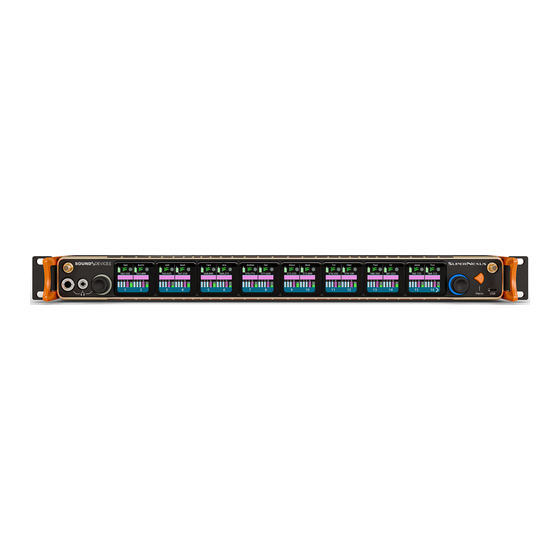
Page 10: Panel Views
Panel Views FRONT PANEL 1 & 3: NexLink Antenna Inputs Dual SMA-F ports for connecting 2.4 GHz SMA-M antennas for NexLink. Both antennas need to be connected. Alternatively, the rear-panel NexLink connections can be used. 2: OLED Touch Screens 12.4-in Color OLED array for control and monitoring. ●... - Page 11 Dual SMA-F ports for connecting 2.4 GHz SMA-M antennas for NexLink. Both antennas need to be connected. Alternatively, the front-panel NexLink connectors can be used. Important: Only use the 2.4 GHz SMA-M antennas supplied with the A20-SuperNexus or equivalent. Do not use 2.4 GHz RP-SMA antennas (as used on Sound Devices 8-Series mixer/recorders).
- Page 12 ● Orange top LED indicates whether 12V antenna bias power is enabled. Bias power is enabled in the Antenna Pair Settings menus. ● Green middle LED indicates that the antenna input is active. Antenna inputs are enabled/disabled depending on the Antenna Mode menu setting.
-
Page 13: Powering
Powering The A20-SuperNexus is powered from AC mains (100-240V AC) or DC 10-18V via the 4-pin XLR. AC power takes priority over DC power if both are connected. The control knob ring LED illuminates blue during power up, then dims once the device has fully booted. When the A20-SuperNexus is first powered on, the last accessed RX View is displayed. -
Page 14: Navigating The A20-Supernexus User Interface
Navigating the A20-SuperNexus User Interface The A20-SuperNexus is operated from its front panel triangle button, control knob, HP knob, and eight touch screens or remotely via a web interface. Triangle Button ● Press to power up. Press and hold to power down. ●... - Page 15 ● Value Button: Displays a parameter’s value. ○ Tap to select - the button turns orange. ○ Rotate the Control knob to adjust the value. ○ Press the Control knob or tap the button to exit. ● Action Button: A button that initiates a process e.g. Format USB Drive, Unpair etc. The button contains the name of the process. ●...
-
Page 16: Rx Views
RX Views RX Views display real-time receiver channel data, transmitter signals, and status information across the eight OLED screens. There are several types of RX View: ● All (Displays either 16, 24, or 32 channels, depending on how many channel expansion licenses are installed) ●... - Page 17 Channel Name: Displays the name of the transmitter that is currently feeding the channel. The transmitter name can be edited if the channel is NexLinked to an Astral transmitter. The transmitter name cannot be edited if an A10-TX or non-NexLinked Astral transmitter is assigned to it. Transmitter Battery Level Icon: Indicates the remaining transmitter battery charge as a color and in % or V depending on the type of battery the transmitter is using.
- Page 18 RF History: Displays the receiver channel’s Receive Signal Strength Indication (RSSI), Link Quality (Q), or RSSI + Q history. See RF History. Antenna Pairs 1,2,3 RSSI Meters: Indicates the received antenna signal strength from the A and B antennas for each of the three antenna pairs at the RX channel’s current frequency. Only the antenna pairs that are feeding the band that the RX channel is assigned to, have their RSSI meters displayed.
- Page 19 Channel Name and Audio Meter: Displays the transmitter (channel) name inside an audio level meter. Tap the meter to edit the name (12-character maximum) using the virtual keyboard. The transmitter name can be edited if the channel is NexLinked to an Astral transmitter The transmitter name cannot be edited if the channel is being fed from an A10-TX or a non-NexLinked Astral transmitter.
- Page 20 1RX View Displays a receiver channel’s received signal, audio level, control functions and status across the four screens. Use the 1RX View to perform detailed control and monitoring of a receiver channel and its associated transmitter. The 1RX View has different control layouts depending on the following criteria: ●...
- Page 21 Channel sourced from an A10-TX or non-NexLink’d transmitter No transmitters are assigned to the channel Tap the TX List button to assign a transmitter. Example 1: 1RX View when sourced from a single A20-TX transmitter in REC+RF Mode ● Rotate the Control knob to navigate to next and previous 1RX views. ●...
- Page 22 Flashing Red = Depleted (transmitter RF and audio is disabled) NexLink RSSI Meter: Indicates the Receive Signal Strength Indication (RSSI) of the 2.4 GHz NexLink signal from the transmitter. The RSSI color signifies the transmitter NexLink status. Green = Transmitter is on and NexLink active White = Transmitter is off and NexLink active Gray = No connection or out of range For receiver channels that are sourced from a single transmitter, tap the NexLink RSSI meter icon to display the NexLinked Transmitter List from which you can select an Astral transmitter to...
- Page 23 Antenna Pairs 1,2,3 RSSI Meters: Indicates the received antenna signal strength from the A and B antennas for each of the three antenna pairs at the RX channel’s current frequency. Only the antenna pairs that are feeding the band that the RX channel is assigned to, have their RSSI meters displayed. For 3-Zone Combiner and 2-Zone Combiner + 1 Pair) Antenna Modes, the RSSI meters for combined antenna pairs are labeled ‘X’.
- Page 24 LEDs On/Off buttons: Tap to enable or disable the Astral transmitter’s LEDs. 17. ID On/Off Buttons: Tap to identify the Astral transmitter. Its LEDs will start flashing and if it's an A20-TX, it will also vibrate. 18. Mute On/Off buttons: Tap to mute and unmute the transmitter. 19.
- Page 25 Example 2: 1RX View when sourced from multiple Astral transmitters in REC+RF Mode, Standalone Many of the controls are the same as those described in Example 1. When a receiver channel is sourced from multiple transmitters, the Assigned Transmitters list in OLED 5 displays a list of all transmitters assigned to the RX channel. The transmitter name shown in OLED 2 and in green font in the Assigned Tx list in OLED 5, is the transmitter that is currently being received by the channel.
-
Page 26: Menus
Menus All A20-SuperNexus settings are organized into menus accessed via the top level Main Menu. The triangle button cycles between the current RX view and Main Menu. The leftmost OLED displays navigation icons for the various RX views. Tap an RX View icon to jump to its RX View. When in a menu, press the triangle button or tap the leftmost OLED to back out to the menu above. -
Page 27: Tx List
TX List The TX List is an inventory of all paired Astral transmitters and which RX channels, if any, they are assigned to. Up to 64 transmitters can be paired with the A20-SuperNexus. ‘Pairing’ is a process that establishes a NexLink relationship between the A20-SuperNexus and Astral transmitter. Once paired, an Astral transmitter can be controlled and monitored from A20-SuperNexus. Transmitters can also be assigned to user-nameable groups. - Page 28 TX List > Gear Menu with a Group row selected, showing the other available group functions, Mode, Modulation, and Format TX. TX List showing a Group retry status in OLED 6. Pairing an Astral Transmitter to the A20-SuperNexus To establish NexLink wireless control between an Astral transmitter and the A20-SuperNexus, a new transmitter must be added to the TX List in a process called ‘pairing’. This pairing is saved indefinitely over power cycles, and typically only has to be done during initial system setup.
- Page 29 ● Power: Displays the transmitter’s power on/off status and battery level. A battery icon with gray fill indicates the transmitter is powered off. Green, orange or red fill means the transmitter is powered on. ● NexLink: Displays NexLink status and RSSI level ○...
- Page 30 Gtr Cable pF/ft: A20-TX Only. Set guitar cable capacitance from 0 to 1500 pF in 25 pF steps (0 to 60 ft in 1 ft steps) Gtr Input Impedance: A20-TX Only. Select guitar amp input impedance from 100K, 1M, or 10M ohm. Battery Chemistry: A20-TX Only.
-
Page 31: Rf Menu
RF Menu The RF Menu accesses antenna, band, and RF History settings. From the Main Menu, tap the RF icon to enter the RF Menu. The A20-SuperNexus includes three independent bands each tunable to anywhere within SpectraBand’s 169 to 1525 MHz frequency range, making it easy to find clean, usable spectrum. Each of these three bands are fed from user-selectable ‘brick wall’... - Page 32 Antenna Mode Details Antenna Mode Description OLED Layout Diversity Antenna Pair 1 -> All three Tuning Bands. Antenna Pairs 2 and 3 are disabled. OLED 4 = RTSA for Band 1. Tap to expand RTSA OLED 5 = RTSA for Band 2. Tap to expand RTSA OLED 6 = RTSA for Band 3.
- Page 33 3-Zone Antenna Pairs 1, 2, and 3 are passively combined -> Combiner Tuning Bands 1, 2, and 3. (Advanced users only) OLED 4 = RTSA for Band 1. Tap to expand RTSA OLED 5 = RTSA for Band 2. Tap to expand RTSA OLED 6 = RTSA for Band 3.
-
Page 34: Antenna Pair Settings
Antenna Pair Settings Change settings for the A and B antennas for each antenna pair 1, 2, and 3. ○ Back: Tap to return to the RF Menu ○ Gang Settings to Antenna A: Gang all Ant B’s settings (except LFA Name and the read-only LFA Version Info) to Ant A’s settings. ○... -
Page 35: Antenna Rf Overload Indication
Antenna RF Overload Indication The A20-SuperNexus indicates when its antenna inputs are approaching overload or overloading. ● Red = Overload ● Orange = Approaching overload ● Left indicator (in OLED 1) = Overload status for antennas 1A, 2A, and 3A ●... -
Page 36: Rtsa (Real Time Spectrum Analyzer)
RTSA (Real Time Spectrum Analyzer) The RTSA is a real time, visual spectrum analysis tool for assisting in frequency coordination and selection of clean RF frequencies. The RTSA can operate over the entire SpectraBand range (169 MHz to 1525 MHz). The RTSA trace represents RF signal level (in dBm) on the vertical axis and RF frequency on the horizontal axis. There are 3 RTSAs, one for each of the three bands, Band 1, Band 2, Band 3. Antenna Mode determines which bands are available. - Page 37 Multi-RTSA View Tap the Main Menu RTSA icon to access the RTSA View. The Antenna Mode determines which of the three bands, Band 1, Band 2, and/or Band 3 are displayed. Filter Range: Shows the selected filter range for each of the tuning bands, Band 1, Band 2, Band 3. Tap to select a different filter for the selected band. If System > ‘Show Audio Off Warnings’ is enabled, a popup appears to warn that audio will stop on all channels if the band’s filter range is changed.
- Page 38 Expanded Individual RTSA View Blue Frequency Marker: Tap the vertical center of OLED screens 2-7 to locate the blue frequency marker at any desired frequency. To more precisely position the marker, rotate the Control knob with the Zoom tool set to horizontal scroll mode (blue Zoom Tool icon). Select the scroll mode by tapping the Zoom icon.The blue frequency marker can be used to identify a specific frequency and its received signal strength.
-
Page 39: Scan Mode
Yellow - horizontal frequency zoom. When selected, rotating the Control knob horizontally zooms in and out of the Band that the blue frequency marker is currently located in. The Band Frequency Range label shows the start and end frequencies of the Band’s zoomed display. Pink - vertical dBm zoom. - Page 40 Select the zoom horizontal tool by tapping the zoom icon in OLED 8 until the yellow zoom icon is displayed. Rotate the Control knob clockwise to zoom in and counter-clockwise to zoom out. Tapping '>' banks to the next range of frequencies with the same width. For example, if 470 to 616 MHz is currently displayed, tapping ‘>’ will display 616 to 762 MHz. Tapping '<' banks to the previous range of frequencies with the same width.
-
Page 41: Autoassign
AutoAssign Use AutoAssign to find and automatically assign multiple clean frequencies to active channels. An active channel is 1) a NexLinked channel or 2) a non-NexLinked channel that has a frequency assigned). If NexLink menu > NexLink Tuning Mode is set to ‘Push to transmitter’, clean frequencies are automatically sent to NexLinked transmitters. AutoAssign assigns clean frequencies on a per band basis i.e. - Page 42 Individual band RTSA From the multi-band RTSA, tap OK to start the AutoAssign process. OLED 8 will show ‘Analyzing’. Once complete, “N out of N active channels successfully assigned. OK” is displayed. From an individual band’s RTSA: Tap the display or rotate the Control knob to position the AutoAssign vertical start marker at the frequency where the AutoAssign range should start. Tap the End button in screen 8, then tap the display or rotate the Control knob to position the AutoAssign vertical end marker at the frequency where the AutoAssign range should end.
-
Page 43: Audio Outputs
Audio Outputs The A20-SuperNexus delivers its multichannel receiver audio via analog, AES, Dante, and MADI outputs. It can also be set up to convert incoming Dante audio to analog and/or AES outputs. Additional Optocore, MADI, AES, and analog outputs are available when the optional A20-Opto interface (coming soon) is docked to the A20-SuperNexus. All Audio and Sync settings are configured from the Audio Menu. - Page 44 ● When synced to Internal, Dante, or MADI, the BNC In port can simultaneously be used as an LTC timecode source. Sample Rate ● The sample rate of the AES, MADI, and Dante digital outputs is determined by the Sample rate and Sync Reference settings. ●...
- Page 45 Each block of 8 analog outputs can be sourced from: ● RX 1-8 ● RX 9-16 ● RX 17-24 (requires 1 expansion license) ● RX 25-32 (requires 2 expansion licenses) ● Dante In 1-8 ● Dante In 9-16 ● Dante In 17-24 ●...
-
Page 46: A20-Opto (Coming Soon)
Global RX Gain Offset Apply a global audio gain offset to all RX channels. This can be utilized to provide optimal audio level to downstream mixing consoles and other devices. It is best practice to add most gain at the downstream device and keep the Global RX Gain Offset as low as possible to prevent clipping. - Page 47 The connector type depends on the A20-Opto model, A20-Opto-HMA or A20-Opto-ST. Dual Optocore connectors for connection to DigiCo consoles. The Optocore connectors can optionally be swapped between HMA, ST or OpticalCon connectors, and the internal SFP modules can be changed to different wavelengths using special disassembly instructions - contact Sound Devices.
- Page 48 A20-Opto Setup Tap the Audio Out > A20-Opto Setup button in Audio menu OLED 2 to access the A20-Opto Setup menu which provides access to the expansion box’s Optocore, MADI Out 3&4 Sync Ref, and GPIO settings. A20-Opto Setup Menu MADI Out 3&4 Sync Reference Determines the sync reference for the A20-Opto’s MADI outputs 3 and 4.
- Page 49 Tap a GPIO 1- GPIO 16 button to configure its GPIO’s settings. GPIO ‘n’: Lists the following voltage triggering options: ● Input, Active High (activates action when pin transitions from low to high) ● Input, Active Low (activates action when pin transitions from high to low) ●...
-
Page 50: Timecode
GPI Target Channel Options GPO Source Channel Options RX Channel 1 -> RX Channel 16 (1-32 with 2x expansion license installed) RX Channel 1 -> RX Channel 16 (1-32 with 2x expansion license installed) All Channels Any Channel Group 1 -> Group 8 transmitter channels None (Default) None (Default) Timecode... -
Page 51: Network
Network The A20-SuperNexus supports both Dante AOIP and control over IP. The built-in web server allows the A20-SuperNexus to be controlled via the Web App running via a web browser on any computer, tablet, or smartphone. From the Main Menu, tap the Network icon to access the Network menu. The Network menu provides network settings for Dante and Control as well as access to RF MIrror Mode. Network Menu Incorporating a 4-way network switch with two RJ45 ports and two SFP ports, Dante and Control can be combined or segregated between the ports from the Network >... -
Page 52: Rf Mirror Mode
RF Mirror Mode RF Mirror Mode allows a second A20-SuperNexus unit to mirror the RF and NexLink settings of a primary A20-SuperNexus such that if the primary unit fails or loses power, the secondary (‘Backup’) unit continues to receive and output audio seamlessly as well as taking over NexLink control of paired Astral transmitters. It is the perfect redundant system for mission critical events where failure is not an option. - Page 53 Example: OLED 6 Status field showing ‘Channel count mismatch’ and yellow border When the Backup unit has established connection to the Primary and is ready to activate Mirror Mode, the following message is displayed: “The existing TX List will be cleared and replaced with the Primary’s TX List. Continue? OK, Cancel”. Select Cancel to disable Mirror Mode.
-
Page 54: Nexlink Menu
NexLink Menu Tap the NexLink Menu Icon in the Main menu to access NexLink settings and the A20-Outpost-NL list. Note: The A20-Outpost-NL NexLink extender accessory is coming soon. NexLink Host SuperNexus can wirelessly control and monitor Astral transmitters via Nexlink over long distances. For extreme distances, the NexLink range can be extended further by using an optional A20-Outpost-NL (coming soon) NexLink extender which connects to the A20-SuperNexus via ethernet. -
Page 55: System Menu
System Menu Tap the System Icon in the Main menu to access System settings. Locale Settings Includes the ‘Pair to A20-Remote App and Country buttons. Country The Country setting determines which Tuning Bands, RF frequencies, and transmit powers are legally available for selection in a Country. SuperNexus and Astral transmitters must be set to the same Country. - Page 56 Once A20-SuperNexus is paired, use A20-Remote to sync the mobile device’s country (determined by the mobile device’s location services) and date/time to the A20-SuperNexus. ● Syncing A20-Remote’s Country, Date, and Time settings to A20-SuperNexus. ○ Select the A20-SuperNexus in the A20-Remote app’s Device List (left pane). ○...
- Page 57 In the event that the A20-Remote app is not available to sync Country to A20-SuperNexus, tap the A20-SuperNexus’s Country button to manually set the Country. In this case, the Country setting is not automatically pushed to the transmitters. The following message is displayed: “A manually-selected country will not be automatically pushed to transmitters. Choose one anyway? Yes, No” Tap ‘Yes’...
- Page 58 Lockout Mode Enable Lockout Mode to prevent unauthorized or accidental access to front panel controls including OLEDs, HP knob, Control knob, and triangle button. Lockout mode can be enabled locally or via the web app. When Lockout mode is enabled, the HP knob ring LED is backlit green to indicate that the A20-SuperNexus is still on. To enable Lockout mode from the Nexus, tap the Lockout Mode button.
- Page 59 Firmware Update Updating Firmware Legal/Patent Displays legal and patent information for the A20-SuperNexus across OLED screens 1-6 System Info Displays model name, firmware version, and serial number SuperNexus User Guide...
-
Page 60: Quick Setup Menu
Quick Setup Menu Quick Setup provides a way to save and load A20-SuperNexus settings. Settings are saved to internal memory slots 1-4 or to a USB thumb drive connected to the USB-A port. Save Setup ● All A20-SuperNexus’s current settings are saved when saving a setup. ●... - Page 61 A and B Antenna Cascade out for all antenna pairs 1, 2, and 3 Filter Range settings for Band 1, Band 2, Band 3 RF History duration RF History Type NexLink Tuning Mode (Push to Transmitter or manual) Local NexLink Antennas - Front or Rear RTSA/Scan RTSA/Scan Zoom Mode RTSA/Scan Vertical dBm Scale...
- Page 62 Screensaver Turn On when Power is Applied Time Zone Daylight Savings On/Off TX List > Global TX Settings: Power Off confirmation, Stop Confirmation, Mute confirmation A20-Opto Optocore Settings All Optocore settings: ID, Outputs, Speed A20-Opto GPIO Settings All A20-Opto GPIO settings Default Settings The Load Setup list also includes a ‘Default Settings’...
-
Page 63: Web App
Web App Remote control the A20-SuperNexus from anywhere in the world using the A20-SuperNexus Web App, a browser-based remote control application for the A20-SuperNexus that can be run on any computer, tablet, or smartphone. It duplicates virtually all of the functions available from the A20-SuperNexus front panel. The integrated RTSA view is particularly useful for performing real time spectrum analysis over a wired or wireless network. - Page 64 Menu Bar: Click or tap to access the various menus. From left to right: A20-SuperNexus: Displays A20-SuperNexus name. Read-only. Home: Displays an overview of all receiver channels. TX List: Displays a list of all paired Astral transmitters, their battery level, which RX channel they are assigned to, their NexLink status, and TX Group assignment. Each row includes quick access to transmitter Power On/Off control.
- Page 65 RF: Sets Antenna Mode, Bands 1-3, Antenna Pairs 1-3, RF and Waterfall History parameters. See RF Menu RF Settings SuperNexus User Guide...
- Page 66 RTSA View: Antenna Mode determines the number of bands displayed. Click on ‘+’ to display a band fully expanded. Drag the dividers between each band to resize bands. 3-Band RTSA display Expanded Band display SuperNexus User Guide...
- Page 67 Audio: Sets sync reference, sample rate, AES, analog output, and Headphone output routing. Use the RX channel metering, gain level sliders, and Global RX Gain Offset to optimize audio output levels. NexLink: NexLink related settings including setup of the A20-Outpost-NL (coming soon) Quick Setup: Load and save settings files for quick configuration of the SueprNexus’s settings.
- Page 68 Web App 1RX View ● Duplicates the functionality of the A20-SuperNexus’s front panel 1RX View. See View. ● When Mode is set to RF Only, the Rec buttons are grayed out. Receiver Channel: Tap or Click to jump straight to another receiver channel’s 1RX View. Frequency: Tap to display the Select Frequency popup from which the receiver channel’s frequency can be set.
- Page 69 Web App RTSA View For the most part, the Web App’s RTSA duplicates the functionality of the A20-SuperNexus’s front panel RTSA. See RTSA. Tip: With smartphones, tablets, and computers with track pad devices, pinch vertically to zoom in/out vertically, pinch horizontally to zoom in/out horizontally and pinch diagonally to zoom in/out horizontally and vertically.
- Page 70 Frequency Marker: Tap or click anywhere just above the RTSA graph to display the Frequency Marker at any desired frequency. To move the marker, drag the cursor from side to side. The marker identifies a specific frequency (MHz) and its received signal strength (dBm). When the marker is placed at a restricted frequency, the ‘Assign’ button changes to ‘Invalid’ with a red background.
-
Page 71: Updating Firmware
Note: If running the Web App, it is recommended to clear the browser cache after a firmware update. Channel Expansion Licenses The A20-SuperNexus can be expanded from 16- to 24- or 32-channels by purchasing one or two 8-channel Expansion Licenses from the Sound Devices website. Permanent or rental licenses (1-week or 30-day) are available. -
Page 72: Astral Wireless Guitar System
Astral Wireless Guitar System The Sound Devices Astral Wireless Guitar System is a paradigm-shift in sonic purity and range for the demanding, professional guitarist/bassist. It is designed to replace a premium guitar cable without altering the tone or feel of the sacred guitar/amp interaction. *Please refer to the Astral Wireless Guitar System User Guide for detailed information. -
Page 73: Supernexus Accessories
SuperNexus Accessories Included ● 2x A20-Monarch Antennas ● 2x Articulating Arm with ¼”-20 mount for mounting A20-Monarch Antennas ● 2x 72” BNC to BNC RG-58 Antenna Cables ● 2x 2.4 GHz Antennas, SMA-M ● USB-C 3.0 to USB-C 3.0 cable ●... -
Page 74: A20-Outpost-Nl (Coming Soon)
A20-Outpost-NL (Coming Soon) The A20-Outpost-NL is a remote NexLink-antenna box. NexLink is Sound Devices’s proprietary long-distance remote control of Astral transmitters. This game-changing system allows remote control of all parameters on the transmitters – and has a distance far exceeding the RF audio link. Since NexLink operates at 2.4 GHz, its antennas cannot be remote-mounted more than a few inches due to cable loss –... - Page 75 A20-Monarch Antenna The A20-SuperNexus ships with two A20-Monarch, omnidirectional, wide-bandwidth (470-1525 MHz) antennas. These antennas provide uniform coverage and gain across the exceptionally wide SpectraBand tuning range of A20-SuperNexus. Each antenna is paired with a multi-function clamp and articulating arm, as well as an RG58 BNC-M to BNC-M cable (72 in.) When purchased as a separate accessory, the A20-Monarch antenna also includes an RG174 BNC-M to SMA-M cable.
-
Page 76: Nexlink Status Alerts
NexLink Status Alerts The NexLink Status View allows you to monitor NexLink communication between the A20-SuperNexus and Astral transmitters. This can assist in resolving NexLink issues. Access the NexLink Status View from the 1RX View Gear menu, TX View menu, or, if the channel is sourced from multiple transmitters, from the 1RX View’s Gear menu. A receiver channel’s Gear icon, NexLink Status button, and RF Frequency display turn red when there is a NexLink error. - Page 77 Country conflict. The country code of the transmitter does match that of the Nexus. No Change the transmitter country. synchronization of settings will be done until these match. Either change the country from A20-Remote or from the A20-SuperNexus. No receive frequency. White The frequency of the receive channel is set to 'Off’.
-
Page 78: Frequency Band Restrictions
Sound Devices encourages all wireless operators to obtain a Part 74 license, and specifically to make sure applicable parts of the 600 MHz and 950 MHz range are included with their license application. -
Page 79: Connector Pin Assignments
Connector Pin Assignments Connector Pin Assignments Notes Center pin - signal Unbalanced (LTC/WCK input} Sleeve - ground 75 ohm cable recommended Center pin - signal Unbalanced (MADI input (sync only) and Sleeve - ground 75 ohm MADI digital audio outputs) Center pin - signal (Rear Antenna inputs and 50 ohm... -
Page 80: A20-Supernexus Specifications
A20-SuperNexus Specifications Specifications are subject to change without prior notice. For the latest information available on all Sound Devices products, visit our website: www.sounddevices.com Patents: The A20-SuperNexus is protected by US patents US10678294B2, US20190166523A1, International patent WO2018022209A1, and several patents pending. - Page 81 Analog Output ● RJ45 connectors conforming to the AES72 Type 1M pin-out standard, balanced connection Analog Output Level ● Line: +20 dBu for 0 dBFS ● -10: +6 dBu for 0 dBFS ● Mic: -20 dBu for 0 dBFS Tone Generator ●...
- Page 82 NexLink Protocol ● 2.4 GHz, proprietary frequency-hopping backlink control of transmitters over long distance Connections ● Front or rear diversity pair ● SMA-F ports for connecting 2.4 GHz SMA-M antennas Type ● USB-A: 5V, 1.5A output; supports keyboards, flash drives, Astral transmitters, and USB hubs ●...
-
Page 83: A20-Monarch Specifications
A20-Monarch Specifications Frequency range ● 470 MHz - 1600 MHz Gain ● 2.2 dBi Pattern ● Omnidirectional Return Loss ● Better than 15 dB across entire 470 - 1600 MHz range Mounting Threads ● ¼”-20 Dimensions (H x W x D) ●... -
Page 84: Note On Rf Interference
This is a non-transferable warranty that extends only to the original purchaser. Sound Devices, LLC will repair or replace the product at its discretion at no charge. Warranty claims due to severe service conditions will be addressed on an individual basis. -
Page 85: Legal Notices
Product specifications and features are subject to change without prior notification. Read and fully understand this manual before operation. Copyright© 2024 Sound Devices, LLC. All rights reserved. This product is subject to the terms and conditions of a software license agreement provided with the product, and may be used in accordance with the license agreement. - Page 86 FCC Conformity NOTE: This equipment has been tested and found to comply with the limits for a Class B digital device, pursuant to part 15 of the FCC Rules. These limits are designed to provide reasonable protection against harmful interference in a residential installation. This equipment generates, uses and can radiate Band frequency energy and, if not installed and used in accordance with the instructions, may cause harmful interference to Band communications.
- Page 87 2) ce dispositif doit accepter toute interférence, y compris les interférences qui peuvent causer un mauvais fonctionnement de l’appareil. WEEE Statement If you wish to discard a Sound Devices product in Europe, contact Sound Devices (England) for further information. SuperNexus User Guide...
- Page 88 Chinese Conformity This information is presented to comply with the requirements of Chinese law SJ/T11363-2006 此資料為顯示符合中國法律SJ/T11363-2006 的要求。 SuperNexus User Guide...
-
Page 89: Declaration Of Conformity
Declaration of Conformity Manufacturer’s Name: Sound Devices, LLC Manufacturer’s Address: E7556 State Road 23 and 33 Reedsburg, WI 53959 USA We, Sound Devices LLC, declare under our sole responsibility that the product Product Name: A20-SuperNexus Model Number: A20-SuperNexus Description: Digital Wireless Receiver... - Page 90 Post Office Box 576 E7556 State Rd. 23 and 33 Reedsburg, Wisconsin 53959 USA support@sounddevices.com +1608.524.0625 main 800.505.0625 toll free (U.S. only) www.sounddevices.com SuperNexus User Guide...
Need help?
Do you have a question about the ASTRAL A20-SuperNexus and is the answer not in the manual?
Questions and answers