
Related Manuals for Beko BBIE12401AMP


Summary of Contents for Beko BBIE12401AMP
- Page 1 Built-in Oven User Manual BBIE12401AMP 385444352/ EN/ R.AA/ 25/03/2024 21:34 7729486404...
- Page 2 Welcome! Dear Customer, Thank you for choosing the Beko product. We want your product, manufactured with high quality and technology, to offer you the best efficiency. Therefore, carefully read this manual and any other documentation provided before using the product.
-
Page 3: Table Of Contents
Table of Contents 6 General Information About Bak- ing ........... 1 Safety Instructions......General Warnings About Baking Intended Use ......... in the Oven ........Child, Vulnerable Person and Pet 6.1.1 Pastries and oven food..... 24 Safety ..........6.1.2 Meat, Fish and Poultry....26 Electrical Safety ...... -
Page 4: Safety Instructions
1 Safety Instructions • This section includes the Intended Use safety instructions necessary • This product is designed to be to prevent the risk of personal used at home. It is not suitable injury or material damage. for commercial use. •... -
Page 5: Electrical Safety
• Children should not play with • Before discarding worn out the product. Cleaning and user and useless products: maintenance should not be 1. Unplug the power plug and performed by children unless remove it from the socket. there is someone overseeing 2. - Page 6 • Unplug the product or switch • Do not use an extension cord off the fuse before repair, or multi-plug to operate your maintenance and cleaning. product. • Plug the product into an outlet • Contact the authorized service that meets the voltage and centre or importer to use the frequency values specified on approved adapter in cases...
-
Page 7: Transportation Safety
• Never put the product plug • When you need to transport into a broken, loose, or out-of- the product, wrap it with socket plug. Make sure the bubble wrap packaging mater- plug is fully inserted into the ial or thick cardboard and tape socket. -
Page 8: Safety Of Use
• Direct sunlight and heat • Don't use the product if it sources, such as electric or breaks down or gets damaged gas heaters, must not be while being used. Disconnect present in the area where the the product from the electri- product is installed. -
Page 9: Accessory Use
Care should be taken to avoid Cooking Safety touching the product and • Be careful when using alco- heating elements. Children un- holic drinks in your dishes. Al- der 8 years of age should be cohol evaporates at high tem- kept away from the product peratures and may cause fire unless constantly supervised. -
Page 10: Maintenance And Cleaning Safety
• Place the greaseproof paper in • An air flow is generated when a cookware or on the oven ac- the product lid is opened. cessory (tray, wire grill, etc.) Greaseproof paper can come with food and place it in the into contact with heating ele- preheated oven. -
Page 11: High Temperature Self-Cleaning (Pyrolysis)
• Do not use harsh abrasive • During self-cleaning, smoke cleaners, metal scrapers, wire will be released due to the wool or bleach materials to burning of food residues. clean the oven front door Ventilate your kitchen well glass. These materials can during the cleaning process. -
Page 12: Recommendations For Energy Saving
wastes, take it to the packaging material • In the oven, use dark or enamelled con- collection points designated by the local tainers that transmit heat better. authorities. • If specified in the recipe or user’s manual, always preheat. Do not open the 2.3 Recommendations for Energy oven door frequently during baking. -
Page 13: Your Product
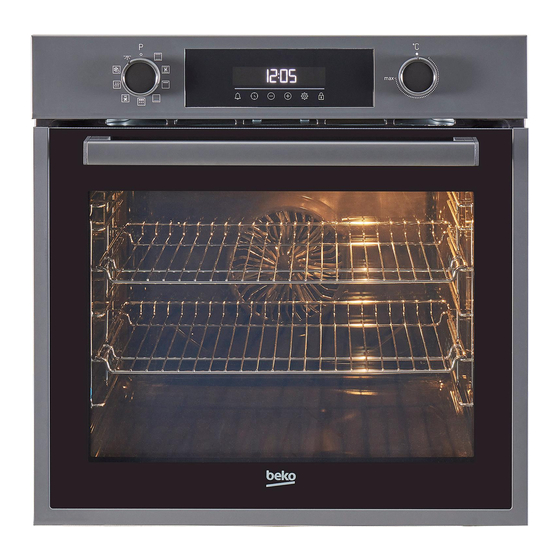
3 Your product 3.1 Product Introduction 1 Control panel 2 Lamp 3 Wire shelves 4 Fan motor (behind the steel plate) 5 Door 6 Handle 7 Lower heater (under the steel plate) 8 Shelf positions 9 Upper heater 10 Ventilation holes 3.2 Product Control Panel Introduc- Varies depending on the model. -
Page 14: Control Panel
3.2.1 Control Panel 1 Function selection knob 2 Timer 3 Temperature knob If there are knob(s) controlling your Timer product, in some models this/these knob(s) may be so that they come out when pushed (buried knobs). For settings to be made with these knobs, first push the relevant knob in and pull out the knob. -
Page 15: Product Accessories
order of the operating modes shown here may differ from the arrangement on your product. Function Temperature Function description Description and use symbol range (°C) Oven lamp No heater works in the oven. Only the oven lamp lights up. The oven is not heated. Only the fan (on the back wall) oper- ates. -
Page 16: Use Of Product Accessories
On models with wire shelves : Wire grill It is used for frying or placing the food to be baked, fried and stewed on the desired On models without wire shelves : shelf. On models with wire shelves : Placing the wire grill on the cooking shelves On models without wire shelves : On models with wire shelves :... - Page 17 Placing the tray on the cooking shelves On models without wire shelves : On models with wire shelves : It is also crucial to place the trays on the wire side shelves properly. While placing the tray on the desired shelf, its side de- signed for holding must be on the front.
-
Page 18: Technical Specifications
3.6 Technical Specifications General specifications Product external dimensions (height/width/depth) (mm) 595 /594 /567 Oven installation dimensions (height / width / depth) 590-600 /560 /min. 550 (mm) Voltage/Frequency 220-240 V ~; 50 Hz Cable type and section used/suitable for use in the min. -
Page 19: First Use
4 First Use Before you start using your product, it is If the first timer is not set, “12:00” recommended to do the following stated in symbol continue to flash the following sections respectively. and your oven will not start. For your oven to function, you must 4.1 First Timer Setting confirm the time of day by setting... -
Page 20: Using The Oven
NOTICE: During the first use, smoke and odour may come up for several hours. This is normal and you just need good ventila- tion to remove it. Avoid directly inhaling the smoke and odours that form. 5 Using the Oven 5.1 General Information on Using the 5.2 Operation of the Oven Control Oven... - Page 21 audible warning. The 3-line animation : Meat probe symbol * appearing on the display stops and the : Key lock symbol C symbol appears fixed next to the : Temperature symbol temperature value. The oven does not : Settings symbol switch off automatically since manual : Door lock symbol * baking is done without setting the...
-
Page 22: Settings
4. Put your food in the oven and set the temperature with the temperature knob. ð Your oven will start operating im- mediately at the selected function and temperature. The set baking time starts counting down and ð The symbol is shown on the display appears on the display. - Page 23 2. Set the desired level with the keys. (b-01-b-02-b-03) 2. Set the alarm time with the keys. ð Touch the key for confirmation or wait without touching any key. The volume set becomes active after a while. Setting the display brightness ð...
-
Page 24: General Information About Baking
3. Touch key to activate the minutes field. 5. Confirm the setting by touching the key. 4. Touch the keys to set the minute. ð The time of day is set and the symbol disappears on the display. 6 General Information About Baking You can find tips on preparing and cooking •... - Page 25 • Metal, ceramic and glass moulds extend • If the top of the cake is burnt, put it on the cooking time and the bottom sur- the lower shelf, lower the temperature faces of pastry foods do not brown and increase the baking time. evenly.
-
Page 26: Meat, Fish And Poultry
Food Accessory to be Operating func- Shelf position Temperature (°C) Baking time used tion (min) (approx.) Round springform pan, 26 cm in dia- Fan assisted bot- Sponge cake 25 … 35 meter on wire grill tom/top heating Top and bottom Cookie Pastry tray * 25 …... -
Page 27: Grill
Cooking table for meat, fish and poultry Food Accessory to be Operating func- Shelf position Temperature (°C) Baking time used tion (min) (approx.) 15 mins. 250/ Steak (whole) / Fan assisted bot- Standard tray * max, after 180 … 60 … 80 Roast (1 kg) tom/top heating Lamb's shank... -
Page 28: Test Foods
Grill table Food Accessory to be Shelf position Temperature (°C) Baking time (min) used (approx.) Fish Wire grill 4 - 5 20 … 25 Chicken pieces Wire grill 4 - 5 25 … 35 Meatball (veal) - 12 Wire grill 20 …... -
Page 29: Maintenance And Cleaning
Food Accessory to be Operating func- Shelf position Temperature (°C) Baking time used tion (min) (approx.) Round springform pan, 26 cm in dia- Top and bottom Sponge cake 30 … 40 meter on wire grill heating Round springform pan, 26 cm in dia- Fan assisted bot- Sponge cake 25 …... -
Page 30: Cleaning Accessories
Inox - stainless surfaces Glass surfaces • Do not use acid or chlorine-containing • When cleaning glass surfaces, do not cleaning agents to clean stainless-inox use hard metal scrapers and abrasive surfaces and handles. cleaning materials. They can damage the •... -
Page 31: Cleaning The Control Panel
7.3 Cleaning the Control Panel • When cleaning the panels with knob- control, wipe the panel and knobs with a damp soft cloth and dry with a dry cloth. Do not remove the knobs and gaskets underneath to clean the panel. The con- trol panel and knobs may be damaged. - Page 32 To start the pyrolysis function: 9. When the symbol disappears on the display, remove the remaining deposits 1. Remove all accessories inside the oven. with vinegar water. In the models with wire shelves, re- member to remove the wire shelf. 10.Touch any key to stop the audible warning.
-
Page 33: Cleaning The Oven Door
5. Turn the temperature knob to the lime residue that may form on the oven glass, wipe the glass with vinegar and highest "max" (maximum) temperat- rinse. ure. 6. When the pyrolysis function is started, Do not use harsh abrasive clean- P1:30 lights up and starts counting ers, metal scrapers, wire wool or down. -
Page 34: Removing The Inner Glass Of The Oven Door
3. As shown in the figure, gently lift the in- nermost glass (1) towards “A” and then, remove it by pulling towards “B”. 8. Pull the removed door upwards to re- lease it from the right and left hinges and remove it. Innermost glass 2* Inner glass (it may not be available for... -
Page 35: Troubleshooting
• To avoid the risk of electric shock before replacing the oven lamp, disconnect the product and wait for the oven to cool. Hot surfaces may cause burns! • This oven is powered by an incandes- cent lamp with less than 40 W, less than 60 mm in height, less than 30 mm in dia- meter, or a halogen lamp with G9 sock- 4. - Page 36 Water droplets appear while cooking Oven is not heating. • The steam generated during cooking • The oven may not be set to a specific condenses when it comes into contact cooking function and/or temperature. with cold surfaces outside the product >>>...
- Page 37 Error codes Error reasons Possible solutions Errors related to the steam (in Consult an authorized service for the error to be re- Er 65 - Er 71 ovens with steam feature) solved. Consult an authorized service for the error to be re- Er 72 - Er 80 Hardware related errors solved.
Need help?
Do you have a question about the BBIE12401AMP and is the answer not in the manual?
Questions and answers