Table of Contents
Advertisement
Advertisement
Table of Contents

Related Manuals for HP f965w


Summary of Contents for HP f965w
- Page 1 Car Camcorder User Manual...
-
Page 2: Table Of Contents
Contents Regulatory notices ................3 Prohibition of co-location ..............3 WEEE Notice ..................3 CE Regulatory Notice ................4 Notes on Installation ................4 Caution ....................4 Introduction ................7 Features ................... 7 Package Contents ..............7 Product Overview ..............8 Getting Started .............. - Page 3 Parking Mode ................. 18 Collision Detection ..............18 Playback Videos and Photos ..........19 Set up Go Carcam App ............20 Download and installation ............. 20 Wi-Fi connection ..............21 Use Go Carcam app ..............22 4.3.1 Main Screen ..............23 Adjust the Settings ..............
-
Page 4: Regulatory Notices
About this Guide The content in this document is for information purpose and is subject to change without prior notice. We have made every effort to ensure that this User Guide is accurate and complete. However, no liability is assumed for any errors or omissions that may have occurred. -
Page 5: Ce Regulatory Notice
CE Regulatory Notice The product herewith complies with the requirements of IEC62368- 1:2014, the EMC Directive 2014/30/EU, the RED-Directive 2014/53/EU and the RoHS Directive 2011/65/EU. EU Health Protection: This equipment should be installed and operated with minimum distance 20cm between the radiator & your body. Notes on Installation 1. - Page 6 This product is used only for non-commercial use, within the maximum limits permitted by applicable law. We do not take any responsibilities for the loss of use of the product. This camcorder gets warm when in use; this is normal. ...
- Page 7 environment that can result in an explosion or the leakage of flammable liquid or gas. HP Inc. is NOT responsible for the loss of any data/content during operation. HP Inc. is NOT responsible for the loss of any data/content during ...
-
Page 8: Introduction
• Parking Mode 1.2 Package Contents The package contains the following items. In case there is any missing or damaged item, contact your dealer immediately. Car camcorder Electrostatic Car charger f965w sticker Rear Camera(option) E-manual... -
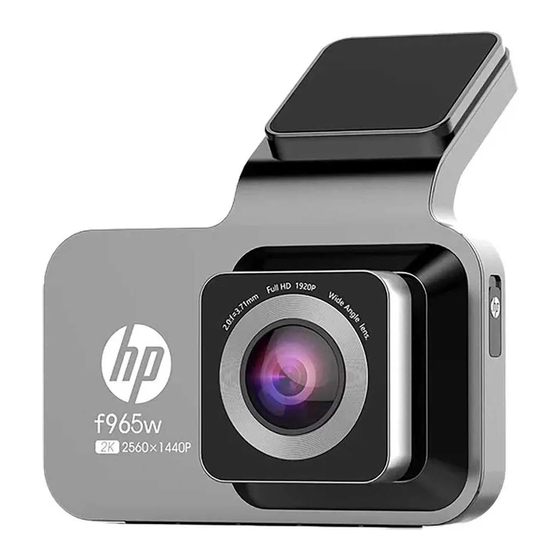
Page 9: Product Overview
1.3 Product Overview Item Item Emergency Recording / Confirm Speaker Bracket Memory Card Slot Wide Angle Lens Rear Camera Connector port Menu/Return Power Connector Port Microphone Snapshot/Up/Left LED Indicator Power / Switch Camera Preview ( LCD Color Screen Voice Record/Down/Right Note: Press the button (4~8) to operate the device. -
Page 10: Getting Started
2 Getting Started 2.1 Storage Media 2.1.1 Insert the Memory Card Insert memory card with the pins facing forward, see the picture as below: 2.1.2 Remove the Memory Card If the camcorder is power on, please power off first and wait for the procedure of switching off the camcorder completed before removing the memory card. -
Page 11: Install Camera
2.2 Install Camera 1. Put the electrostatic sticker onto the suggested area on the windshield. Before putting the sticker, please wipe and clean the windshield. During the installation, please make sure the bubbles in between the sticker and the window are all gone. 2. -
Page 12: Connect To Power
4. Adjust view angle. 2.3 Connect to Power Use only the supplied car charger to power up the camcorder. Connect one end of the car charger to the USB connector of the camcorder. USB port input: DC 5V / 2A. Plug the other end of the car charger to the cigarette lighter socket of your vehicle. -
Page 13: Powering The Camcorder On / Off
2.5 Powering the Camcorder On / Off 2.5.1 Auto Power On/Off Start the car engine, wait a few seconds to charge the camcorder, and then screen will light up and the camcorder will automatically power on and start recording. Once the vehicle engine shuts down, the camcorder automatically saves the recording and turns off the power. -
Page 14: Initial Settings
2.6 Initial Settings Before using the camcorder, we recommend you setup the correct Date and Time. Note: Please note that if you tap the icon during recording, the system will stop recording and enter OSD menu. Make sure the recording is already stopped then continue operating the menu. 2.6.1 Set the Date / Time To set the correct date and time, do the following: Press... -
Page 15: Using The Car Camcorder
3 Using the Car Camcorder 3.1 Automatic Record Start the car engine, wait a few seconds to charge the camcorder, and then screen will light up and the camcorder will automatically power on and start recording. Recording will automatically stop when the engine is switched off. Note: 1. -
Page 16: The Recording Screen
3.2 The Recording Screen Icon Item Description Recording Duration Indicates the video current duration. 00:10 Indicates the current recording date Date / Time and time. Tap this icon or press button to enter Menu the OSD menu. Tap this icon or press button to Capture capture video screen shot. -
Page 17: Emergency Recording
Resolution Indicates the video resolution. icon Voice Record Indicates voice recording sets as off, the sound will not be recorded. icon Indicates camcorder is connected with Power icon power. Wi-Fi on Wi-Fi icon Wi-Fi off Indicates rear camera recording VIV (Video in Video) screen. -
Page 18: Picture In Video
3.4 Picture in Video You can also use this camcorder to take snapshots of the current scene. In recording status, press button to capture recording screen shots. When the icon shows in the central of screen, it means the screenshots is completed. Note: 1. -
Page 19: Parking Mode
3.6 Parking Mode To monitor the vehicle when it is parked, you can activate Park Mode. Before you activate Parking Mode, please install ACC cable through professional car service shop. Follow the steps below to set up Parking Mode: Press button to enter the OSD menu. -
Page 20: Playback Videos And Photos
3.8 Playback Videos and Photos Press button to enter the OSD menu and select File Browser. Press button to select Video, EMER, or Picture folder and press button to enter. Press button to select FRONT, or REAR folder and press button to enter. -
Page 21: Set Up Go Carcam App
4 Set up Go Carcam App 4.1 Download and installation The camcorder allows you to connect to the smart phone via the app. When using for the first time, install the [Go Carcam] app for your smart phone. Scan below QR code or download Go Carcam app from Google Play or App Store. -
Page 22: Wi-Fi Connection
4.2 Wi-Fi connection In the recording screen, tap icon to stop recoding and enter menu. Select Wi-Fi and turn it on. Press to activate it. Using the Wi-Fi function of your smart phone, search for the camcorder ID “hp_f965w_xxxx” from the list (last 4 numbers are system random numbers). -
Page 23: Use Go Carcam App
4.3 Use Go Carcam app Tap [Go Carcam] icon to activate the application. For the first time use, please check and agree all the authorization in order to use the application. Then, follow the instruction to add your camcorder into your app. -
Page 24: Main Screen
4.3.1 Main Screen Tap “Connect Camera” to enter the app main screen. Tap the icon to start to use app. Camera File Camera Setting icon Description Main Screen Album: You can use this feature to playback or delete the file that you download in your smart phone. - Page 25 Full Screen Preview Voice Record On/Off Camera File (check the files in microSD) Camera Setting...
-
Page 26: Adjust The Settings
5 Adjust the Settings In the recording screen, press button to enter Menu, and use button to select Setting and press button to enter camera setting. Then, use buttons to adjust the setting. Followings is available menu options. Menu Description Available option Set the recording duration for each 1 min/ 2 min/... - Page 27 Menu Description Available option Anti-flicker Reduce flicker on LCD 60Hz / 50Hz When Driver Fatigue Alert is enabled, audible alert and screen Driver Fatigue message will be activated 1 hour On/ Off Alert after the camcorder is powered on, with a repetition every 30 minutes. APP download QR code to download app Reset the camcorder to the initial...
-
Page 28: Specifications
6 Specifications Item Description Image sensor 1/3” CMOS sensor 2560 (H) x 1440 (V) Effective pixels Storage media Supports microSD class V30 or higher LCD display 3” LCD color TFT Wide Angle Fixed Focus lens Lens Aperture: Up to F/1.5 Focus range 1.5m~Infinity Resolution:... - Page 29 Item Description Operating Humidity 20 ~ 70% RH Storage -20° ~ 70° C Temperature Android 9.0 and above App Supports OS iOS 13 and above Harmony 2 and above Dimensions 86 x 88 x 69.8 mm Weight Approx. 100g Built-in IEEE 802.11g/n(HT20) Wi-Fi chip: RTL8188FTV Frequency range 2.4GHz: 2412~2472MHz Wi-Fi Channel...
Need help?
Do you have a question about the f965w and is the answer not in the manual?
Questions and answers