Advertisement
- 1 Introduction
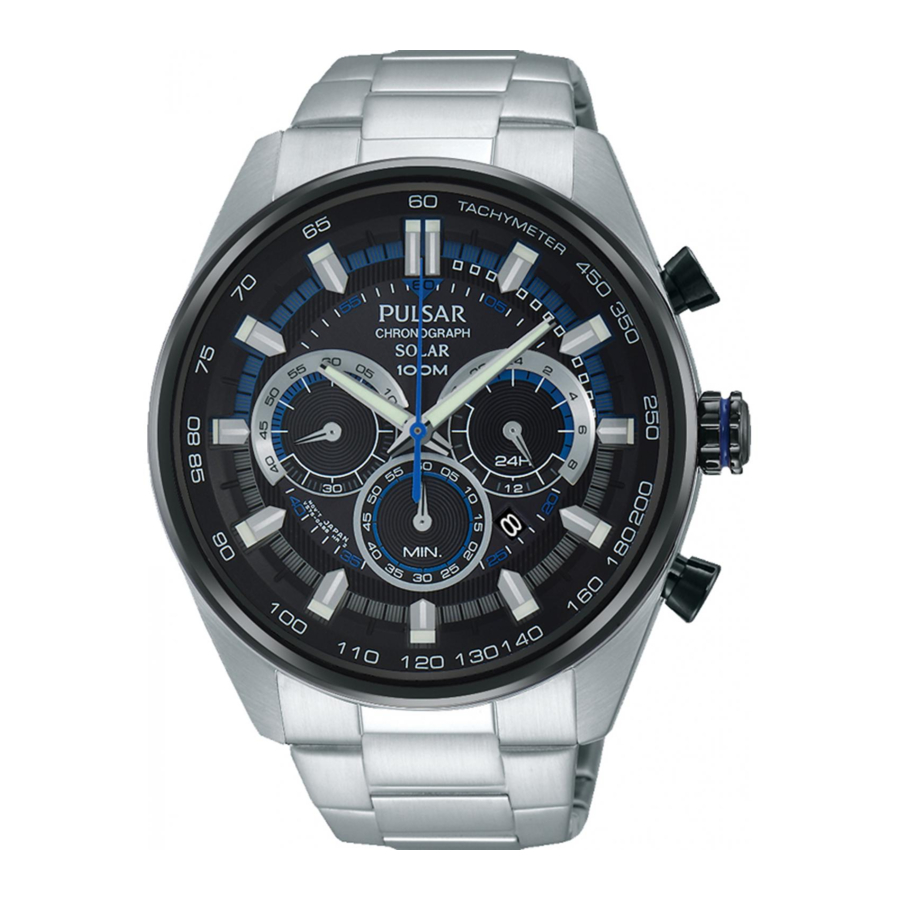
- 2 DISPLAY AND CROWN/BUTTONS
- 3 HOW TO CHARGE AND START THE WATCH
- 4 GUIDELINES FOR CHARGING TIME
- 5 HOW TO SET THE TIME AND DATE
- 6 STOPWATCH
- 7 STOPWATCH HAND POSITION ADJUSTMENT
- 8 NOTES ON OPERATING THE WATCH
- 9 ENERGY DEPLETION FOREWARNING FUNCTION
- 10 NOTES ON POWER SUPPLY
- 11 TO PRESERVE THE QUALITY OF YOUR WATCH
- 12 Documents / Resources
Introduction
TIME/CALENDAR
- 24-hour, hour and minute hands, and small second hand
- Date displayed in numerals
STOPWATCH
- Two Stopwatch hands: 1/5-second and minute hands
- The stopwatch can measure up to 59' 59"8 in 1/5 second increments.
- Split time measurement is available.
DISPLAY AND CROWN/BUTTONS

- Normal position
- First click position
- Second click position
SCREW DOWN CROWN
[for models with screw down crown]
Unlocking the crown

- Turn Crown counterclockwise until you no longer feel the threads turning.
- Crown can be pulled out.
Locking the crown

- Push Crown back in to normal position.
- Turn Crown clockwise while pressing it lightly until tight.
HOW TO CHARGE AND START THE WATCH
When you start the watch or when the energy in the rechargeable battery is reduced to an extremely low level, charge it sufficiently by exposing the watch to light.

NOTE
- It is not necessary to charge the watch fully. It is important, however, to charge the watch sufficiently, especially in case of initial charge.
GUIDELINES FOR CHARGING TIME
| Time required (approx.) | |||||
| Illumination (Lux) | Light source | Environment | A (Hours) | B* (Hours) | C (Minutes) |
| 700 | Fluorescent lamp | Inside office | - | 35 | 90 |
| 3,000 | 30W 20 cm | 65 | 8 | 20 | |
| 10,000 | Sunlight | Cloudy weather | 18 | 2.5 | 6 |
| 100,000 | Fine weather | 5 | 36 minutes | 2 | |
| The above table provides only general guidelines. | |||||
<Reference>
Condition A: Time required for full charge
Condition B: Time required for steady operation
Condition C: Time required for 1 day's charge
*The values in this column represent the charging times required until the second hand moves constantly at 1-second intervals after the watch starts operating with the second hand moving at 2-second intervals.
- Even if the watch is not charged for the time specified in the column, the second hand may temporarily move at 1-second intervals. But it will soon resume moving at 2-second intervals, and therefore, charge the watch for more than the specified period.
- When the watch is fully charged, it will continue to operate for about 6 months.

- When charging the watch, do not place it too close to a hot light source such as a photo flash light, spotlight or incandescent light as this can greatly raise the watch temperature.
- When charging the watch by sunlight, do not leave it exposed to the sun for a long time, on the dashboard of a car, etc.. as this can greatly raise the watch temperature.
- Make sure the watch temperature does not exceed 50°C while charging, to avoid damage to the parts inside.
HOW TO SET THE TIME AND DATE


Pull out to the first click position.
Turn clockwise until the previous day's date appears.
Pull out to the second click position when the small second hand is at the 12 o'clock position.
While the stopwatch is running or has been stopped while running, if the crown is pulled out to the second click position, the stopwatch will be automatically reset.
Turn clockwise to advance the hour and minute hands past 12:00 midnight. This will advance the date to the current date.
Turn to set the hour and minute hands.
Take AM/PM in to consideration when setting the hour and minute hands to the desired time.
Push back simultaneously with a time signal.
- It is recommended that the hands be set to the time a few minutes ahead of the current time, taking into consideration the time required to adjust the STOPWATCH hand position if necessary.
- When setting the minute hand, first advance it 4 to 5 minutes ahead of the desired time and then turn it back to the exact minute.
STOPWATCH
- The stopwatch can measure up to 59'59"8 in 1/5-second increments.
- When the measurement reaches 60 minutes, the stopwatch automatically stops counting.
- Split time measurement is available.

- Before using the stopwatch, be sure to check that the crown is set at the normal position and that the STOPWATCH hands are reset to the "0" position.
If the STOPWATCH hands do not return to the "0" position when the stopwatch is reset, follow the procedure in "STOPWATCH HAND POSITION ADJUSTMENT".

- Restart and stop of the stopwatch can be repeated as many times as necessary by pressing the button A.

- Measurement and release of the split time can be repeated as many times as necessary by pressing the button B.

STOPWATCH HAND POSITION ADJUSTMENT
- If the stopwatch hands are not in the "0" position, follow the procedures below to set them to the "0" position.

Pull out to the second click position.
 Press for 2 seconds.
The STOPWATCH minute hand turns a full circle.
 Press repeatedly to set the STOPWATCH minute hand to the "0" position.
The hand moves quickly if the button B is kept pressed.
 Press for 2 seconds.
The STO P WATC H 1/5- second hand turns a full circle.
Press repeatedly to set the STOPWATCH 1/5-second hand to the "0" position.
The hand moves quickly if the button B is kept pressed.
Push back in to the normal position.
NOTES ON OPERATING THE WATCH
TIME SETTING
- When the time is set, the 24-hour hand move correspondingly with the hour and minute hands.
- When setting the hour hand, check that the 24-hour hand is correctly set.
DATE SETTING
- It is necessary to adjust the date on the first day after a 30-day month and February.
- Do not set the date between 9:00 p.m. and 1:00 a.m., as the date may not change properly. If it is necessary to set the date during that period of time, first change the time to any time outside of this period, set the date, and then reset to the correct time.
ENERGY DEPLETION FOREWARNING FUNCTION
- When the energy stored in the rechargeable battery is reduced to an extremely low level, the second hand starts moving at 2-second intervals instead of the normal 1-second intervals.
- In that case, recharge the watch as soon as possible by exposing it to light. Otherwise, the watch may stop operating in about 1 week.
- To prevent the energy depletion
- When you wear the watch, try not to keep it covered by your clothes.
- When the watch is not in use, leave it in a bright place as long as possible.
* Make sure that the watch temperature does not exceed 50°C.
- To prevent the energy depletion
NOTES ON POWER SUPPLY
- This watch is provided with a rechargeable battery for exclusive use with the watch. Unlike conventional battery-powered watches, therefore, battery replacement is not necessary.
- The solar cell is a clean energy source, having no adverse effect on the natural environment.
- Never insert a conventional silver oxide battery in your watch as it may explode, generate an intense heat or catch fire. The watch is designed not to operate even if the battery is installed in it.
TO PRESERVE THE QUALITY OF YOUR WATCH
WATER RESISTANCE
- Non-water resistant
![]()
If "WATER RESISTANT" is not inscribed on the case back, your watch is not water resistant, and care should be taken not to get it wet as water may damage the movement. If the watch becomes wet, we suggest that you have it checked by an AUTHORIZED PULSAR DEALER or SERVICE CENTER. - Water resistance (3 bar)
![]()
If " WATER RESISTANT " is inscribed on the case back, your watch is designed and manufactured to withstand up to 3 bar, such as acci dental contact with splashes of water or rain, but it is not designed for swimming or diving. - Water resistance (5 bar)*
![]()
If "WATER RESISTANT 5 BAR" is inscribed on the case back, your watch is designed and manufactured to withstand up to 5 bar and is suitable for swimming, yachting and taking a shower. - Water resistance (10 bar/15 bar/20 bar)*
![]()
If "WATER RESISTANT 10 BAR", "WATER RESISTANT 15 BAR" or "WATER RESISTANT 20 BAR" is inscribed on the case back, your watch is designed and manufactured to withstand up to 10 bar/15 bar/20 bar and is suitable for taking a bath, shallow diving, but not for scuba diving. We recommend that you wear a PULSAR Diver's watch for scuba diving.


* Before using the water resistance 5, 10, 15 or 20 bar watch in water, be sure the crown is pushed in completely.
Do not operate the crown when the watch is wet or in water. If used in sea water, rinse the watch in fresh water and dry it completely.
* When taking a shower with the water resistance 5 bar watch, or taking a bath with the water resistance 10, 15 or 20 bar watch, be sure to observe the following:
- Do not operate the crown when the watch is wet.
- If the watch is left in warm water, a slight time loss or gain may be caused. This condition, however, will be corrected when the watch returns to normal temperature.
NOTE:
Pressure in bar is a test pressure and should not be considered as corresponding to actual diving depth since swimming movement tends to increase the pressure at a given depth. Care should also be taken on diving into water.
TEMPERATURES

Your watch works with stable accuracy within a temperature range of 5°C and 35°C (41°F and 95°F). Temperatures over 50°C (122°F) may cause battery leakage or shorten the battery life. Do not leave your watch in very low temperatures below –5°C (+23°F) for a long time since the cold may cause a slight time loss or gain. However, the above conditions will be corrected when the watch returns to normal temperature.
MAGNETISM

Your watch will be adversely affected by strong magnetism. Keep it away from close contact with magnetic objects.
SHOCKS & VIBRATION

Light activities will not affect your watch, but be careful not to drop your watch or hit it against hard surfaces, as this may cause damage.
CHEMICALS

Be careful not to expose the watch to solvents, mercury, cosmetic spray, detergents, adhesives or paints. Otherwise, the case, bracelet, etc. may become discolored, deteriorated or damaged.
CARE OF CASE AND BRACELET

To prevent possible rusting of the case and bracelet caused by dust, moisture and perspiration, wipe them periodically with a soft dry cloth.
PERIODIC CHECK

It is recommended that the watch be checked once every 2 to 3 years. Have your watch checked by an AUTHORIZED PULSAR DEALER or SERV ICE CENTER to ensure that the case, crown, buttons, gasket and crystal seal remain intact.
PRECAUTION REGARDING CASE BACK PROTECTIVE FILM

If your watch has a protective film and/or a sticker on the case back, be sure to peel them off before using your watch.

THIS PRODUCT CONTAINS A BUTTON BATTERY
If swallowed or placed inside any part of the body, the battery can cause severe or fatal injuries within 2 hours or less.
Button batteries are hazardous whether new or used. Keep batteries out of reach of children.
If you think the battery may have been swallowed or placed inside any part of the body, seek immediate medical attention. Contact the Australian Poisons Information Centre immediately on 13 11 26 (New Zealand 0800 764 766) for 24 / 7 fast, expert advice.
Documents / ResourcesDownload manual
Here you can download full pdf version of manual, it may contain additional safety instructions, warranty information, FCC rules, etc.
Advertisement


Need help?
Do you have a question about the VS75 and is the answer not in the manual?
Questions and answers