Advertisement
Available languages
Available languages
Table of Contents
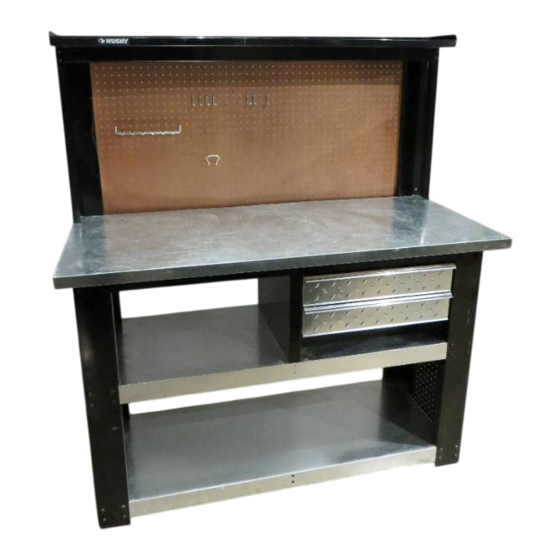
Workbench with Riser Shelf and Backpanel
Assembly Instructions
Fasteners
1/2"
(Shown full
12.7mm
size)
Quantity
54
"A"
Type
Note: The galvanized steel parts sometimes retain a
slight protective coating after the manufacturing
process. You may want to wipe the coating off the parts
with a clean dry cloth before assembling the unit.
1.
Do not tighten any fasteners until all the
workbench components in step 1 and 2 are
assembled together.
Assemble each of the two shelves to the end
panels using 16 type "A" fasteners per shelf, 4 at
each corner and 4 type "C" fasteners per shelf, two
on each end of the shelf. Note: The two shelves
are interchangable for assembly.
Attach the support channel to the bottom shelf
using 4 type "C" fasteners, two at the front of the
shelf and two at the back.
2.
Assemble the center panel to the top shelf using 2
type "A" fasteners. (You will find the center panel
packed inside one of the drawers)
Assemble the two top rails using 10 type "A"
fasteners per rail, 4 at each end and 2 in the center
to the center panel. Note: The two top rails are
interchangable for assembly.
Tighten all the fasteners used in step 1 and 2.
R
1/2"
12.7mm
3/8"
9.52mm
8
40
"C"
"B"
1/2"
5/8"
12.7mm
15.87mm
4
14
"D"
"A"
End Panel
"C"
"A"
2
1"
25.4mm
4
"E"
"F"
End Panel
"C"
Top
Shelf
Bottom
Shelf
Support
channel
"A"
Center
panel
Top rail
"A"
1/4"
6.35mm
8
"G"
1
Top rail
1
HUSKY-524
8
9027-0601
Advertisement
Table of Contents

Subscribe to Our Youtube Channel
Related Manuals for Husky Workbench with Riser Shelf and Backpanel


Summary of Contents for Husky Workbench with Riser Shelf and Backpanel
- Page 1 Workbench with Riser Shelf and Backpanel Assembly Instructions Fasteners 1/2" 1/2" 1/2" (Shown full 5/8" 1" 12.7mm 12.7mm 12.7mm 3/8" size) 15.87mm 25.4mm 1/4" 9.52mm 6.35mm Quantity "C" "A" "B" "D" "E" "F" "G" Type End Panel Note: The galvanized steel parts sometimes retain a slight protective coating after the manufacturing process.
- Page 2 For each drawer, assemble one roller glide assembly to the end panel and one opposing roller glide assembly to the Front of unit center panel using 2 type "C" fasteners for each roller glide assembly. HUSKY-524 9027-0601...
- Page 3 Front Rail "F" "D" "C" Assemble the front rail to the riser posts using 4 type "C" fasteners, 2 at each corner. Assemble the back rail to the riser posts using 4 type "C" fasteners, 2 at each corner. HUSKY-524 9027-0601...
-
Page 4: Trim Installation
While holding down the right tab and holding up the left tab, pull the drawer off the roller glides. Maintenance: Hardware (nuts, bolts, screws) should be tightened periodically to maintain trouble free operation. HUSKY-524 For customer service help in the United States call: 1-800-323-9601 9027-0601... - Page 5 Ensamble cada riel superior usando (10) tornillos tipo "A" "A" cada uno, 4 en cada extremo y 2 para fijar al centro del panel central. Nota: Los dos rieles superiores son intercambiables para ensainblar. Apriete todos los sujetadores utilizados en los pasos 1 y 2. HUSKY-524 9027-0601...
- Page 6 (Figura 5,4). Para cada cajón, fije una guía para cajón al panel extremo Frente de la Unidad lateral y otra al panel central utilizando 2 tornillos tipo "C" por cada guía. HUSKY-524 9027-0601...
- Page 7 Reil frontal "F" "D" "C" Fije el reil frontal a los postes verticales usando 4 tornillos tipo "C", 2 en cada esquina. Fije el reil trasero a los postes verticales usando 4 tornillos tipo "C", 2 en cada esquina. HUSKY-524 9027-0601...
-
Page 8: Mantenimiento
Mientras empuje la pestaña derecha hacia abajo y jale la pestaña izquierda hacia arriba, jale el cajón para liberarlo de las guías. Mantenimiento: Los tornillos y las tuercas deberán ser apretados periódicamente para mantener un funcionamiento ideal. HUSKY-524 9027-0601...
Need help?
Do you have a question about the Workbench with Riser Shelf and Backpanel and is the answer not in the manual?
Questions and answers