Advertisement
Table of Contents
Advertisement
Table of Contents

Related Manuals for Dreame Roboticmower A1

Summary of Contents for Dreame Roboticmower A1
- Page 1 Dreame Roboticmower A1 User Manual...
-
Page 2: Table Of Contents
TABLE OF CONTENTS 1 Safety Instructions ..................P03 2 What's in the Box ..................P07 3 Product Overview ..................P08 4 Installation ....................P09 5 Preparations before Use ................P11 6 Map Your Garden ..................P14 7 Operation ....................P20 8 Dreamehome App .................. -
Page 3: Safety Instructions
• When connecting the main cable to the power outlet, use a residual-current device (RCD) with a maximum tripping current of 30 mA. • Only use original batteries recommended by Dreame. The safety of the product cannot be guaranteed with non-original batteries. Do not use non-rechargeable batteries. - Page 4 install it in a covered Class A GFCI receptacle (RCD) with a weatherproof enclosure, ensuring that the attachment plug cap is inserted or removed. 1.3 Safety instructions for operation • Keep your hands and feet away from the rotating blades. Do not place your hands or feet near or below the product when it is turned on.
- Page 5 1.7 Symbols and Decals WARNING – Read user instructions before operating the machine. WARNING – Keep a safe distance from the machine when operating. WARNING – Operate the disabling device before working on or lifting the machine. WARNING – Do not ride on the machine. WARNING –...
- Page 6 This product conforms to the applicable UK Directives. Class Ⅲ Before charging, read the instructions. Direct current Class Ⅱ INTENDED USE The garden product is intended for domestic lawn mowing. It is designed to mow often, maintaining a healthier and better looking lawn than ever before. Depending on the size of your lawn, your mower may be programmed to operate at any time or frequency.
-
Page 7: What's In The Box
2 What's in the Box LiDAR protective cover Charging tower Baseplate (with a 10 m extension cable) Power supply Cleaning brush Screws × 8, Hex key Spare blade kits × 9 User manual Lint-free cloth Quick start guide... -
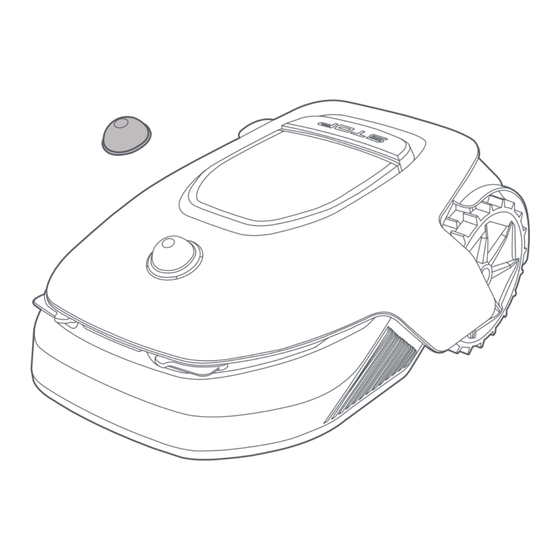
Page 8: Product Overview
3 Product Overview Stop button LiDAR Knob Display Charging contacts Blade disc protective cover Battery compartment Blade disc Rear wheel Front wheel Sensor Name Description Obtains environmental information and facilitates A1's positioning, obstacle avoidance LiDAR and sensing of water and dirt. Detection range: 70 m with 360°... -
Page 9: Installation
4 Installation 4.1 Select a suitable location • Place the charging station on a level surface near the edge of the lawn and a power outlet. It is recommended to place the charging station in an area with good Wi-Fi signal strength. Note: Use your mobile device to help check the Wi-Fi signal strength of the location. - Page 10 Insert the charging tower to the baseplate until you hear the click. Insert the cleaning brush into the charging tower by aligning the tongue with the groove. Connect the power supply to the extension cable and then connect to a power outlet. Please keep the power supply at least 30 cm above the ground.
-
Page 11: Preparations Before Use
LED Indicator on the charging station LED Indicator Light Colour Meaning 1. Charging station has a problem (for example a charging current or voltage problem). Blinking/solid red 2. A1 docks in the charging station but the charging is abnormal (for example charging contacts have a short circuit). Solid blue The charging station has power. - Page 12 Remove the LiDAR protective cover. Press Stop button to open the cover of the control panel. Press and hold the Power button on the control panel for 2 seconds to turn on A1. Note: A1 will automatically turn on when it docks in the charging station. Select the language you prefer Turn the knob clockwise to go down and anticlockwise to go up to select your language.
- Page 13 2. Enter the PIN code again to complete setting the PIN code. Note: If two passwords do not match, please set the new password again. Connect A1 to the internet Please scan the QR code to download the Dreamehome app on your mobile device. After the installation, please create an account and log in.
-
Page 14: Map Your Garden
4. Pair A1 with your mobile device via Bluetooth. Note: Make sure that your mobile device is within 10 m of A1. 2) Wi-Fi connection Make sure A1 and your mobile device are on the same Wi-Fi network. Please follow the in-app guidance to complete the connection. - Page 15 • A1 correctly docks in the charging station. 6.1 Create the boundary Tap "Start Creating" via the app, and A1 will check its status and calibrate. It will automatically leave the charging station to do the calibration. Please be careful. Remote control A1 to the edge of your lawn and tap "Set Starting Point"...
- Page 16 • Do not create the boundary on a slope that exceeds 27%. • Avoid creating boundaries inside corridors narrower than 1 m. • If there is a height difference of more than 4 cm between the edge of your lawn and the adjacent ground, please keep A1 at least 10 cm from the edge of your lawn.
- Page 17 • Make sure the turning angles are greater than 90° . When A1 returns to the place 1 m near the starting point, you can tap "Close Boundary" and the boundary will automatically be completed. 6.2 Set no-go zone Though A1 can automatically avoid obstacles, it is still necessary to set up no-go zones for areas which A1 is prohibited from entering such as swimming pools and sandpits.
- Page 18 6.4 Set path For isolated zones, please create a path to connect them. Isolated zones without a path will be inaccessible to Note: A1 can move in the path, but does not mow grass. Note: If your lawn is divided by passages higher than 4 cm, place an object with a slope equal in height to the passage (such as a ramp).
- Page 19 • To connect the work area and the charging station If your charging station is not in the work area, a path should be created to connect it to the work area. Tap "Path", and remote control A1 to create a path that allows it to return to the charging station. Note: When creating a path, ensure that one end overlaps with the work area by at least 1 metre ( ≥...
-
Page 20: Operation
7 Operation 7.1 Get familiar with the control panel Display Start Power on/off Knob Back Home Icon Status Battery level (Shows the current battery level.) Charging (A1 successfully docks in the charging station.) Bluetooth (A1 is connected to the app via Bluetooth.) Wi-Fi (A1 is connected to the app via a Wi-Fi network.) Link service (Link service is activated.) Schedule (A task is scheduled for today.) - Page 21 Button Function Ensure that A1 is outside the charging station. Press and hold the Power button for 2 seconds Power to turn it on or off. Press Start button and close the cover in 5 seconds to start mowing. The task will be Start cancelled if the cover is not closed in 5 seconds.
- Page 22 Menu structure overview All-Area Mowing Modes Edge Mowing View Schedule Schedule Turn on/off Schedule Mowing Efficiency Mowing Height Obstacle Avoidance Height Do Not Disturb Mode Winter/Summer Time Rain Protection Main Page Frost Protection Lift Alarm Settings Off-Map Alarm Change PIN Code Volume Language Reset the Robot...
- Page 23 Press Start button on the control panel and close the top cover in 5 seconds. A1 will leave the charging station and start mowing. You can also tap "Start" in the app to start mowing. • Start via the control panel 1.
- Page 24 4. Press Start button and close the top cover in 5 seconds. A1 will start mowing. • Start via the app 1. Open the app. 2. Select a mowing mode and tap "Start" to start mowing. 7.3 Pause To pause the current mowing task, you can press the Stop button on A1 or tap "Pause" in the app. Note: A1 will be locked and cannot be started directly through app after Stop button is pressed.
-
Page 25: Dreamehome App
7.4 Resume To resume the task when A1 is paused, press Start button on the robot and close the cover in 5 seconds. A1 will resume the previous mowing task. You can also tap "Continue" in the app to resume the mowing task. 7.5 Return to the charging station To stop the mowing task and send A1 back to the charging station, confirm your PIN code on the control panel and then press Home button. - Page 26 8.1 Mowing modes A1 offers various mowing modes. You can switch between modes through the app. 8.2 Schedule After the first map is completed, A1 automatically creates two weekly mowing schedules according to the lawn size, which are "Spr & Sum Schedule" and "Aut & Win Schedule". You can tap "Schedule" in the app to do detailed schedule settings.
-
Page 27: Maintenance
With Link Module, you can view the current location of A1 in Google Map. Note: Dreame development team will continuously conduct OTA (Over-the-Air) updates and maintenance on the firmware and app. Please check for update notifications or enable the Auto-update function to keep the firmware and app up-to-date and enjoy more features. - Page 28 • The body of A1, chassis and blade disc: 1. Turn A1 off. 2. Put the LiDAR protective cover on the LiDAR. 3. Turn A1 upside down. 4. Clean the body of A1, blade disc and chassis with a hose. Warning: Do not touch the blades when cleaning the chassis. Please wear gloves when cleaning. Warning: Please do not use a high-pressure washer for cleaning.
- Page 29 To keep the blades sharp, please replace the blades regularly. It is recommended to replace the blades every 6–8 weeks or sooner. Please only use Dreame original blades. Warning:Please turn off A1 and wear protective gloves before replacing the blades.
- Page 30 3. Put A1 on a soft surface and turn it upside 4. Remove the receptacle by pressing the button down. under the blade disc. 5. Remove the blade by aligning the hole of the 6. Remove 3 blades and receptacles. blade with the shaft.
-
Page 31: Battery
10 Battery For long-term storage, charge A1 every 6 months to protect the battery. Battery damage caused by over- discharge is not covered by the limited warranty. Do not charge the battery at an ambient temperature above 45° C (113° F) or below 6° C (43° F). The long-term storage temperature for the battery should be between -10 and 35°... -
Page 32: Troubleshooting
13 Troubleshooting Issue Cause Solution 1. Check if A1 has completed the process of 1. A1 is not within Wi-Fi signal turning on. A1 is not connected to coverage or Bluetooth range. 2. Check if the router is working properly. the app. - Page 33 Issue Cause Solution 4. If the problem persists, please contact the after-sales service. 1. Check if the charging station is correctly connected to power. A1 docks in the charging 2. Check if the charging contacts on A1 and the station, but the charging charging station are clean.
- Page 34 Issue Cause Solution Low battery. A1 will shut Battery level is ≤ 10%. Dock A1 in the charging station to charge. down soon. 1. Enter PIN code to verify. A1 is away from the A1 is away from the map. 2.
-
Page 35: Specifications
14 Specifications Product name Dreame Roboticmower Brand Dreame Basic information 643 × 436.5 × 261 mm Dimensions (25.3 × 17.2 × 10.2 in) Weight (battery included) 12 kg (26 lbs) Recommended working capacity 2000 ㎡ (0.5 acre) Standard: 120 ㎡ (0.03 acre)/h Mowing efficiency Efficient: 200 ㎡... - Page 36 Battery type Lithium-ion battery Battery (mower) Rated capacity 5000 mAh Rated voltage 18 V Input voltage 100~240 V Power supply Output voltage 20 V Output current Input voltage 20 V Output voltage 20 V Charging station Input current Output current [1] Charging time applies when A1 automatically returns to the charging station at low battery.
Need help?
Do you have a question about the Roboticmower A1 and is the answer not in the manual?
Questions and answers