Advertisement
Technical Support and E-Warranty Certificate www.vevor.com/support
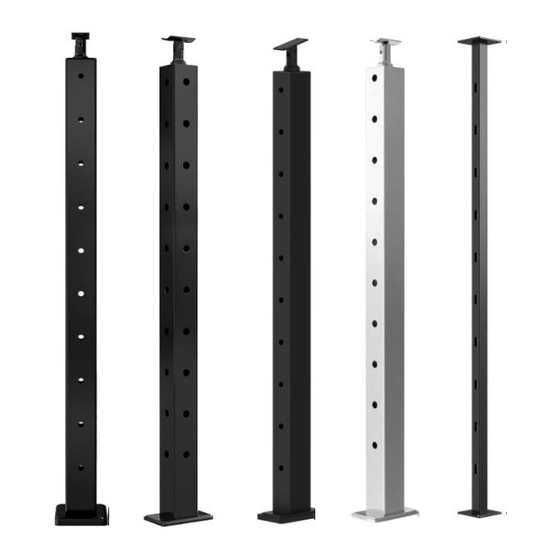
CABLE RAILING POST
MODEL:HR-001/HR-002/HR-003/HR-004/HR-005/HR-006/HR-007/
HR-008/HR-009/HR-010/HR-011/HR-012/HR-013/HR-014
HR-015/HR-016/HR-017/HR-018/HR-019/HR-020/HR-021/
HR-022/HR-023
We continue to be committed to provide you tools with competitive price.
"Save Half", "Half Price" or any other similar expressions used by us only represents an
estimate of savings you might benefit from buying certain tools with us compared to the major
top brands and does not necessarily mean to cover all categories of tools offered by us. You
are kindly reminded to verify carefully when you are placing an order with us if you are
actually saving half in comparison with the top major brands.
Advertisement
Table of Contents

Related Manuals for VEVOR HR-001


Summary of Contents for VEVOR HR-001
- Page 1 Technical Support and E-Warranty Certificate www.vevor.com/support CABLE RAILING POST MODEL:HR-001/HR-002/HR-003/HR-004/HR-005/HR-006/HR-007/ HR-008/HR-009/HR-010/HR-011/HR-012/HR-013/HR-014 HR-015/HR-016/HR-017/HR-018/HR-019/HR-020/HR-021/ HR-022/HR-023 We continue to be committed to provide you tools with competitive price. "Save Half", "Half Price" or any other similar expressions used by us only represents an estimate of savings you might benefit from buying certain tools with us compared to the major top brands and does not necessarily mean to cover all categories of tools offered by us.
- Page 2 This is the original instruction, please read all manual instructions carefully before operating. VEVOR reserves a clear interpretation of our user manual. The appearance of the product shall be subject to the product you received. Please forgive us that we won't inform you again if there are any technology or software updates on our product.
-
Page 3: Important Safeguards
This product is mainly used for column installation of wire functions and decorative accessories. VEVOR’s Cable Railing Post is made of all stainless steel materials, which has great resistance to rust and corrosion. It will work for long life time for interior and exterior railings with low maintenance. -
Page 4: Product Information
PRODUCT INFORMATION Drille Hole Pitch Heig Section Inclu Drille diamet Model size Color numb holes (mm) (mm) (pcs) (mm) (mm) - 3 -... - Page 5 HR-00 level 1067 φ10.5 50*50 Black HR-00 level φ10.5 50*50 Black HR-00 level 1067 φ8 30*50 Black HR-00 level φ8 30*50 Black HR-00 10.5×1 30° 1067 50*50 Silver HR-00 10.5×1 30° 1067 50*50 Black HR-00 1067 φ10.5 50*50 Black HR-00 50*50 Black HR-00...
-
Page 6: Package Include
1067 φ10.5 50*50 Black HR-02 level Φ8 30*50 Silver HR-02 level 1067 φ10.5 50*50 Silver PACKAGE INCLUDE Fit model Compone HR-013~ Picture HR005~HR0 HR-016/ HR-001/ HR-003/ HR-0 12/HR-019/H HR-018/ R-021/HR-02 HR-002 HR-004 HR-020/ HR-022/ post Square cover - 5 -... -
Page 7: Installation
Rectangul ar cover anchor bolt Curved bracket Horizontal bracket wrench Open end wrench Tapping screw Plastic cover INSTALLATION For concrete or wood floor Step1.Mark the drilling Step2.use a hammer Step3.Hammer the points at the drill to make a hole for anchor screw into the appropriate installation ∅... - Page 8 Step4.Tighten the Step5.Close the lid and finish fixing the post. screws Note:Ensure that the column is upright when fixing the bottom plate of the post. Mount with handrail(horizontal) Step1: Fixed bracket Step2: Determine the installation position of the handrail, and then mark the position under the handrail and bracket holes and drill holes with a ∅...
- Page 9 It is also suitable for the installation of arc handrails and brackets. Mount with handrail(gradient) Step1: Fixed bracket Step2: Adjust the Angle of the bracket to fit the underside of the handrail.Determine the installation position of the handrail, and then mark the position under the handrail and bracket holes and drill holes with a ∅...
- Page 10 Step3:Remove the bracket from the post and then use the self-tapping screws in the accessory to fix the bracket to the handrail. Fix the post and bracket again. It is also suitable for the installation For model HR-017 of arc handrails and brackets. Install with wire rope and fittings For Level Wheel Protector Sleeve For Stud Tensioner Horizontal mounting and Angle...
- Page 11 For Turnbuckle Tensioner and Fixed Terminal Address:Baoshanqu Shuangchenglu 803long 11hao 1602A-1609shi Shanghai Imported to AUS: SIHAO PTY LTD, 1 ROKEVA STREETEASTWOOD NSW 2122 Australia Imported to USA: Sanven Technology Ltd. Suite 250, 9166 Anaheim Place, Rancho Cucamonga, CA 91730 Pooledas Group Ltd Unit 5 Albert Edward House, The Pavilions Preston, United Kingdom SHUNSHUN GmbH...
- Page 12 Technical Support and E-Warranty Certificate www.vevor.com/support...
Need help?
Do you have a question about the HR-001 and is the answer not in the manual?
Questions and answers