Diono Cambria 2 - Booster Seat Manual
- Instruction manual (49 pages) ,
- Instruction manual (27 pages) ,
- Instruction manual (23 pages)
Advertisement
- 1 REGISTER THIS CAR SEAT
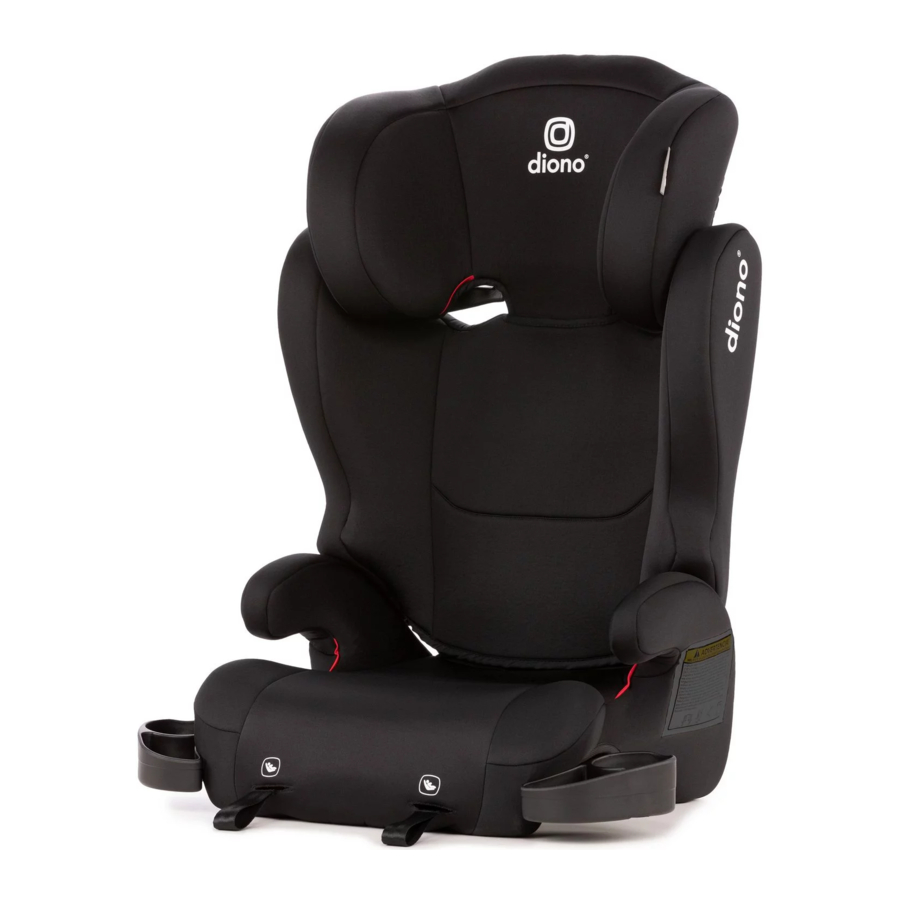
- 2 PARTS
- 3 CERTIFICATION
- 4 CAR SEAT USE AFTER A COLLISION
- 5 VEHICLE SEATING LOCATIONS
- 6 VEHICLE SEAT BELT TYPES
- 7 FIRST SETUP
- 8 SECURING THE CHILD
- 9 BACKLESS BOOSTER
- 10 COVER REMOVAL
- 11 BOOSTER COVER INSTALLATION
- 12 COMFORT FEATURES
- 13 CARE & MAINTENANCE
- 14 Safety Information
- 15 SAFE USE GUIDE
- 16 Documents / Resources
REGISTER THIS CAR SEAT
Please take a few moments to promptly fill out and return the attached card or register online using the direct link to the manufacturer's registration website provided.
Child restraints could be recalled for safety reasons. You must register this restraint to be reached in a recall. Send your name, address, e-mail address if available, and the restraint's model number and manufacturing date to:
Diono U.S., PO Box 77129, Seattle, WA 98177
or call 1-855-463-4666 or register online at: http://diono.com/productregistration/
Diono Canada ULC, 2139 Wyecroft Rd, Oakville, ON L6L 5L7 or call
1-866-954-9786 or register online at: http://diono.ca/product-registration/
For future reference, in the case of a change of address, please take a moment to fill out the following information:
Model Number:
Manufacture Date:
This information can be found either on the registration card or on the manufacturing label located on the seat.
For recall information, call the U.S. Government's Vehicle Safety Hotline at 1-888-327-4236 (TTY: 1-800-424-9153), or go to http://www.NHTSA.gov.
PARTS

- Head Support
- Head Support Adjuster
- Upper Belt Guide
- Lower Belt Guide
- LATCH/UAS Connectors
- LATCH/UAS Adjuster Straps
- Cup Holder
- Instruction Manual Storage Pocket. Located Under The Seat Cover.
- Backless Booster Shoulder Belt Guide Strap. Located Under The Seat Cover.
CERTIFICATION

This child restraint system conforms to all applicable requirements of U.S. Federal Motor Vehicle Safety Standards (FMVSS) 213 and Canadian Motor Vehicle Safety Standard (CMVSS) 213.2 and is certified for use in passenger cars, multi-purpose passenger vehicles, and trucks only.

THIS RESTRAINT IS NOT CERTIFIED FOR USE IN AIRCRAFT. Aircraft seats do not have shoulder belts which are required for use with this child restraint.
CAR SEAT USE AFTER A COLLISION
UNITED STATES
The U.S. National Highway Traffic Safety Administration (NHTSA) recommends that car seats be replaced following a MODERATE or SEVERE collision in order to ensure a continued high level of collision protection for child passengers. In the U.S., car seats do not automatically need to be replaced following a MINOR collision.
NHTSA defines a MINOR crash as one in which ALL of the following apply:
- The vehicle was able to be driven away from the crash site.
- The vehicle door nearest the car seat was not damaged.
- None of the passengers in the vehicle sustained any injuries in the crash.
- If the vehicle has air bags, the air bags did not deploy during the crash;and
- There is no visible damage to the car seat.
NEVER use a car seat that has been involved in a MODERATE or SEVERE collision.
CANADA
- DO NOT USE THIS CHILD RESTRAINT SYSTEM IF IT HAS BEEN IN A VEHICLE ACCIDENT.
- Transport Canada designates that you MUST replace this child restraint if it has been involved in a collision.
- You must dispose of your child seat or booster seat if the child seat was in a vehicle during a crash. Even if the child seat was empty or was not directly hit, it may be damaged.
- You must dispose of your child seat or booster seat if the shell is cracked or the webbing of the child car seat is frayed, torn or discolored.
VEHICLE SEATING LOCATIONS
According to accident statistics, children are safer when properly restrained in the rear seating positions than in the front seating positions.
The safest seating position is one that works best for your specific child restraint, family and vehicle model.

Before installing this child restraint you must determine the method of installation and the best vehicle seating position for that method.
When determining whether the child restraint can be used with vehicle LATCH/UAS anchors in the rear center seating position, it is critical that you refer to your vehicle owner's instruction manual.

VEHICLE SEAT BELT TYPES
The following types of vehicle belts CANNOT BE USED with your child restraint.
If any of the belt types listed below are in the chosen seating position, you MUST choose another seating position.
- Motorized (Automatic) Vehicle Belts
![]()
- Dual Retractor Lap/Shoulder Belts
![]()
- Non-Locking (ELR) Lap Belts
![]()
- Inflatable Seat Belts
![]()
- Door Mounted Vehicle Belts
![]()


Please refer to your vehicle owner's manual for specific information about seat belts and their use with child restraints.
TYPES OF RETRACTORS
- Emergency Locking Retracors (ELR)
- Only locks with sudden stops, accelerations, turns or if involved in an accident.
- Automatic Locking Retractor (ALR)
- Found in older vehicles.
- Switchable Retractor
Most common type of retractor and is switchable from (ELR) to (ALR).- Leave in ELR mode for booster use.
FIRST SETUP
- ATTACHING THE BACKREST

- With seat lying flat on the floor, place hooks at seat bottom.
- Attach the backrest hooks to seat mounting points.
- Push down on backrest just above hooks until fully engaged.
- Rotate backrest to an upright position while maintaining pressure just above the hooks.
To detach backrest, follow steps backwards starting from step 4.

- LATCH/UAS INSTALLATION
To improve safety and performance, this booster seat is equipped with a lower anchorage system that allows secure attachment to a vehicle's lower anchor locations.


DO NOT use LATCH/UAS if installation interferes with vehicle seat belt.

When using booster seat in center seating position, make sure it is does not rock from side-toside, otherwise choose a different seating position.

Unsecured objects can become flying hazards and can cause serious injury in an accident. If your vehicle is equipped with lower anchors, Diono always recommends installation utilizing the LATCH/ UAS connectors with this booster seat.
- Disengage LATCH/UAS connectors from storage slots and lay booster seat on its side. While PRESSING the silver cam lock lever, pull LATCH/UAS connectors away from the booster seat and extend both straps. Do not overextend connector straps.

- Attach both LATCH/UAS connectors to the vehicle anchors, starting with the connector that is furthest from you. For ease of use, make sure open end of hooks face upward during use.

- While pushing booster against vehicle seat, pull one adjuster strap tight and then the other. Make sure that both LATCH/UAS connectors are securely attached to the vehicle's lower anchors.

- Booster seat should rest firmly on vehicle seat bottom and touching the vehicle seat back. A gap is acceptable as long as the head support is touching the vehicle seat back or headrest. The entire seat bottom should sit flat on the vehicle seat.


NOTE: Even with LATCH/UAS connectors properly attached and adjusted, the booster seat will still have movement against the vehicle seat back and bottom.
Disengage lower anchors by reaching under the bottom of the booster seat and depressing the cam lock lever while pulling the seat away from the vehicle seat back until the lower anchor straps are extended all the way. Unhook lower anchor connectors from car LATCH/UAS anchors.
- ADJUSTING THE RECLINE ANGLE
![]()
It may also be necessary to adjust the recline angle of the booster seat to match that of the vehicle seat.
This booster seat features a recline angle that can adjust to match that of the vehicle seat:- Push booster seat backrest backwards until it moves freely.
- Push the booster seat bottom down and the backrest of booster seat back into vehicle seat until there is secure positioning. A gap is acceptable as long as the head support is touching the vehicle seat back or headrest.
- ADJUSTING THE HEAD SUPPORT
Squeeze the head support adjustment lever on the back of the booster seat while adjusting its height up or down to fit the child.
![]()

SECURING THE CHILD
Use ONLY the vehicle's lap and shoulder belt system when restraining the child in this booster seat. DO NOT use a lap belt only!
ALWAYS make sure the vehicle seat belt can properly retract before each use.

- Properly position child into installed seat. The child should be sitting upright and seated all the way back in the booster seat.
- Adjust head support to proper height. The upper belt guide should be slightly above the child's shoulders (at least 1 cm)
- Feed the shoulder belt portion of the vehicle seat belt through the upper belt guide.
![]()

- When the shoulder belt is routed through the upper belt guide, pull some webbing out of the retractor. Slowly release it to make sure the belt property feeds back into the retractor.Do this between each use.
- The vehicle shoulder belt should lay over the shoulder and should NOT be touching the child's neck.
- Fasten vehicle seat belt across child. The lap portion of the seat belt should rest within both lower belt guides. Make sure the vehicle seat belt is not twisted and lays flat across child's hips, torso and shoulder. DO NOT lay belt high over the child's belly.

- Tighten the seat belt by pulling the shoulder belt portion upwards.
- Confirm seat belt buckle is in correct position. It should align with the RED belt path guides on the side of seat.


INCORRECT SEAT BUCKLE POSTITION
After booster seat is installed and seat belt is fastened around child, it is important to confirm correct seat belt buckle position to ensure secure installation.
- DO NOT position the vehicle shoulder belt over the armrest. It MUST pass through the lower belt guide.
![]()
- If the buckle is being pulled across the lower belt guide and into the seat choose another seating position within the vehicle.
![]()


BACKLESS BOOSTER
While this booster seat is designed to offer advanced side-impact protection with its backrest section attached, the seat bottom can also be used alone as a backless booster.
Use ONLY the vehicle's lap and shoulder belt system when restraining the child in this booster seat.
DO NOT use a lap belt only!
ONLY use with children whose ears are below the top of the vehicle seat or headrest.


- Remove the backrest.
- Attach LATCH/UAS connectors.
- The booster seat should rest firmly on vehicle seat bottom and touching the vehicle seat back. The entire seat bottom should sit flat on the vehicle seat.

- Fasten vehicle seat belt across child. The lap portion of the seat belt should rest within both lower belt guides. Make sure the vehicle seat belt is not twisted and lays flat across child's hips, torso and shoulder. DO NOT lay belt high over the child's belly.

- Fasten vehicle seat belt across child. The lap portion of the seat belt should rest within both lower belt guides. Make sure the vehicle seat belt is not twisted and lays flat across child's hips, torso and shoulder. DO NOT lay belt high over the child's belly.
- Tighten the seat belt by pulling the shoulder belt portion upwards.
- Confirm seat belt buckle is in correct position. It should align with the RED belt path guides on the side of seat.
INCORRECT SEAT BUCKLE POSTITION
After booster seat is installed and seat belt is fastened around child, it is important to confirm correct seat belt buckle position to ensure secure installation.
- DO NOT position the vehicle shoulder belt over the armrest. It MUST pass through the lower belt guide.
![]()
- If the buckle is being pulled across the lower belt guide and into the seat choose another seating position within the vehicle.
![]()


USING THE SHOULDER BELT GUIDE STRAP
When in backless mode, if the vehicle shoulder belt does not correctly fit the child, then the seat must be used with the shoulder belt guide strap or with the backrest attached and properly adjusted to fit the child.
- Remove shoulder belt guide strap from storage area underneath seat.
![]()
- Position child correctly in seat, making sure lap and shoulder belts are positioned properly across child.
- Attach the RED shoulder belt guide strap onto the diagonal shoulder belt.

- Adjust strap to correct length, so that the RED guide is just above shoulder.


COVER REMOVAL
The Cambria 2 booster seat features a three piece, easy to remove cover; headrest cover, backrest cover and the seat bottom cover.
First detach backrest from seat bottom.
- HEADREST COVER REMOVAL
![]()
- Pull headrest up to highest position.
- Pull flap out of the booster seat back cover.
- Pull headrest cover over headrest shell.
- BACKREST COVER REMOVAL

- Pull elastic tabs off the bottom of the backrest shell attachment hooks.
- Pull cover over backrest shell.
- SEAT BOTTOM COVER REMOVAL

- Remove elastic tabs from the plastic tabs on the underside of the bottom of the booster seat.
- Pull cover over the bottom section of the booster seat.


BOOSTER COVER INSTALLATION

- Pull headrest cover over headrest and adjust cover to fit.
- Pull backrest cover over backrest and attach elastic bands over backrest shell attachment hooks.
- Pull bottom cover over bottom section of booster seat and attach elastic band over plastic tabs.
- Attach backrest to seat bottom.
- Tuck headrest flap into backrest cover.
COMFORT FEATURES
CUP HOLDER
- Swivel outward to the extended position for use.
- Swivel inward to the recessed position when not in use.
DO NOT use with hot liquids and foods as this could burn a child.
Do not step on or put excess weight on the cup holder which could cause it to break.

CARE & MAINTENANCE
DO NOT use solvents, harsh detergents or any other chemical or cleaning agent. DO NOT lubricate any part of the seat.
CLEANING FABRICS: Seat Cover
Machine or hand wash fabrics in cold water on gentle cycle with mild detergent. Dry flat and away from direct sunlight before re-use or storage. DO NOT bleach, iron or dry clean.

CLEANING PLASTICS: Seat Shell And Components
Spot clean using a damp cloth and warm water with mild detergent. Towel dry completely before re-use or storage.

WE LOVE TO HELP
Hello there, Welcome to the Diono family! We've created this lovingly engineered car seat to help keep your child comfortable and safe with all of the goods and none of the gimmicks. We look forward to lending a helping hand each and every day.

Any questions?
Diono U.S.: 1-855-463-4666
Diono Canada: 1-866-954-9786
Share your journey @diono social or find the latest news on,

Safety Information

Never place this child restraint in a vehicle seating location with an active front air bag. Death or serious injury may occur. If an air bag inflates, it can hit the child or child restraint with enough force to cause serious injury or death to your child. For vehicles with side passenger air bags, refer to your vehicle owner's manual for information on your child restraint installation.
For any questions or concerns please contact diono at:
Diono U.S.:
1-855-463-4666 or online at www.diono.com
Diono Canada:
1-866-954-9786 or online at www.diono.ca
 !DEATH OR SERIOUS INJURY CAN OCCUR!
EXPIRATION
- DO NOT use the child restraint if any part is damaged or broken, expired (over eight years from date of purchase), missing instructions, missing parts, or if the straps are cut, frayed, or damaged in any way. Call to find out if the damaged part or parts can be replaced.
Diono U.S.: 1-855-463-4666
Diono Canada: 1-866-954-9786
SAFE PRACTICES
- DO NOT leave loose objects, such as books, bags, etc., in the back of the vehicle. In the event of a sharp turn, sudden stop, or collision, loose objects can be thrown around and possibly cause serious injury to vehicle occupants.
- ALWAYS check all surfaces of restraint before securing your child. In warm weather, child restraints can become very hot. Do not allow children to play with vehicle seat belts.
- Before installing this child restraint in a vehicle, be sure to also check the vehicle owner's manual for information on proper installation. You can store these instructions in the pocket provided under the seat cover of your booster seat.
- DO NOT use child restraint in any configuration not shown in the instructions.
- UseONLY with children who weigh 40–120 lb (18–54 kg) AND whose height is 38–63 in (97–160 cm).
- ALWAYS make sure the vehicle seat belt can properly retract before each use.
- NEVER leave your child unattended.
- NEVER install in rear-facing, side-facing or on the back of a folded down vehicle seat.
- ALWAYS install this child restraint in the rear vehicle seat.
- DO NOT use this child restraint backless unless there is a vehicle headrest for that seating position.
!DEATH OR SERIOUS INJURY CAN OCCUR!
- DO NOT use this child restraint with any other backrest or cushions.
- ALWAYS secure the child restraint using the vehicle seat belt or LATCH/UAS (Lower Anchors and Tether for CHildren/Universal Anchorage System) connectors even when it is unoccupied. It could injure other occupants in a sudden stop or collision.
- DO NOT use any accessories, inserts or products not included with this child restraint, unless approved by Diono. Items not tested with this child restraint could injure your child.
- DO NOT modify your child restraint.
- NEVER provide this child restraint to another person without also providing them with the instruction manual.
SAFE USE GUIDE
failure to follow these instructions and the product labels can result in serious injury or death to your child.
Your child's safety depends on you. Death or serious injury can occur.
No child restraint can guarantee protection from injury in every situation, but proper use helps to reduce the risk of serious injury or death.
Carefully read and understand all instructions and warnings in this manual. Your child's safety depends on you knowing how to setup, install and use this child restraint properly.
This child restraint is designed for use only with children who weigh 40–120 lb (18–54 kg) and whose height is 38-63 in (97-160 cm).

Use ONLY the vehicle's lap and shoulder belt system when restraining the child in this booster seat. DO NOT use a lap belt only! This could result in serious injury or death.

Use ONLY with children whose ears are below the top of the fully raised vehicle seat or headrest.


Documents / Resources
References
![diono.ca]() Product Registration | diono® Car Seats, Strollers, Baby Carriers & More
Product Registration | diono® Car Seats, Strollers, Baby Carriers & MoreNHTSA | National Highway Traffic Safety Administration
![www.diono.com]() diono® Car Seats, Booster Seats, Baby Carriers & Travel Accessories | diono®
diono® Car Seats, Booster Seats, Baby Carriers & Travel Accessories | diono®![www.diono.ca]() diono® Car Seats, Booster Seats, Baby Carriers & Travel Accessories
diono® Car Seats, Booster Seats, Baby Carriers & Travel Accessories
Download manual
Here you can download full pdf version of manual, it may contain additional safety instructions, warranty information, FCC rules, etc.
Advertisement


Need help?
Do you have a question about the Cambria 2 and is the answer not in the manual?
Questions and answers