Table of Contents
Advertisement
Quick Links
Advertisement
Table of Contents

Related Manuals for Inovance MDKE9


Summary of Contents for Inovance MDKE9
- Page 1 User Guide MDKE9 Multi-Language LCD Keypad User Guide...
-
Page 3: Preface
This user guide describes the MDKE9 Multi-language LCD keypad product information, installation and wiring, function and application, maintenance and repair. Please be careful to read and understand the user guide before use MDKE9 keypad. Contact our customer service center if you have any questions. Note The drawings in the user guide are sometimes shown without covers or protective guards. -
Page 4: Table Of Contents
Chapter 2 Installation and Wiring ....7 2.1 Connect the MDKE9 keypad with AC Drive ............7 2.2 Connect MDKE9 keypad with PC ... 8 2.3 Install MDKE9 keypad on the Cabinet Door ............9 Chapter 3 Functions and Applications..11 3.1 Summary .......... -
Page 5: Chapter 1 Product Information
1 Product Information Chapter 1 Product Information 1.1 Nameplate Figure 1-1 Nameplate Nameplate Model MODEL : MDKE9 S/N : 01040037H500025 1.2 MDKE9 keypad dimensions Figure 1-2 MDKE9 keypad dimensions (Unit: mm) 3 / 36... -
Page 6: Components
Figure 1-3 MDKE9 keypad components ● USB connector Connect the MDKE9 to a PC via a USB cable for data exchange after connection, it can work in USB disk mode to read/write the MDKE9 SD card from the PC. ●... -
Page 7: Keys Introduction
Meaning Always on green The device runs normally. Flashing in green Data is transferring between the MDKE9 keypad and PC via USB. Communication between the MDKE9 keypad and the device is Always on red normal, but the device is faulty. -
Page 8: General Specifications
Connected to drive equipment: IP54 (select IP54 accessories) IP rating Single unit: IP20 Electromagnetic IEC 61800-3 compatibility Disposal: the MDKE9 keypad is recyclable. Material Refer to relevant international and local laws and regulations for disposal and recycling. 6 / 36... -
Page 9: Chapter 2 Installation And Wiring
Chapter 2 Installation and Wiring This user guide takes MD310 AC drive as the example to describe the installation and wiring of the MDKE9 keypad. Refer to the corresponding drive user guide for details if the MDKE9 keypad is installed on other AC drives. -
Page 10: Connect Mdke9 Keypad With Pc
Figure 2-2 Connect MDKE9 keypad to PC (step 2) Figure 2-3 MDKE9 keypad display after connected to PC. Multi-Language Keypad Inovance ETC – Milan Rev.1.21.228 [7/06/2022] Data Storage USB Serial Adapter Note The MDKE9 keypad supports the data storage and USB serial adapter functions. 8 / 36... -
Page 11: Install Mdke9 Keypad On The Cabinet Door
2) MKDE9 keypad installation Place the bottom of the MDKE9 keypad at the bottom of the base slot. Rotate the MDKE9 keypad at the rotation point and push the upper part until it clicks, and the keypad is mounted on the base successfully. - Page 12 3) Take the MDKE9 keypad out. Press clip in figure 2-5 with the index finger and middle finger to release the MDKE9 keypad, then pull the upper end of the MDKE9 keypad out of the base slot. Figure 2-6 Sheet metal slot dimensions...
-
Page 13: Chapter 3 Functions And Applications
3 Functions and Applications Chapter 3 Functions and Applications Summary Figure 3-1 MDKE9 keypad Main Menu structure diagram Maintenance Params 11 / 36... -
Page 14: Operation Status
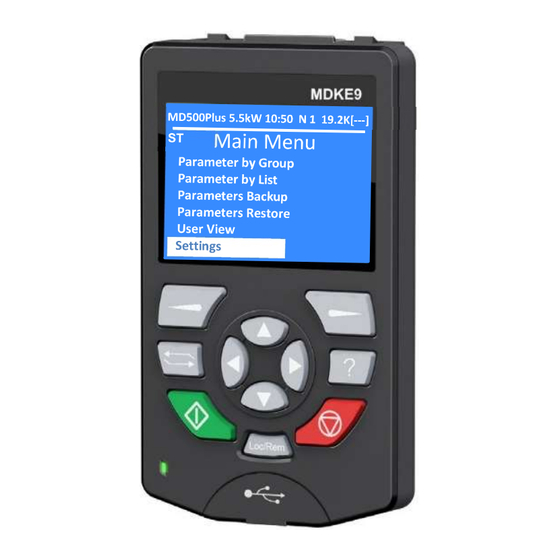
3 Functions and Applications 3.2 Operation Status After connect to the Drive successfully, MDKE9 will switch automatically to operation status menu, as shown below. MD500Plus 5.5kW 10:50 N 1 19.2K[---] MD500Plus 5.5kW 10:50 N 1 19.2K[---] STOP Main Menu Parameter by Group Parameter by Group 0.00Hz... -
Page 15: Parameter Setting
3 Functions and Applications Factory Default Which will be allow the MDKE9 keypad restore to factory default settings. Generally used to fix the unknown issue, which causes that the keypad cannot communicate with AC Drives. Edit Customer Password If the customer forgets the customer password, we can use this function to reset the customer password after login by factory account. -
Page 16: Model Selection
ME320LN and MD500-Plus drives. Note: When powered on, MDKE9 keypad runs an auto-searching to identify the drive model, therefore user can skip reading the model selection (chapter 3.4.2), Protocol type selection (chapter 3.4.3) and Baud rate selection (chapter 3.4.4) sections of this manual. -
Page 17: Baud Rate Selection
3 Functions and Applications Figure 3-4 describes the protocol type selection operation. Figure 3-4 Protocol type selection operation MD500Plus 5.5kW 10:50 N 1 19.2K[---] MD500Plus 5.5kW 10:50 N 1 19.2K[---] Main Menu Settings Parameter by Group Select Model Parameter by List Select Language Parameters Backup Baudrate... -
Page 18: Date & Time Setting
3 Functions and Applications 3.4.5 Date & Time Setting MDKE9 keypad supports the RTC function; we can set the system date and time in Settings menu; the setting operation is as shown below in figure 3-6. Figure 3-6 Date & Time Setting Operation MD500Plus 5.5kW 10:50 N 1 19.2K[---]... -
Page 19: Lcd Color Tune Setting
Date & Time Date & Time LCD Brightness LCD Brightness LCD Color tune LCD Color tune LCD Color tune LCD Color tune 3.4.8 Firmware Version Info MDKE9 keypad latest firmware version is 1.21.228, release date is 2022-07-06. 17 / 36... -
Page 20: Parameters Backup
3 Functions and Applications 3.5 Parameters Backup The MDKE9 keypad supports the parameters backup function, which allows to select all parameters or by parameter groups. The backup file will be saved in SD card Backup directory, the format is .csv which can be convenient to edit using PC Microsoft Office suite. -
Page 21: Parameters Restore
3 Functions and Applications 3.6 Parameters Restore The MDKE9 keypad can support the backup of many different model’s parameters in the SD card. The default SD card capacity is 8GB, and the maximum capacity can be up to 32GB. Figure 3-11 shows the parameters restore operation. -
Page 22: User View
Display one parameter with meter gauge The User View operation supports saving, loading, deleting the customer selected parameters. After selecting the parameters of the user view, this configuration can be saved in MDKE9 SD card. Note The saving procedure is described below. - Page 23 3 Functions and Applications Press return key to go back to Main Menu after finishing to add parameters to user view. Figure 3-13 shows how to access the User View Menu. Figure 3-13 User View Menu MD500Plus 5.5kW 10:50 N 1 19.2K[---] MD500Plus 5.5kW 10:50 N 1 19.2K[---] Main Menu User View...
- Page 24 3 Functions and Applications Big Digits Figure 3-16 below shows how to access the Big Digits display. Figure 3-16 How to access Big Digits display MD500Plus 5.5kW 10:50 N 1 19.2K[---] MD500Plus 5.5kW 10:50 N 1 19.2K[---] Big Digits User View Short List 10100...
- Page 25 3 Functions and Applications Auto Show Figure 3-18 below shows how to set the Auto Show display. Figure 3-18 How to set Auto Show display MD500Plus 5.5kW 10:50 N 1 19.2K[---] MD500Plus 5.5kW 10:50 N 1 19.2K[---] User View AutoShow User View No Data to Show No Data to Show...
- Page 26 3 Functions and Applications Save Figure 3-20 below shows how to operate the Save function. Figure 3-20 How to operate the Save function MD500Plus 5.5kW 10:50 N 1 19.2K[---] MD500Plus 5.5kW 10:50 N 1 19.2K[---] User View Save User View View 1->free View 1->...
-
Page 27: Connecting To The Pc
The MDKE9 keypad firmware update procedure is very simple, as follows. Use the USB cable to connect to the PC, and select the MDKE9 as the USB data storage mode, then delete all files in the SD card, and copy the firmware to SD card (after decompressing the zip file). After power on again, the MDKE9 keypad will automatically finish the firmware update. - Page 28 ● Copy the firmware to SD card root directory after decompressing the zip file ● Remove the disk and disconnect the MDKE9 keypad from PC ● Connect the MDKE9 keypad to PC again, after MDKE9 keypad power on, it will automatically finish the firmware update, as shown in figure 3-18.
-
Page 29: Port
Installation of the MDKE9 keypad USB driver. In order to be able to be able to use the MDKE9 keypad as USB to TTL adapter, first we have to install the serial driver by running the executable file "STM32-VirtualCOM-Dvr-64bit.exe". This executable file is contained in the folder “Windows Drivers”. - Page 30 3 Functions and Applications Connection of the control board to earth (MD290/MD500/MD500E/MD500- PLUS/CS710) In case of MD290/MD500/MD500E/MD500-PLUS/CS710), in order to reduce the electrical noise and improve the communication robustness, the control board can be connected to earth. The drive provides a grounding cable to make this connection.
- Page 31 After select the “USB Serial Adapter” mode, the keypad will indicate in the screen “USB Serial Adapter”. Then connect the keypad to the commissioning port of the AC drive through the RJ45 connectors (on both keypad and drive). Note: This function only suitable for MDKE9 firmware version 1.21.228 and above 29 / 36...
-
Page 32: Chapter 4 Maintenance And Repair
4 Maintenance and Repair Chapter 4 Maintenance and Repair 4.1 Periodical Inspection Table 4-1 below describes the periodical inspection items. Table 4-1 Periodical Inspection Items. Type Cycle Inspection Items Check whether the fastening parts get loose. Check whether there is overheat. Check whether the USB connector is damaged. -
Page 33: Sd Card Replacement
4 Maintenance and Repair Step 3: Place the battery into the clip (A side) first and Step 4: Put the battery cover back then press other end (B side) of the battery. 4.3 SD Card Replacement Figure 4-2 shows the SD card replacement procedure. Figure 4-2 SD card replacement procedure Step 1: Use a slotted screwdriver or fingers to remove Step 2: Push the metal cover towards the... - Page 34 4 Maintenance and Repair Step 5: Put the battery cover back Note MDKE9 keypad does not support hot-plug of the SD card, please replace the SD card when the keypad is not powered. 32 / 36...
-
Page 35: Revision History
Date Version Change Description January 2020 Draft Version. March 2020 First Release Version. December 2020 Add new products and new languages support with 1.9.2 version firmware. August 2022 Add MDKE9 new functions support with 1.21.228 version firmware. 33 / 36... - Page 36 Suzhou Inovance Technology Co., Ltd. Add.: No. 16 Youxiang Road, Yuexi Town, Wuzhong District, Suzhou 215104, P.R. China Tel: +86-512-6637 6666 Fax: +86-512-6285 6720 Service Hotline: 400-777-1260 http://www.inovance.com © Copyright Shenzhen Inovance Technology Co., Ltd.
Need help?
Do you have a question about the MDKE9 and is the answer not in the manual?
Questions and answers