
Subscribe to Our Youtube Channel
Related Manuals for Bimar CP092


Summary of Contents for Bimar CP092
- Page 1 LIBRETTO ISTRUZIONI INSTRUCTION BOOKLET CONDIZIONATORE PORTATILE 9000BTU 9000BTU PORTABLE AIR CONDITIONER Type CP092 (mod. JHS-A016-09KR2/E)
-
Page 2: Avvertenze Generali
Questo simbolo vi invita a leggere attentamente queste istruzioni prima dell’uso dell’apparecchio, ed eventualmente informare terzi, se necessario. Conservare il libretto per ulteriori consultazioni e per l’intera durata di vita dell’apparecchio. Se nella lettura di queste istruzioni d’uso alcune parti risultassero difficili nella comprensione o se sorgessero dubbi, prima di utilizzare il prodotto contattare l’azienda all’indirizzo scritto in ultima pagina. - Page 3 • Esempi di apparecchi per ambiente domestico sono apparecchi per tipiche funzioni domestiche, usati in ambito domestico, che possono essere utilizzati per tipiche funzioni domestiche anche da persone non esperte: - in negozi, uffici e altri luoghi di lavoro similari; - in aziende agricole o similari;...
- Page 4 esempio: telecomando e batterie) devono essere mantenuti fuori dalla portata di bambini. • Non ostruire la griglia di aspirazione e di emissione aria. • Non introdurre dita o oggetti nei condotti delle griglie di ingresso o uscita dell’aria. • Non appoggiare oggetti pesanti o caldi sopra l’apparecchio. •...
- Page 5 danni derivanti da uso improprio, erroneo e irresponsabile e/o da riparazioni effettuate da personale non qualificato. • In caso di anomalie di funzionamento (per esempio: rumore anomalo, cattivo odore, fumo, innalzamento anomalo della temperatura, dispersioni elettriche, ecc.) spegnere immediatamente l’apparecchio e scollegare la spina dalla presa di corrente.
- Page 6 L’apparecchio deve essere immagazzinato in un locale ben ventilato in cui la dimensione minima della stanza sia di 11m². L’apparecchio deve essere installato, utilizzato e conservato in un locale con la superficie del pavimento maggiore di 11m². Questo apparecchio contiene una quantità di gas refrigerante R290 pari a quella indicata sulla targa dati posta sull’apparecchio.
- Page 7 riparazioni che richiedono l’assistenza di altro personale specializzato devono essere eseguite sotto la supervisione di una persona competente nell’uso di refrigeranti infiammabili. Trasporto di apparecchiatura contenente refrigeranti infiammabili: fare riferimento alle normative sul trasporto. Marcatura dell’apparecchiatura con simboli: fare riferimento alle normative locali.
- Page 8 Assicurarsi che l’area sia in sicurezza grazie al controllo del materiale infiammabile. 1.1.5 Verifica della presenza di refrigerante. L’area deve essere controllata utilizzando un adeguato rilevatore di refrigerante prima e durante il lavoro per assicurarsi che l’operatore sia consapevole della presenza di atmosfere potenzialmente infiammabili.
- Page 9 deve essere in grado di disperdere in maniera sicura qualsiasi refrigerante rilasciato e, preferibilmente, di espellerlo esternamente nell’atmosfera. 1.1.9 Controlli sull’apparecchiatura di refrigerazione. Nel momento in cui vengono sostituiti dei componenti elettrici, essi devono essere idonei all’uso e conformi alle specifiche indicate. Le linee guida del costruttore riguardo alla manutenzione e all’assistenza devono essere sempre rispettate.
- Page 10 dell’apparecchiatura cosi che tutte le parti siano informate. I controlli di sicurezza iniziali comprendono: controllare che i condensatori siano scarichi: questo controllo deve essere eseguito in modalità sicura per evitare scintillamenti; controllare che componenti elettrici e cablaggi in tensioni non siano esposti durante il caricamento, ripristino o lo spurgo del sistema;...
- Page 11 ammesse per l’apparecchiatura in uso. I componenti intrinsecamente sicuri sono gli unici su cui si può operare in tensione in presenza di un’atmosfera infiammabile. Il sistema di prova deve essere al corretto amperaggio. Sostituire i componenti solo con parti di ricambio indicate dal costruttore.
- Page 12 recuperare tutto il refrigerante dal sistema od isolarlo (attraverso valvole di intercettazione) in una parte del sistema lontana dalla perdita. Azoto esente da ossigeno (OFN) deve quindi essere liberato nel sistema prima e durante il processo di saldatura. 1.1.16 Rimozione e svuotamento.
- Page 13 al minimo la quantità di refrigerante al loro interno. I cilindri devono essere mantenuti in posizione eretta. Assicurarsi che il sistema di refrigerazione sia collegato a terra prima di caricarlo con del refrigerante. Etichettare il sistema una volta caricato (se non è ancora stato fatto).
- Page 14 -Se una condizione di vuoto non è ottenibile, utilizzare un collettore in modo che il refrigerante possa essere rimosso dalle varie parte del sistema. -Assicurarsi che il cilindro sia posizionato sulle bilance prima di effettuare il recupero. -Avviare la macchina di recupero e operare in conformità con le istruzioni del costruttore.
-
Page 15: Installazione
e, se possibile, raffreddati prima del recupero. L’attrezzatura di recupero deve essere perfettamente funzionante e comprensiva di un set di istruzioni riguardo la stessa a portata di mano e adatto al recupero di refrigeranti infiammabili. Inoltre, un gruppo di bilance calibrate deve essere disponibile e perfettamente funzionanti. - Page 16 sicurezza e la portata in corrente (ampere) non deve essere inferiore a quella massima dell’apparecchio. • L’installazione deve essere eseguita da personale qualificato, in possesso dei requisiti tecnici che accerti la conformità alle norme d’installazione vigenti. • Si declina ogni responsabilità dall’inosservanza di tale disposizione e qualora l’impianto elettrico a cui ci si allaccia, non sia realizzato secondo le norme vigenti.
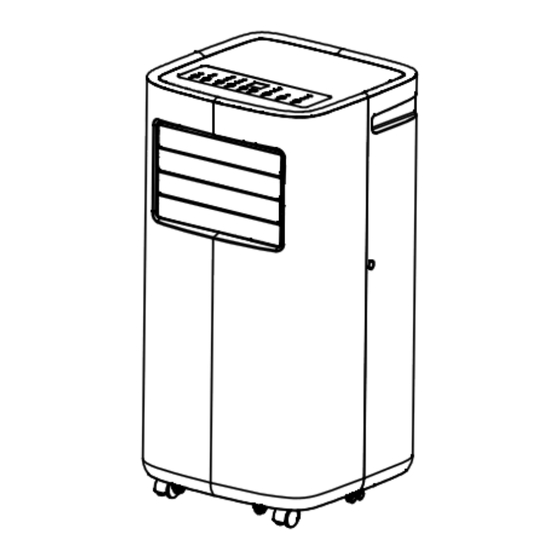
- Page 17 DESCRIZIONE Display Deflettori Display frontale Pannello frontale Ruote Ingresso aria Sede per tubo flessibile Filtro aria Foro drenaggio 10. Avvolgicavo 11. Pannello posteriore 12. Ingresso aria inferiore 13. Custodia spina cavo 14. Foro drenaggio continuo 15. Maniglia per trasporto 16. Filtro aria 17.
- Page 18 (17)
- Page 19 DESCRIZIONE L’apparecchio è dotato dei seguenti elementi di controllo, di regolazione, e parti: Telecomando Le funzioni dell’apparecchio si azionano con la tastiera del pannello comandi e con il telecomando che deve essere puntato frontalmente (distanza max di circa 6m) in direzione del display, e prima ancora inserirvi le batterie (aprire lo sportello posteriore e inserire 2 batterie tipo “AAA”...
- Page 20 Tasto Timer Temporizza il funzionamento o l’avvio dell’apparecchio: per (TIMER) aumentare e diminuire premere i rispettivi tasti “D” e “C” da 1 ora, sino a un massimo di 24 ore, se premuto nuovamente, il tempo è annullato. Temporizzare avvio: con l’apparecchio in stand-by, premere il tasto sino al tempo desiderato (1-24h) il tempo lampeggia per alcuni secondi circa e poi trascorso il tempo impostato il timer avvia l’apparecchio nelle modalità...
- Page 21 40cm ad un massimo di 145cm circa; limitare al minimo la lunghezza del tubo, evitare curve troppo strette o pieghe del tubo flessibile. Non utilizzare tubi di prolunga o sostituirli con altri tubi diversi, in quanto ciò potrebbe causare un malfunzionamento. Lo scarico deve essere libero;...
- Page 22 Modalità Freddo/deumidificazione/ventilazione: ad ogni pressione del tasto “Mode” si selezionano le modalità e si accende il Led corrispondente della funzione selezionata, nel cambio da una modalità all’altra, il ventilatore continua a funzionare, ma il compressore si ferma: il compressore riparte dopo 3 minuti circa. Questo ritardo di avviamento protegge il compressore da eventuali danni.
- Page 23 - Deumidificazione (DRY) Quando è impostata questa funzione sul pannello di controllo si accende la spia “Dry”; la velocità di ventilazione è fissa alla minima e non può essere regolata. L’apparecchio non raffredda l’ambiente quando è attiva la funzione deumidificazione. Quando si utilizza questa funzione si deve predisporre sempre il drenaggio continuo, per garantire la massima efficienza di deumidificazione.
-
Page 24: Pulizia E Manutenzione
Prima di ogni utilizzo verificare: -che l’apparecchio sia in buono stato -che il cordone elettrico e tubo flessibile non siano danneggiati • Aprire le alette orizzontali manualmente nella direzione desiderata Inserire la spina nella presa di corrente, udirete un segnale acustico. •... - Page 25 • Se si decide di non utilizzare più l’apparecchio, si raccomanda di renderlo inoperante tagliando il cavo di alimentazione (prima assicurarsi d’aver tolto la spina dalla presa di corrente), e di rendere innocue quelle parti che sono pericolose qualora utilizzate per gioco dai bambini. •...
-
Page 26: Risoluzione Dei Problemi
RISOLUZIONE DEI PROBLEMI GUASTO CAUSA SOLUZIONE L’apparecchio non si accende L’apparecchio non è acceso. Accendere l’apparecchio. La presa elettrica è difettosa. Rivolgersi ad una persona personalmente qualificata. La spina non è inserita nella Inserire la spina nella presa presa di corrente. elettrica. -
Page 27: General Warnings
This symbol tells you to read these instructions carefully before using the appliance, and to inform any third parties if necessary. Keep the instruction booklet for further reference throughout the lifetime of the appliance. If when reading these instructions you find any parts difficult to understand or have any doubts, contact the manufacturer at the address provided on the back page before using the product. - Page 28 • Examples of household appliances are appliances for typical household functions, those used in the home, or those which may be used for typical household functions even by untrained persons: - in shops, offices and other similar workplaces; - on farms and in similar locations; - by the customers of hotels, motels and other residential environments;...
- Page 29 • Do not obstruct the air inlet or air outlet grille. • Do not insert fingers or objects into the ducts of the air inlet and outlet grilles. • Do not place heavy or hot objects on top of the appliance. •...
- Page 30 using genuine spare parts. Failure to comply with the above may impair the appliance's safety. This product contains fluorinated greenhouse gases, which are hermetically sealed. The refrigerant used is R290 and its relative global warming potential (GWP) is 3. Additional warning for appliances with refrigerant gas R290 (refer to the data plate for the type of gas used).
- Page 31 The appliance shall be stored in a room Without continuously operating ignition sources (for example: open flames, an operating gas appliance or an operating electric heater). Be aware that the refrigerants may not contain an odour. R290 is a refrigerant gas in compliance with the European directives on environment.
-
Page 32: Information On Servicing
Transport of equipment containing flammable refrigerants. See transport regulations. Marking of equipment using signs. See local regulations. Disposal of equipment using flammable refrigerant. See national regulations. Storage of equipment/appliances. The storage of equipment should be in accordance with the manufacturer’s instructions. Storage of packed (unsold) equipment. - Page 33 1.1.5 Checking for presence of refrigerant. The area shall be checked with an appropriate refrigerant detector prior to and during work, to ensure the technician is aware of potentially flammable atmospheres. ensure that the leak detection equipment being used is suitable for use with flammable refrigerants, i.e.
- Page 34 to the correct specification. At all times the manufacturer’s maintenance and service guidelines shall be followed. If in doubt consult the manufacturer’s technical department for assistance. The following checks shall be applied to installations using flammable refrigerants. The charge size is in accordance with the room size within which the refrigerant containing parts are installed;...
- Page 35 absolutely necessary to have an electrical supply to equipment during servicing, then a permanently operating form of leak detection shall be located at the most critical point to warn of a potentially hazardous situation. Particular attention shall be paid to the following to ensure that by working on electrical components, the casing is not altered in such a way that the level of protection is affected.
- Page 36 Leak detection methods. The following leak detection methods are deemed acceptable for systems containing flammable refrigerants. Electronic leak detectors shall be used to detect flammable refrigerants, but the sensitivity may not be adequate, or may need re- calibration. (detection equipment shall be calibrated in a refrigerant- free area).
- Page 37 The system shall be flushed with OFN to render the unit safe. This process may need to be repeated several times. Compressed air or oxygen shall not be used for this task. Flushing shall be achieved by breaking the vacuum in the system with ofn and continuing to fill until the working pressure is achieved, then venting to atmosphere, and finally pulling down to a vacuum.
- Page 38 -Become familiar with the equipment and its operation. Isolate system electrically. Before attempting the procedure ensure that: -Mechanical handling equipment is available, if required, for handling refrigerant cylinders; All personal protective equipment is available and being used correctly. -The recovery process is supervised at all times by a competent person;...
- Page 39 1.1.20 Recovery.When removing refrigerant from a system, either for servicing or decommissioning, it is recommended good practice that all refrigerants are removed safely. When transferring refrigerant into cylinders, ensure that only appropriate refrigerant recovery cylinders are employed. Ensure that the correct number of cylinders for holding the total system charge is available.
-
Page 40: Installation
INSTALLATION • After removing the packaging, check that the appliance is intact; if in doubt, do not use it and contact a qualified professional. The packaging elements (plastic bags, polystyrene, metal tacks, etc.) must not be left in reach of children or irresponsible people, as they can be dangerous. They must be disposed of according to current regulations. - Page 41 prevent the appliance from falling. Place the mains cable so that people do not pass over it, to prevent tripping. • The appliance must be transported and handled vertical. If it is transported horizontal, wait at least two hours before restarting it. •...
- Page 42 (17) DESCRIPTION The appliance has the following control and adjustment devices and components: Remote control The appliance's functions are operated using the control panel keypad and the remote control, which must be pointed straight at the display from a distance of no more than 6 metres, fitting the batteries before use (open the hatch in the rear and fit two “AAA”...
- Page 43 WARNING: Do Not Ingest Battery. Chemical Burn Hazard. Keep new and used batteries away from children. If the battery compartment does not close securely, stop using the product and keep it away from children. If you think batteries might have been swallowed or placed inside any part of the body, seek immediate medical attention.
- Page 44 Sleep Reduces the fan speed (if med/hi speed is set); this function is button available in Cool mode. In this function the appliance will operate in quiet, energy saving mode. • Front grille: the horizontal flaps can be adjusted up or down manually. Window kit, comprising: extending flexible pipe (15x145)cm, (18): fit the rectangular fitting on the end and turn it •...
- Page 45 done, check that the parts are rigidly fixed together. Open the window slightly and set the adapter in the horizontal or vertical position, as appropriate, and semi-close the blinds or shutters.
- Page 46 Modes Cool/dry/fan: each pressure of the “Mode” button selects the modes and the LED of the selected function illuminates. During the switch between modes, the fan keeps operating but the compressor stops and will restart after about 3 minutes. This delayed start protects the compressor from potential damage.
- Page 47 - Dry When this function is set, the "Dry" light on the control panel illuminates; the fan speed is fixed at the minimum level and cannot be modified. The appliance does not cool the room when the dry function is activated. When this function is used, continuous drainage must always be provided to ensure the maximum drying efficiency.
-
Page 48: Cleaning And Maintenance
Energy saving advice • Always keep the filters clean, inspecting them regularly • Keep doors and windows firmly closed except when the room needs airing Do not allow sunlight to shine straight into the room (use curtains, lower the roller blinds or close •... -
Page 49: Troubleshooting
Information for correct disposal of the product under the European Directive 2011/65/EU. At the end of its lifetime, the product must not be disposed of with ordinary urban waste. It can be consigned to the special waste recycling centres provided by local government, or by the retailers who provide this service. - Page 51 La garanzia è disciplinata e interpretata in base alle leggi applicabili vigenti nel Paese in cui il prodotto viene acquistato. Per i dettagli, consultare il Servizio clienti del proprio paese o il sito internet di Bimar (www.bimaritaly.it).La Ditta costruttrice declina ogni responsabilità...
- Page 52 Via G.Amendola, 16/18 25019 Sirmione (BS) – ITALY www.bimaritaly.it Assistenza: assistenza.privati@bimaritaly.it. CP092_I.B._2023_rev01...
Need help?
Do you have a question about the CP092 and is the answer not in the manual?
Questions and answers