
Related Manuals for Bimar CP120


Summary of Contents for Bimar CP120
- Page 1 LIBRETTO ISTRUZIONI INSTRUCTION BOOKLET CONDIZIONATORE PORTATILE 12000BTU CON POMPA CALORE E WIFI PORTABLE AIR CONDITIONER WITH WIFI Type CP120 (mod. JHS-A018-12KR2H/x)
-
Page 2: Avvertenze Generali
Questo simbolo vi invita a leggere attentamente queste istruzioni prima dell’uso dell’apparecchio, ed eventualmente informare terzi, se necessario. Conservare il libretto per ulteriori consultazioni e per l’intera durata di vita dell’apparecchio. Se nella lettura di queste istruzioni d’uso alcune parti risultassero difficili nella comprensione o se sorgessero dubbi, prima di utilizzare il prodotto contattare l’azienda all’indirizzo scritto in ultima pagina. - Page 3 • Esempi di apparecchi per ambiente domestico sono apparecchi per tipiche funzioni domestiche, usati in ambito domestico, che possono essere utilizzati per tipiche funzioni domestiche anche da persone non esperte: - in negozi, uffici e altri luoghi di lavoro similari; - in aziende agricole o similari;...
- Page 4 icluso le batterie del telecomando devono essere mantenuti fuori dalla portata di bambini. • Non ostruire la griglia di aspirazione e di emissione aria. • Non introdurre dita o oggetti nei condotti delle griglie di ingresso o uscita dell’aria. • Non appoggiare oggetti pesanti o caldi sopra l’apparecchio. •...
- Page 5 • In caso di anomalie di funzionamento (per esempio: rumore anomalo, cattivo odore, fumo, innalzamento anomalo della temperatura, dispersioni elettriche, ecc.) spegnere immediatamente l’apparecchio e scollegare la spina dalla presa di corrente. Per l’eventuale riparazione rivolgersi esclusivamente a personale qualificato e richiedere l’utilizzo di ricambi originali. Il mancato rispetto di quanto sopra può...
- Page 6 1. AVVERTENZE PER IL GAS REFRIGERANTE R290 L’apparecchio contiene R290 (classificazione infiammabilità A3). La quantità espressa in peso e in CO2 di gas fluorurati ad effetto serra per i quali l'apparecchio è progettato e il potenziale di riscaldamento globale di tali gas è di 230g. L’apparecchio deve essere immagazzinato in un locale ben ventilato in cui la dimensione minima della stanza sia di 12m².
- Page 7 valido che attesti la competenza di tale persona a maneggiare i refrigeranti in modo sicuro, in conformità con una specifica di valutazione riconosciuta dal set- tore. La manutenzione deve essere eseguita esclusivamente come raccomandato dal produttore dell’apparecchio. Le manutenzioni e le riparazioni che richiedono l’assistenza di altro personale specializzato devono essere eseguite sotto la supervisione di una persona competente nell’uso di refrigeranti infiammabili.
- Page 8 1.1.4. Area di lavoro generale. Tutto lo staff addetto alla manutenzione e gli altri operatori presenti nell’area di lavoro devono essere istruiti sulla natura del lavoro che si sta svolgendo. Evitare di lavorare in spazi ristretti. La zona circostante all’area di lavoro deve essere area sezionata.
- Page 9 qualsiasi lavorazione a caldo. Il grado di ventilazione deve essere presente durante tutto il periodo nel quale si sta eseguendo la lavorazione. La ventilazione deve essere in grado di disperdere in maniera sicura qualsiasi refrigerante rilasciato e, preferibilmente, di espellerlo esternamente nell’atmosfera. 1.1.9 Controlli sull’apparecchiatura di refrigerazione.
- Page 10 il funzionamento. Questa situazione deve essere riferita al proprietario dell’apparecchiatura cosi che tutte le parti siano informate. I controlli di sicurezza iniziali comprendono: controllare che i condensatori siano scarichi: questo controllo deve essere eseguito in modalità sicura per evitare scintillamenti; controllare che componenti elettrici e cablaggi in tensioni non siano esposti durante il caricamento, ripristino o lo spurgo del sistema;...
- Page 11 senza essersi assicurati che non superi la massima tensione e corrente ammesse per l’apparecchiatura in uso. I componenti intrinsecamente sicuri sono gli unici su cui si può operare in tensione in presenza di un’atmosfera infiammabile. Il sistema di prova deve essere al corretto amperaggio.
- Page 12 perdita di refrigerante la quale necessita di saldatura, recuperare tutto il refrigerante dal sistema od isolarlo (attraverso valvole di intercettazione) in una parte del sistema lontana dalla perdita. Azoto esente da ossigeno (OFN) deve quindi essere liberato nel sistema prima e durante il processo di saldatura. 1.1.16 Rimozione svuotamento.
- Page 13 dell’apparecchiatura. I tubi devono essere il più corti possibili per ridurre al minimo la quantità di refrigerante al loro interno. I cilindri devono essere mantenuti in posizione eretta. Assicurarsi che il sistema di refrigerazione sia collegato a terra prima di caricarlo con del refrigerante.
- Page 14 -Assicurarsi che il cilindro sia posizionato sulle bilance prima di effettuare il recupero. -Avviare la macchina di recupero e operare in conformità con le istruzioni del costruttore. -Non sovraccaricare i cilindri. (Non più dell’80 % del volume di carico del liquido). -Non superare la massima pressione di lavoro del cilindro, nemmeno temporaneamente.
-
Page 15: Installazione
gruppo di bilance calibrate deve essere disponibile e perfettamente funzionanti. I tubi devono essere equipaggiati con attacchi ermetici con scollegamento in perfette condizioni. Prima di utilizzare la macchina di recupero, controllare che sia in condizioni di funzionamento soddisfacenti, che sia stata mantenuta in modo appropriato e che qualsiasi componente elettrico associato sia sigillato per prevenire ignizioni nel caso il refrigerante venga rilasciato. - Page 16 - bagno, lavanderia, ambienti dove vi sono prodotti infiammabili (bombolette spray o con gas, liquidi, o solidi, zolfo), ambiente polverosi o in prossimità di fonti di calore - locali dove sono presenti altri macchianari che sono forte fonte di calore - prossimità...
- Page 17 Prima Installazione/Configurazione 1.1 Installare l’applicazione “BIMAR Live Smart” tramite Google Play (Android) o da AppStore (iOS), oppure scansionare il codice QR qui presente. Per Android Per iOS 1.2 Al termine dell’installazione, icona dell’applicazione appare. Cliccare l’icona “Bimar Live Smart” per avviare l’applicazione.
- Page 18 2.4 Nella schermata successiva, cliccare sulla scritta” /Confermare che il LED lampeggia velocemente. Impostazioni e personalizzazioni Aprire sullo smartphone la schermata e premere in basso a destra per personalizzare le seguenti funzioni: Gestione casa, Centro Messaggi, Centro assistenza, Acquisti in APP. Premere in basso al centro per personalizzare la operatività...
- Page 19 …ecc Nota: il controllo vocale possiede solo alcune funzioni definite. Il nostro servizio clienti (assistenza.privati@bimar-spa.it) è sempre disponibile per inviare elenco aggiornato dei comandi supportati dai dispositivi. Lo smartphone deve essere connesso tramite rete Wifi o rete dati del cellulare per il controllo da remoto.
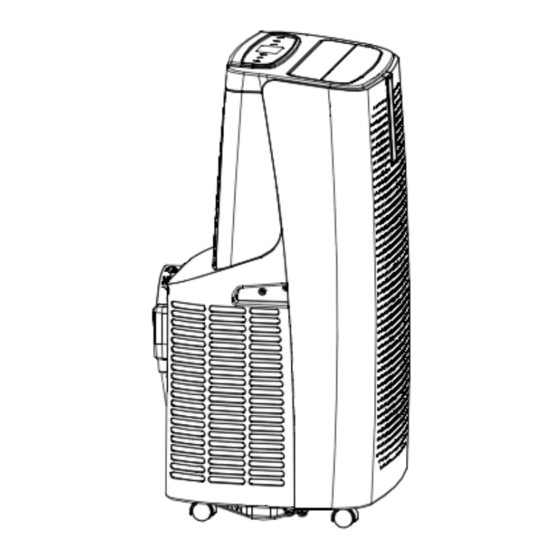
- Page 20 Display Deflettori Display frontale Pannello frontale Ruote Ingresso aria Sede per tubo flessibile Filtro a scomparsa Foro drenaggio 10. Spina elettrica 11. Cordone elettrico 12. Ingresso aria inferiore 13. Custodia spina cavo 14. Foro drenaggio continuo 15. Maniglia per trasporto 16.
- Page 22 DESCRIZIONE L’apparecchio è dotato dei seguenti elementi di controllo, di regolazione, e parti: Telecomando Le funzioni dell’apparecchio si azionano con la tastiera del pannello comandi, con l’APP e con il telecomando che deve essere puntato frontalmente (distanza max di circa 6m) in direzione del display, e prima ancora inserirvi le batterie (aprire lo sportello posteriore e inserire 2 batterie tipo “AAA”...
- Page 23 Tasto Temporizza il funzionamento o l’avvio dell’apparecchio: per (TIMER Timer aumentare e diminuire premere i rispettivi tasti “D” e “C” da 1 ora, sino a un massimo di 24 ore, se premuto nuovamente il tasto è annullato (sul display del telecomando non appare nessun numero). Temporizzare avvio: con l’apparecchio in stand-by, premere il tasto sino al tempo desiderato (1-24h) il tempo lampeggia per alcuni...
- Page 24 minimo la lunghezza del tubo, evitare curve troppo strette o pieghe del tubo flessibile. Non utilizzare tubi di prolunga o sostituirli con altri tubi diversi, in quanto ciò potrebbe causare un malfunzionamento. Lo scarico deve essere libero; altrimenti potrebbe causare surriscaldamento.
- Page 25 Modalità Freddo/caldo/deumidificazione/ventilazione: ad ogni pressione del tasto “Mode” si selezionano le modalità e si accende il Led corrispondente della funzione selezionata, nel cambio da una modalità all’altra, il ventilatore continua a funzionare, ma il compressore si ferma: il compressore riparte dopo 3 minuti circa. Questo ritardo di avviamento protegge il compressore da eventuali danni.
- Page 26 - Deumidificazione (DRY) Quando è impostata questa funzione sul pannello di controllo si accende la spia “Dry”; la velocità di ventilazione è fissa alla minima e non può essere regolata. L’apparecchio non raffredda l’ambiente quando è attiva la funzione deumidificazione. Quando si utilizza questa funzione si deve predisporre sempre il drenaggio continuo, per garantire la massima efficienza di deumidificazione.
-
Page 27: Pulizia E Manutenzione
• Se il drenaggio continuo è in uso, accertarsi che il tubo di evacuazione sia collegato al beccuccio, che l’estremità opposta sia ad un livello inferiore rispetto al beccuccio, e la pendenza sia costante in modo che l’acqua scorra internamente senza alcun ostacolo. •... - Page 28 Unità principale Pulire solo con un panno morbido leggermente imbevuto d’acqua. • Per periodi lunghi di inutilizzo, svuotare l’acqua nel serbatoio, avvolgere il cordone e posizionare la spina nella propria sede, stivare l’apparecchio in posizione verticale, al riparo da polvere e umidità, e nel rispetto delle precauzioni indicate al paragrafo avvertenze. Mantenere l’apparecchio sempre in posizione verticale.
-
Page 29: Risoluzione Dei Problemi
RISOLUZIONE DEI PROBLEMI GUASTO CAUSA SOLUZIONE L’apparecchio non si accende L’apparecchio non è acceso. Accendere l’apparecchio. La presa elettrica è difettosa. Rivolgersi ad una persona personalmente qualificata. La spina non è inserita nella Inserire la spina nella presa presa di corrente. elettrica. -
Page 30: General Warnings
This symbol tells you to read these instructions carefully before using the appliance, and to inform any third parties if necessary. Keep the instruction booklet for further reference throughout the lifetime of the appliance. If when reading these instructions you find any parts difficult to understand or have any doubts, contact the manufacturer at the address provided on the back page before using the product. - Page 31 in the presence of extremely volatile materials, which might foul the filters or damage the motor, or outdoors. • This is a radio appliance that intentionally emits and/or receives radio waves for radiocommunication and/or radiodetermination purposes. • Examples of household appliances are appliances for typical household functions, those used in the home, or those which may be used for typical household functions even by untrained persons:...
- Page 32 knowledge providing they are supervised or have been instructed on the safe use of the appliance and understand the hazards involved. Children must not play with the appliance. Cleaning and maintenance intended to be carried out by the user should not be done by children unless they are supervised.
- Page 33 • If the power cable is damaged, it must be replaced by the manufacturer or its technical support service, or by a person with similar qualifications, to prevent all risks. • Never leave the device exposed to the weather (sun, rain, etc.).
- Page 34 Please read these instructions carefully before using the appliance. R290 is a refrigerant gas that conforms to EU environmental directives. This appliance contains approximately 230g of R290 refrigerant gas. The appliance must be installed, used and stored in a place with a surface area greater than 12 m². 1.
- Page 35 Do not use means to accelerate the defrosting process or to clean, other than those recommended by the manufacturer. Do not use tools different from those recommended by the manufacturer when defrosting and cleaning the appliance. If the appliance is installed, used or stored in a non-ventilated area, the room must be designed to prevent the accumulation of refrigerant leaks with the consequent fire or explosion hazard due to the refrigerant combustion caused by electrical heaters, stoves...
-
Page 36: Information On Servicing
Disposal of equipment using flammable refrigerant. See national regulations. Storage of equipment/appliances. The storage of equipment should be in accordance with the manufacturer’s instructions. Storage of packed (unsold) equipment. Storage package protection should be constructed such that mechanical damage to the equipment inside the package will not cause a leak of the refrigerant charge. - Page 37 1.1.5 Checking for presence of refrigerant. The area shall be checked with an appropriate refrigerant detector prior to and during work, to ensure the technician is aware of potentially flammable atmospheres. ensure that the leak detection equipment being used is suitable for use with flammable refrigerants, i.e. non- sparking, adequately sealed or intrinsically safe.
- Page 38 released refrigerant and preferably expel it externally into the atmosphere. 1.1.9 Checks to the refrigeration equipment. Where electrical components are being changed, they shall be fit for the purpose and to the correct specification. At all times the manufacturer’s maintenance and service guidelines shall be followed. If in doubt consult the manufacturer’s technical department for assistance.
- Page 39 to the owner of the equipment so all parties are advised. initial safety checks shall include: that capacitors are discharged: this shall be done in a safe manner to avoid possibility of sparking; that there no live electrical components and wiring are exposed while charging, recovering or purging the system;...
- Page 40 in the presence of a flammable atmosphere. The test apparatus shall be at the correct rating. Replace components only with parts specified by the manufacturer. Other parts may result in the ignition of refrigerant in the atmosphere from a leak. Cabling.
- Page 41 is found which requires brazing, all of the refrigerant shall be recovered from the system, or isolated (by means of shut off valves) in a part of the system remote from the leak. Oxygen free nitrogen (ofn) shall then be purged through the system both before and during the brazing process.
- Page 42 vacuum pump is not close to any ignition sources and there is ventilation available. Charging Procedures. In addition to conventional charging procedures, the following requirements shall be followed. Ensure that contamination of different refrigerants does not occur when using charging equipment. Hoses or lines shall be as short as possible to minimise the amount of refrigerant contained in them.
- Page 43 -The recovery process is supervised at all times by a competent person; -Recovery equipment and cylinders conform to the appropriate standards. -Pump down refrigerant system, if possible. - If a vacuum is not possible, make a manifold so that refrigerant can be removed from various parts of the system.
- Page 44 1.1.20 Recovery.When removing refrigerant from a system, either for servicing or decommissioning, it is recommended good practice that all refrigerants are removed safely. When transferring refrigerant into cylinders, ensure that only appropriate refrigerant recovery cylinders are employed. Ensure that the correct number of cylinders for holding the total system charge is available.
-
Page 45: Installation
carried out prior to returning the compressor to the suppliers. Only electric heating to the compressor body shall be employed to accelerate this process. When oil is drained from a system, it shall be carried out safely. INSTALLATION • After removing the packaging, check that the appliance is intact; if in doubt, do not use it and contact a qualified professional. - Page 46 Make sure that the smartphone is connected to the wi-fi network to be used for the appliance. First Installation/Setup 1.1 Install the "BIMAR Live Smart" App via Google Play (Android) or AppStore (iOS), or scan the QR code provided here. For Android...
- Page 47 1.2 Once installed, the app icon appears. Click the “Bimar Live Smart” icon to run the app. 1.3 At the first access, register and fill in your credentials: click on "Create a new account", confirm "I agree" for the data relating to the Privacy Policy (by pressing: "...
- Page 49 If the above operations do not proceed correctly, the device must be reset by disconnecting the plug from the power socket and leaving the device disconnected for 30 seconds. Reconnect the plug to the appliance's power socket. Press the "FAN" button for about five seconds: a "beep"...
- Page 50 (update and/or change where permitted) the appliance's position or the outdoor wind speed, air pressure, humidity and temperature (see right). Press to buy directly on Bimar App. Press top right to customise the following: Change Device name, Device position, Check...
- Page 51 Display Louver Front display Front panel Wheels Air inlet Flexible pipe connection Concealed filter Drainage hole 10. Power plug 11. Power cable 12. Bottom air inlet 13. Cable plug socket 14. Continuous drainage hole 15. Transport handle 16. Air filter 17.
- Page 52 DESCRIPTION...
- Page 53 The appliance has the following control and adjustment devices and components: Remote control The appliance's functions are operated using the control panel keypad, the APP and the remote control, which must be pointed straight at the display from a distance of no more than 6 metres, fitting the batteries before use (open the hatch in the rear and fit two “AAA”...
- Page 54 Control Panel On/Off Turns on the appliance and puts on standby. (POWE Button Selects: cool/heat/dry/fan: only active if the appliance is already on. Mode (MODE button Decrease (DOW button Adjusts the room temperature (16-31)°C for the heat and cool programs, and sets the time; press button “D” to increase and button “C”...
- Page 55 Display Button: Only activated via the remote control: to change the unit of °C-°F measurement from Celsius (°C) to Fahrenheit (°F). Louver Only activated via the remote control and APP: to start or disable button movement of the louvers. Sleep Activated via the remote control and APP: it reduces the fan speed (if button med/hi speed is set);...
- Page 56 Fit the circular end of the extending pipe on the air outlet (7), and turn it anticlockwise (“LOCK”) until it locks (you will hear a “click”); reverse the procedure to remove the pipe. Extend the flexible pipe as much as necessary to reach the outside fitting (window or glass door).
- Page 57 Modes Heat/cold/dry/fan: each pressure of the “Mode” button selects the modes and the LED of the selected function illuminates. During the switch between modes, the fan keeps operating but the compressor stops and will restart after about 3 minutes. This delayed start protects the compressor from potential damage. The extending pipe must always be connected to the appliance, except when it is used in dry mode;...
- Page 58 temperature and speed; when it is switched back on, it will maintain the settings made earlier. - Dry When this function is set, the "Dry" light on the control panel illuminates; the fan speed is fixed at the minimum level and cannot be modified.
-
Page 59: Cleaning And Maintenance
• Do not leave the air-conditioner in operation for long periods with high humidity and open doors or windows. The humidity might condense, wetting or damaging furnishings. • For optimal air-conditioning and heating efficiency, doors and windows must always be closed. - Page 60 Main Unit Wash only with a soft cloth dampened with water. • For long periods out of use, drain the water from the tank, wind up the power cable and fit the plug in its seat, and stow the appliance vertical, protected from dust and damp, adopting the precautions detailed in the safety warnings section.
-
Page 61: Troubleshooting
Information for correct disposal of the product under the European Directive 2011/65/EU. At the end of its lifetime, the product must not be disposed of with ordinary urban waste. It can be consigned to the special waste recycling centres provided by local government, or by the retailers who provide this service. - Page 62 Technical Data/Informazioni tecniche: 2.400~2.4835GHz Bande di frequenza/Frequency bands: Massima potenza a radiofrequenza/Maximum radio-frequency: 17.5dbm...
- Page 63 La garanzia è disciplinata e interpretata in base alle leggi applicabili vigenti nel Paese in cui il prodotto viene acquistato. Per i dettagli, consultare il Servizio clienti del proprio paese o il sito internet di Bimar (www.bimaritaly.it).La Ditta costruttrice declina ogni responsabilità per eventuali danni a persone, animali domestici o cose, diretti o indiretti, conseguenti alla mancata osservanza di tutte le prescrizioni indicate nel libretto istruzioni dell’apparecchio concernenti specialmente le avvertenze, l’installazione, l’uso e la manutenzione dell’apparecchio.
- Page 64 Via G.Amendola, 16/18 25019 Sirmione (BS) – ITALY www.bimaritaly.it Servizio clienti: Assistenza.privati@bimaritaly.it CP120_I.B._2023_rev02...
Need help?
Do you have a question about the CP120 and is the answer not in the manual?
Questions and answers