Table of Contents
Advertisement
Quick Links
COLLATOR
Important Information
• This manual is designed to help you to install, operate and maintain the VAC-
1000 Collator. Please read, understand and keep this manual in a safe and
convenient place.
• Do not operate the VAC-1000 until you read and understand the instructions
in this manual.
• Horizon International Inc. shall not be liable for incidental consequential
damages resulting from: improper or inadequate maintenance by the
customer, unauthorized modification or misuse, or operation outside of the
environmental specifications for the product.
• Horizon International Inc. pursues a policy of continuing improvement in
design and performance of the product. Therefore, the product design and
specifications are subject to change without prior notice and without our
legal obligation.
• All rights are reserved. No part of this manual may be photocopied,
reproduced or translated to another language without the prior written
consent of Horizon International Inc.
160229/VAC1000/10E/RM,IDA/IDCS5.5/ICS5/PXI
VAC-1000
UM201120-10(000)
Advertisement
Chapters
Table of Contents

Related Manuals for Horizon Fitness VAC-1000


Summary of Contents for Horizon Fitness VAC-1000
- Page 1 VAC-1000 COLLATOR Important Information • This manual is designed to help you to install, operate and maintain the VAC- 1000 Collator. Please read, understand and keep this manual in a safe and convenient place. • Do not operate the VAC-1000 until you read and understand the instructions in this manual. • Horizon International Inc. shall not be liable for incidental consequential damages resulting from: improper or inadequate maintenance by the customer, unauthorized modification or misuse, or operation outside of the environmental specifications for the product. • Horizon International Inc. pursues a policy of continuing improvement in design and performance of the product. Therefore, the product design and specifications are subject to change without prior notice and without our legal obligation. • All rights are reserved. No part of this manual may be photocopied, reproduced or translated to another language without the prior written consent of Horizon International Inc. 160229/VAC1000/10E/RM,IDA/IDCS5.5/ICS5/PXI UM201120-10(000)
-
Page 2: Safety Precautions
Safety Precautions Safety precautions are indicated in this manual as follows: The term WARNING indicates a potentially hazardous situation which, if not avoided, could result in death or serious injury. The term CAUTION indicates a potentially hazardous situation which, if not avoided, may result in serious injury, or damage to the machine. This symbol indicates a note which includes important information. Follow the note to operate the machine safely. This symbol indicates a prohibited action. Do not perform any prohibited action. This symbol indicates an essential procedure. Follow the procedure to operate the machine safely. This will help you to avoid an incorrect operation which may cause problems with the machine, or make it necessary to go back to a previous step. This explains functional limitations and restrictions on the operation of the machine. This indicates a helpful hint. This indicates additional information which will help you to operate the machine efficiently. - Horizon International Inc. cannot anticipate every possible situation that might involve a potential hazard. Therefore, the instructions in this manual and warning labels on the machine are not all- inclusive. - All equipment shall be locked out or tagged out to protect against accidental or inadvertent operation when such operation could cause injury to personnel. Do not attempt to operate any switch, valve, or other energy isolating device when it has been locked or tagged out. - Do not operate the machine when any covers are removed. - Some of the drawings in this manual show the machine uncovered to help in explaining the details inside the machine. VAC-1000... -
Page 3: Basic Safety Precautions
Basic Safety Precautions WARNINGS for Operation Work alone when you operate the machine. Letting someone else operate the machine could cause it to start suddenly without warning, causing severe personal injury. Keep your hands and fingers away from any moving parts while the machine is running. Otherwise, moving parts can cause severe personal injury. Do not remove or bypass any safety features. Moving parts can cause severe personal injury. CAUTIONS for Operation If you turn off the Power switch, wait about ten seconds before turning it on again. Otherwise, a circuit board may be damaged. If a jam occurs, remove all the jammed sheets before you start the operation again. Otherwise the machine may be damaged. Do not use the machine for any improper purpose. Otherwise, the performance of the machine cannot be guaranteed. Remove the sheet guides from the bins which will not be loaded with sheets. Otherwise, the machine may be damaged when the bins are raised. WARNINGS for Maintenance Keep your hands away from the feed mechanisms. These parts can cause severe personal injury. Disconnect the power cable before you open any covers. Otherwise, an electric shock can cause severe personal injury. Turn off the Power switch before beginning any maintenance operation. Otherwise, the machine may start suddenly, causing severe personal injury. Turn off the Power switch before resetting the circuit breakers. Otherwise, the machine may start suddenly, causing severe personal injury. Work carefully when your hands are inside the machine, and keep them away from any moving parts. VAC-1000... - Page 4 CAUTIONS for Maintenance Press the Stop button before setting up the delivery section. Do not use thinner or benzine. This may damage the rollers or plastic parts. Do not use rubber cleaner on the rollers. This may cause the rollers to swell and wear more quickly. WARNINGS for Installation Turn off the Power switch or circuit breaker in the factory before connecting the power cable to the machine. High voltage electricity can cause severe personal injury. If the machine's power cable will be connected directly to a circuit breaker on the power distribution board in the building, ask a qualified contractor to do the job. Do not connect the power cable before being instructed to do this. High voltage electricity can cause severe personal injury. CAUTIONS for Installation Do not cover the air holes in the blower box. Do not attach a sheet guide into the bin that is not loaded with sheets. Otherwise, it will cause damage on the machine when the bin moves up. Be sure to install all cables and hoses in areas where they will not catch your feet. Be sure to install the mounting feet and use the leveling bolts to level the machine. Otherwise, the machine can be moved by vibration. The collating quality may deteriorate, or the machine may be damaged. The VAC-1000 weighs 320 kg (706 lb). Transport and install the machine safely, and keep the weight of the machine in mind. Install the machine in a place which can support its weight. Install the machine correctly, and refer to the installation manual or installation instructions in the operation manual before starting the machine. Otherwise, the performance of the machine cannot be guaranteed. VAC-1000...
- Page 5 This page is intentionally left blank.
-
Page 6: Warning Label Locations And Meanings
Warning Label Locations and Meanings (Rear) Only for 230 V HIGH LEAKAGE CURRENT Only for c-tower Earth connection essential before connecting supply VAC-1000... - Page 7 There are electric parts inside. Take care when opening the cover. Otherwise, an electric shock can caure severe personal injury. HIGH LEAKAGE CURRENT Earth connection essential Attach the ground wire. (See page 96 for details.) before connecting supply Keep your hands and fingers away from the rotating rollers. Otherwise, the moving rollers can caure severe personal injury. VAC-1000...
-
Page 8: Table Of Contents
Contents Important Information ........................I Safety Precautions ........................II Basic Safety Precautions......................III Warning Label Locations and Meanings .................VI 1. Before You Begin 1-1 Specifications ....................2 1-1-1 VAC-1000 Series Specifications ................2 1-1-2 Receiving Tray Specifications ................4 1-2 Machine Descriptions ..................5 1-2-1 Overview ........................5 1-2-2 Feed Section ......................6 1-2-3 Screen Descriptions ....................7 [1] Collating - Operation Screen ................7 [2] Collating - Operation Setting Screen ..............9 [3] 6-page Fold Setting Screen ................12 [4] Tower Setting Screen ..................13 [5] Bin Setting Screen ..................... - Page 9 4-3 Replacing the Double Feed Stop Pads ............85 4-4 Cleaning the Feed Error Sensor ..............86 4-5 Lubricating the ST-20 Option Stacker ............87 4-6 Adjusting the Sensitivity of the Feed Error Sensor ........88 4-7 Replacing the Battery for the Remote Controller ........89 5. Installation 5-1 Installation ....................92 VAC-1000...
- Page 10 5-5-2 Installing the ST-20/ST-20R ................100 5-6 Setting the Remote Controller ..............102 5-7 Attaching the CTK-100 a-tower Right Side Unit (Option) .......104 5-7-1 Accessories ......................104 5-7-2 CTK-100 Attaching Procedures .................106 5-8 Attaching the HMU-100 Hand Marry Unit (Option) ........114 5-8-1 Accessories ......................114 5-8-2 Installing the HMU-100 ..................115 5-8-3 Connecting the Cables ..................118 VAC-1000...
-
Page 11: Before You Begin
1. Before You Begin 1. Before You Begin 1-1 Specifications .................. 2 1-2 Machine Descriptions..............5 1-3 Accessories ..................29 1-4 Consumables and Optional Parts ........... 32 VAC-1000... -
Page 12: Specifications
1. Before You Begin 1-1 Specifications 1-1-1 VAC-1000 Series Specifications Model VAC-1000 VAC-2000 VAC-3000 VAC-4000 VAC-5000 VAC-6000 Module Configuration VAC-1000a, VAC-1000m, VAC-1000c Number of Bins 10 bins 20 bins 30 bins 40 bins 50 bins 60 bins Size of Sheet Max. - Page 13 1. Before You Begin 1-1 Specifications Model VAC-1000 VAC-2000 VAC-3000 VAC-4000 VAC-5000 VAC-6000 Rated Current VAC-1000a/c/m: Single Phase 200 / 220 V, 50 / 60 Hz, 11.9 A Single Phase 230 / 240 V, 50 / 60 Hz, 11.9 A Leak Current VAC-1000a/c/m: Single Phase 200 to 240 V, 50 / 60 Hz, 3.8 mA...
-
Page 14: Receiving Tray Specifications
645 mm x 560 mm x 480 mm 590 mm x 575 mm x 730 mm (Width x Depth x Height) (25.4” x 22.1” x 18.9”) (23.3” x 22.7” x 28.8”) The machine design and specifications are subject to change without prior notice. VAC-1000... -
Page 15: Machine Descriptions
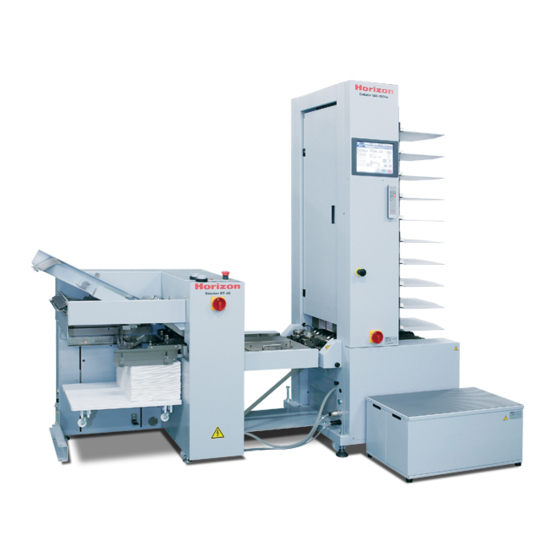
Belts are mounted behind this Sheets can be delivered to the right by door. These belts transport setting on this panel. Feed errors and the sheets from the bins to the other problems are also indicated on delivery section. This door can be this panel. opened or removed. Sheets are loaded into these bins. Stop Button Power Switch Hand Marry Unit (Option) Receiving Tray Unit This unit is used to insert a sheet Receiving tray or stitcher & folder on or under the collated sheets (option) can be connected. in VAC-1000. This unit can be attached to a-tower or m-tower. Delivery Section Sheets are transported from this section Receiving Tray Unit (Option) to the receiving tray. Receiving tray can be connected. Stool This stool is used to load sheets on the upper bins. The Blower is mounted inside. VAC-1000... -
Page 16: Feed Section
Separation Air Adjusting lever (Blue) This lever is used to adjust the separation air for the bin. Separation Air Adjusting Knob This knob is used to adjust the separation air for the tower. Front Plate Load the sheets into these bins. This plate is the left register when sheets are loaded on bin. Double Feed Stop Pad Adjusting Lever This lever adjusts the height of the double feed stop pads. Raise this lever to lower the pads. Lower this lever to raise the pads. Separator Nose Knob This knob is used to extend the Double Feed Stop Pads separator nose. These pads prevent double feeding. Separator Nose This separates sheets to prevent double-feeding. VAC-1000... -
Page 17: Screen Descriptions
Press and hold this button to run rollers screen, current number of tabs inserted and the and belts at the transport section and the preset number are indicated here. delivery section. Release this button to Double Cycle Preset Counter stop the rollers and belts. The machine does not collate the sheets. Use this button When the double cycle program has been to remove the jam. turned on and a double cycle preset number has been entered on the Collating - Operation Setting screen, current number of collated sets Feed Error Reject Function On/Off Button and the preset number are indicated here. This button is used to turn on and off the function to deliver the error sets to the feed-error tray. Dual Cover Feed Preset Counter (This button appears when the ST-40, ST-60, When the dual cover feed program has HOF-30 or BC-20 is connected to the VAC-1000.) been turned on and a dual cover feed preset number has been entered on the Collating - Operation Setting screen, current number of collated sets and the preset number are indicated here. VAC-1000... - Page 18 Little Overlap (Normal) Middle Overlap Large Overlap Porous Sheet Feed Setting If double feeding occurs while the machine is feeding porous sheets, turn on this button. Each sheet is gripped by Program Indication the vacuum just before feeding to prevent double feeding. These icons indicate the settings done in the Collating - Operation Setting screen. All three icons are shown here for an example, but the machine Stop does not practically run the dual cover feed program and the tab While the machine is running, press this insert program together. button to stop collating. Press this button three times to stop the machine completely Overlap and lower the bins. See the table below The amount of overlap of the sheets in that indicates the state of machine when the delivery can be adjusted in four steps. the Stop button is pressed. Press the triangle buttons below. Start Press this button to start the collating operation. But the collating operation cannot be started unless the sheet calibration has already been done. Stop Button Pressing Times Collating Motor and Blower Down VAC-1000...
-
Page 19: Collating - Operation Setting Screen
Double Cycle Turn on the Double Cycle button This button is used to and enter a number for collating turn on or off the double sets. When the entered number cycle program. of collating sets has been made, the machine automatically switches the collating section over to the second section. Dual Cover Feed Preset Dual Cover Feed Turn on the Dual Cover Feed button This button is used to and enter a number for collating turn on or off the dual sets. When the entered number of cover feed program. collating sets has been made, the Double Cycle Section machine automatically switches the This button is used to select cover bin over to the second bin. the section to start collating for Bin Select Button the double cycle program. This button is used to select the bin to start collating cover sheet for the dual cover feed program. VAC-1000... - Page 20 1. Before You Begin 1-2 Machine Descriptions [2] Collating - Operation Setting (Continued) Double Cycle: The VAC-1000 system is divided into two sections. When any bin in one section empties, the collator switches over to the second section and continues collating. 1 Tower 3 Towers 5 Towers 2 Towers 4 Towers 6 Towers Dual Cover Feed: Normally, the cover sheets are Tab Insert: Up to two tab sheets can be inserted thicker than the inside sheets, so between the collated sets. You can set the bin holding the cover sheets the number of collated sets. empties earlier than the other bins. Tab Sheets Use two bins for the cover sheets Collated Set and when one bin empties, the Collated Set collator automatically switches over to the other bin. Collated Set Cover Sheets Collated Set Inside Sheets Tab Sheets NOTE • Double cycle and dual cover feed can be operated together. The cover sheets for the second section should be set on the first two bins in the second section. • Double cycle and tab insert can be operated together. The tab sheets for the second section should be set on the first bin or first two bins in the second section. VAC-1000...
- Page 21 1. Before You Begin 1-2 Machine Descriptions [2] Collating - Operation Setting (Continued) Block Feed On/Off This button is used to turn on/off the block feed program. Block feed is used to divide each book block into several parts. This program can be used only when StitchLiner is connected. When the number of sheets for one book is too many and the sheets cannot be folded sharply, use this program. (See page 63 for details.) 6-page Fold Setting Block Pattern Setting Press this button to open the 6-page Fold Setting screen. Press this button to select the block pattern. 6-page Folding Block Number Indication Turn on this button to feed the 6-page The number of blocks is fold signatures. This button will be automatically calculated shown when the 6-page folding unit depending on the selected (option) is installed to the StitchLiner. pattern and indicated here. VAC-1000...
-
Page 22: 6-Page Fold Setting Screen
1. Before You Begin 1-2 Machine Descriptions [3] 6-page Fold Setting Screen 6-page Fold Cover Sheet Turn on this button to feed the 6-page fold signatures as cover sheet. 6-page Fold Last Sheet Turn on this button to feed the 6-page fold signature as the last sheet. Block Number Indication The number of blocks is automatically calculated depending on the selected pattern and indicated here. Press this button to go to the Collating - Operation screen. 6-page Signature Block Layout Block layout is created depending on the bin to load the 6-page fold signature and selected block pattern. Touch the screen and select the block. VAC-1000... -
Page 23: Tower Setting Screen
1. Before You Begin 1-2 Machine Descriptions [4] Tower Setting Screen Finisher Tower Indication This button is used to select the Working towers (collators) are highlighted. finisher connected. When CCR-DX is used, icon must be selected. For the other devices, select Delivery Direction This button is used to select the delivery direction. The c-tower must be connected in order to deliver to the right. Tower Power Sheet Vacuum Time The tower that is not used must be turned off. The time to vacuum the sheet can be adjusted in three steps. If there are double feed frequently, reduce this time. VAC-1000... -
Page 24: Bin Setting Screen
1. Before You Begin 1-2 Machine Descriptions [5] Bin Setting Screen Sheet Calibration Press this button for each tower to calibrate the sheets for that tower. (Collate the sheets to store the sheet thickness and printed condition.) All Towers Calibration Press this button to calibrate the sheets for all towers. (Collate the sheets to store the sheet thickness and printed condition.) Page This button is used to see the other towers when four or more towers are connected. VAC-1000... - Page 25 Bin Power Sheets are fed from any bins that are Double Feed Sensor Sensitivity turned on. Each bin that has been loaded This adjusts the sensitivity of the with sheets turns on automatically after double feed sensor. Sensitivity the sheet calibration. If you do not want to can be adjusted in four steps. If feed the sheets on a bin, turn it off. a higher setting is selected, the sensor will be more sensitive to double-feeding. However, this may Light Brightness also make it more likely to falsely This adjusts the light brightness of the double detect double-feeding. feed sensor. The light brightness can be adjusted in High two steps. Middle: Normal : Normal Low Select this if misfeeding is detected when Detect Off: The sensor calibrating thin sheets. detects misfeeding and Select this if the sensor will be looking at a jam only. dark image on the sheets, or the sensor falsely detects double feeding while the machine is calibrating sheets. VAC-1000...
-
Page 26: Memory Screen
1. Before You Begin 1-2 Machine Descriptions [6] Memory Screen Job No. Button Select the job number from 1 through 9 to read or write the setting information. Write Button Current Setting Select the job number and Press this button to indicate the press this button to store the current setting of the collator. current setting information for that number. Recall Button Setting Information Select the job number and press this The setting information is indicated when button to recall the stored setting the Current Setting button or the Job No. information. button is pressed. VAC-1000... -
Page 27: Preset Input Screen
1. Before You Begin 1-2 Machine Descriptions [7] Preset Input Screen The Preset Input screen is shown when you press one of the following buttons: the Preset Stop on the Collating - Operation screen, the Preset Tab Insert, the Tab Insert Stop, the Double Cycle Preset, or the Dual Cover Feed Preset on the Collating - Operation Setting screen. Up Key This key is used to increase the value. Down Key This key is used to decrease the value. Numeric Keys Press these keys to enter a value. Enter Key This key is used to enter the value. The screen will return to the original screen. Clear Key The key is used to clear the value. VAC-1000... -
Page 28: Information Screen
When the machine is in power saving mode, the When this button is pressed, the Numeric touch panel turns dark. Press Keypad screen appears so a technician the touch panel to cancel the can enter a password. This screen should power saving mode. be used only by a the service technician. Remote Controller Setting Single Operation Error History If two or more a-towers are running in a Press this button to open the Press this button to display same filed, enter the remote controller Information- Single Operation the Information - Error History number (a value from 0 through 15 that Screen. Machine parts can be screen. You can see the history is set using a DIP switch on the board) run separately. (See page 19 of errors. See page 20 for and avoid interference. See Page 96 for details.) details. for details. Input Monitor Press this button to open the Information- Input Monitor Screen. You can check the light brightness of the double feed sensor. (See page 20 for details.) VAC-1000... -
Page 29: Information - Single Operation Screen
1. Before You Begin 1-2 Machine Descriptions [9] Information - Single Operation Screen Mechanisms of the machine can be operated separately. The selected mechanism on all of the towers will run. Use this screen to check the motion of one mechanism. The buttons on the remote controller run the mechanism separately while this screen is displayed. Bin Down Button Bin Up Button Delivery Direction Blower On/Off Motor On/Off Go back to the Information - Main screen. If you press this button while the motor of blower is running, it is turned off. VAC-1000... -
Page 30: Information - Error History Screen
This screen displays a list of previous errors. Check the condition of the machine using this screen. Date This indicates the date when the error occurred. Time This indicates the time when the error occurred. Error Code This indicates the identifying code for the error. Go to another page Eight errors are indicated on one page, and a total of 24 errors can be checked on three pages. Go back to the Information - Main screen. [11] Information - Input Monitor Screen This screen displays the light brightness of the double feed sensor on each bin on the tower. Light Brightness of Double Feed Sensor You can check this value to adjust the light brightness of double feed sensor. Sheet Detection If the sheet on the bin is detected, is displayed. If the sheet on the bin is not detected, is displayed. VAC-1000... -
Page 31: Remote Controller
1. Before You Begin 1-2 Machine Descriptions 1-2-4 Remote Controller Speed Button These buttons are used to adjust the collating speed. The speed can be adjusted also while the machine is running. This button has the same function as the Collating Speed buttons in the Collating - Operation Setting screen. When the SPF-30S (StitchLiner) is connected, the speed cannot be changed using these buttons. Stop Button This button is used to stop the collating operation. This button has the same function as the Stop button in the Collating - Operation screen. While the Error screen is displayed, press this button to go back to the Collating -Operation screen. This function is the same as the OK button in the Error screen. Start Button Press this button to start the collating operation. But the collating operation cannot be started unless the sheet calibration has already been done. This button has the same function as the Start button in the Collating - Operation screen. Jog Button This button is used to jog rollers and belts in the transport section and the delivery section. Press this button again to stop jogging. The machine does not collate sheets. VAC-1000... -
Page 32: Receiving Tray (Ccr-Dx)
This knob is used to adjust the delivery air. Connecting Cable This cable must be connected to Stopper the connector of collator. This stopper must be set to match the size Operation Panel of sheet. Tray Locking Knob This knob is used to lock the tray. Operation Panel Full Tray Detection Switch Off-set Timing Knob This switch is used to turn on/off the This knob is used to adjust the side guide full tray detection. delay after sheets have been delivered to the CCR-DX. Off-set On/Off Switch Single Motion Button This switch is used to turn Tray rotation can be actuated with the off-set function on or this button. off . VAC-1000... -
Page 33: Stacker (St-20)
Collated sets are stacked on this tray. Stopper Delivered collated-sets stop at this Operation Panel stopper. Tray Up Button This button is used to raise the tray. Off-set Timing Knob This knob is used to adjust the side Tray Down Button guide delay after sheets have been This button is used to lower the tray. delivered to the ST-20. Tray can be lowered only while this button is being pressed. Off-set On/Off Switch Tray Lower Time Knob This switch is used to turn on/ This knob is used to adjust the off the off-set. time for lowering the tray for every cycle. Single Motion Button Movable side guide can be actuated with this button. VAC-1000... -
Page 34: Stacker (St-20R)
Collated sets are stacked on Off-set Guide this tray. This guide is for off-set receiving. Operation Panel Tray Up Button This button is used to raise the tray. Off-set Timing Knob This knob is used to adjust the side Tray Down Button guide delay after sheets have been This button is used to lower the tray. delivered to the ST-20R. Tray can be lowered only while this button is being pressed. Off-set On/Off Switch Tray Lower Time Knob This switch is used to turn on/ This knob is used to adjust the off the off-set. time for lowering the tray for every single cycle. Single Motion Button Movable side guide can be actuated with this button. VAC-1000... -
Page 35: Stacker (St-40)
Feed Error Reject Function On/Off Button Lamp on: Stitch the collated sets at the stitcher. Lamp off: Stack the collated sets at the ST-40. This button is used to turn on/off the function of delivering error sets to the feed error tray. VAC-1000... -
Page 36: Stacker (St-60)
Operation Panel A Off-set Guide A This guide is for off-set receiving. Power Switch Side Guide A Adjusting Knob Stopper A This knob is used to adjust side Delivered collated sets guide A to match the size of stop at this stopper. sheet. This knob can be locked using the knob on top. Stack Tray A Stopper A Adjusting Knob Collated sets are This knob is used to adjust stopper A to accumulated on this tray. match the size of sheet. This knob can be locked using the knob on top. Side Guide A This guide moves up and down for every cycle of off-set receiving. VAC-1000... - Page 37 Lamp off: W hen a feed error occurs at the collator, the collated sets are routed to the collator stops. Error set will be delivered to other stack tray. the stack tray. Operation Panel B Stack Tray Up Button Press this button to raise the tray. Off-set Single Motion Button The movable side guide can be actuated with this button. Stack Tray Down Button Press and hold this button to lower the stack tray. Delivery Air On/Off Button Stack Tray B Height Select Button This button is used to turn on/off the delivery air Lamp On: Max. 580 mm (about 700 sheets of 64 gsm) for side B (left side). Lamp off: Max. 360 mm (about 430 sheets of 64 gsm) Lamp on: Delivery air is on Lamp off: Delivery air is off VAC-1000...
-
Page 38: Hand Marry Unit (Hmu-100)
1. Before You Begin 1-2 Machine Descriptions 1-2-10 Hand Marry Unit (HMU-100) Sheet Detection Sensor When this sensor detects a sheet, collating operation starts. Sheet Registration Guide Sheets to marry are registered with this guide. Sub-table Hand Marry Table Sheets to marry are placed on this table. Sheet Guide Set this guide to match the sheet width. Insert Mode Selecting Switch Turn this switch to select on or under the collated sheets from VAC-1000 to insert a sheet or turn off the insert mode. VAC-1000... -
Page 39: Accessories
1. Before You Begin 1-3 Accessories User’s Manual a: 1pc, c: 1 pc Parts Book a: 1pc, c: 1 pc Upper Docking Plate m: 1pc, c: 1 pc Detector a: 1pc Double Feed Stop Pad Assemblies (Purple) Lower Docking Plate m: 1 pc, c: 1 pc a: 10 pcs, m: 10 pcs, c: 10 pcs Double Feed Stop Pad Assemblies for Thin Sheets Double Feed Stop Pad Assemblies (Green) (Pink) a: 10 pcs, m: 10 pcs, c: 10 pcs a: 10pcs, m: 10 pcs c: 10 pcs Attached to the machine. Sheet Guide a: 20 pcs, m: 20 pcs, c: 20 pcs Hose Clamps a: 3 pcs, m: 3 pcs, c: 3 pcs VAC-1000... - Page 40 1 pc each 5 mm 4 mm 3 mm 2.5 mm 2 mm Open-end Wrenches: 1 pc each 19×24 mm 13×17 mm 8×10 mm Cleaning Brush a: 1 pc Blower Box a: 1 pc, m: 1 pc, c: 1 pc VAC-1000...
- Page 41 1. Before You Begin 1-3 Accessories Sheet Hold Plates a: 5 pcs Grease a: 1pc Mounting Feet a: 3 pcs m: 3 pcs c: 3 pcs Remote Controller a: 1pc Two AAA Batteries Fuses (For replacement) a:4 pcs m:4 pcs Cable (Red) Between Towers 1 pc This cable is supplied with the m-tower and c-tower, not the a-tower. 2 A×1 5 A×3 Attached inside the panel cover VAC-1000...
-
Page 42: Consumables And Optional Parts
1. Before You Begin 1-4 Consumables and Optional Parts 1-4-1 Consumables Grease Double Feed Stop Pad Assemblies: Purple Parts book : Fig.32 - Index 3 Parts book : Fig.32 - Index 1 Double Feed Stop Pad Assemblies for Thin Double Feed Stop Pad Assemblies: Green Sheets: Pink Parts book : Fig.32 - Index 2 Parts book : Fig.32 - Index 4 1-4-2 Options Right Side Delivery Kit for Support Guide Sheet Raise Spacer a-tower (CTK-100) Sheet Guide Hand Marry Unit (HMU-100) VAC-1000... -
Page 43: Operating Procedures
2. Operating Procedures 2. Operating Procedures 2-1 Power On ..................34 2-2 Preparation for Operation ............... 35 2-3 Collating Operation ................. 52 2-4 If the Error Screen Is Displayed ............55 2-5 Collating Programs ................. 57 2-6 Job Memory ..................66 2-7 Right Side Delivery ................. 67 2-8 Hand Marry ..................68 2-9 Warming Up ..................70 VAC-1000... -
Page 44: Power On
2. Operating Procedures 2-1 Power On NOTE • When two or more towers are used, turn on power from the right tower. Turn on the Power switch. NOTE Power Switch • When turning off the power for two or more ▼ Initial Screen towers connected, turn off the Power switch for a-tower. Other towers will also be powered off. • The Initial screen as shown at right is displayed. 16 to 30 seconds later, the Collating - Operation screen is displayed. ▼ Collating - Operation Screen ▼ Information Screen NOTE • When you press the Warm Up button on the Information screen, the collator starts warming up and the screen indicates the warm up mode. Warming up completes automatically in five minutes. If you want to stop warming up in the way, Press the Stop button on the remote controller. Warm Up VAC-1000... -
Page 45: Preparation For Operation
2. Operating Procedures 2-2 Preparation for Operation 2-2-1 Setting the Tower Setting Screen ▼ Tower Setting Screen . Select the Tower Setting Screen Turn on the power for the tower to run. Turn off the power for the tower you do not use. . When c-tower is connected, select the delivery direction to the right or to the left. Delivery Direction Power for Tower NOTE • When c-tower is not connected, sheets are delivered only to the left side. • If you want to deliver the sheet to the right, see Section 2-7 Right Side Delivery. VAC-1000... -
Page 46: Loading The Sheets
2-2 Preparation for Operation 2-2-2 Loading the Sheets Load the sheets into the bins. ▼ Collating - Operation Screen Select the Collating - Operation screen. When bins have been raised, press the Stop button on the screen or the remote controller to lower the bins. Stop Stop Button Place sheets against the side guide and the front plate. Front Plate NOTE • When you have selected left side delivery, load Side Guide Sheets sheets with the front up from the top bin in the page order. When you have selected right side delivery, load sheets with the front down from The Page Order of Sheets The Page Order of Sheets the bottom bin in the page order. • When collecting a few pages, it is more efficient to load the sheets into the bottom bins. • If two or more towers are being used, it is more efficient to load the sheets equally into each of the towers. For example, it is more efficient to load seven pages of sheets into both the first and second towers than to load ten pages of Left Side Delivery Right Side Delivery sheets into the first tower and four pages of sheets into the second tower. VAC-1000... - Page 47 2. Operating Procedures 2-2 Preparation for Operation NOTE • Fan the sheets well. Otherwise double feeding may occur. If the sheets are bent, straighten them before loading into the bins. • When you collate 4-page signatures, press firmly the folded sheet edge. Otherwise misfeeding or jam may occur or you may not load many sheets. Load sheets so the folded edges touch the front plate. • If you want to collate small size sheet, use the optional support guide. 120 mm to 148 mm (4.8” through 5.8”) width can be collated. Support Guide Set the sheet guides at the front and right of sheets respectively. Sheet Guides NOTE • For accordion-folded sheets or NCR papers, set sheet hold plate on the right sheet guide . Sheet Hold Plate Sheet Hold Plate Sheet Guide Setting for Accordion-folded Sheets VAC-1000...
-
Page 48: Small Size Sheet Setting
2. Operating Procedures 2-2 Preparation for Operation 2-2-3 Small Size Sheet Setting For small size sheets whose width is 120 to 148 mm (4.8" to 5.8"), use the support guide (option). Support Guide Set the support guide on the bin where small size sheets will be loaded. Sheet Support Guide Raise the feed height sensor and move it to the front. Feed Height Sensor VAC-1000... -
Page 49: Adjusting Suction Air
2. Operating Procedures 2-2 Preparation for Operation Place sheets against the support guide and the front guide. Front Guide Sheets Support Guide Set the sheet guides at the front and right of sheets respectively. Sheet Guides 2-2-4 Adjusting Suction Air Adjust the suction air for all bins. Reduce Increase Normally, set the knob in this range. Turn the suction air adjusting knob to adjust Suction Air the air. Adjusting Knob - T urn the knob clockwise to increase the air, turn the knob counterclockwise to reduce the air. VAC-1000... -
Page 50: Adjusting The Feed Height
Feed Height Adjusting lever (White) Adjust feed height adjusting lever (white). NOTE • Normally, set the lever at the middle (lever becomes level). • When the lever is raised, the feeding position is raised. When the lever is lowered, the feeding position is lowered. Do the test collating. Raise the lever if misfeeding occurs because the sheets are thick. Lower the lever if double feeding occurs because the sheets are thin. When double feeding occurs at all bins, reduce the suction air using the suction air adjusting knob. Feeding Side Separation Air Adjusting Lever (Blue) 2-2-6 Adjusting the Separation Air Separation Air Nozzles Adjust the separation air. Turn the separation air adjusting knob to adjust the amount of separation air for the tower. - Turn the knob clockwise to increase the separation air. Turn the knob counterclockwise to reduce the separation air. Turn the separation air adjusting lever (blue) to adjust the air for the bin. Weak Strong - Raise the lever to increase the separation Normally, set the knob air. Lower the lever to reduce the separation in this range. air. Turn the levers at all bins to adjust the air properly for the sheet range. Separation Air Adjusting Knob VAC-1000... -
Page 51: Adjusting The Height Of Double Feed Stop Pad
• Double feed stop pads prevent double feeding. Double Feed Stop Pads Turn up and down the double feed stop pad adjusting lever to adjust the height of the double feed stop pad. NOTE • Normally, set the double feed stop pad adjusting lever at the lowest position. • Do the test collating. If misfeeding occurs, raise the lever to lower the double feed stop pad. Double Feed Stop Pads Adjusting Lever For the green double feed stop pad, adjust the attaching height of adjusting plate. NOTE • The height of adjusting plate can be changed at three positions. Normally, set the plate in the middle position. • Adjust the height of the adjusting plate and the double Adjusting Plate feed stop pad for higher feeding accuracy. If double feeding occurs, raise their heights. If misfeeding occurs, lower their heights. 2-2-8 Adjusting the Separate Nose Separate Nose Knob When double feeding occurs because of thin sheets, use separate nose. Move separate nose to the left and push out separate nose. NOTE • Use separate nose only for thin sheets that causes double feeding. Separate Nose VAC-1000... -
Page 52: Setting The Delivery Section
2. Operating Procedures 2-2 Preparation for Operation 2-2-9 Setting the Delivery Section WARNING • Press the Stop button before setting the delivery section. Otherwise, sudden start of the machine may cause severe personal injury. [1] Setting the Bulging Nose and Delivery Roller Adjust the position of delivery rollers and attach the bulging nose so that sheets are delivered smoothly and arranged well. Slide and position the delivery rollers evenly for the size of sheet. - Raise the end of roller to slide. NOTE • Sheets are delivered 20 mm (0.8”) distance from the rear. 20 mm (0.8”) Sheet Attach the bulging nose so that it is positioned in the center of sheet to deliver. Delivery Roller Press to lock. Press to remove. Bulging Nose VAC-1000... -
Page 53: Setting The Weight
Adjust the position of the weights properly for the thickness of sheet. - Turn the weight counterclockwise to move. Weight - Normally, position the weight in the center. NOTE • When sheets are skew when they are going through the delivery section, change the position of weight. • When sheets are skew in direction (1), move the weights to direction A. • When sheets are skew in direction (2), move the Middle weights to the opposite of direction A. Down • The pressure of delivery roller becomes lighter when the weights move upward. Move the weight upward for thin sheets. Weight Position For thick sheets, as long as they are delivered Up : For thin sheets smoothly, you do not have to move the weight Middle : F or normal sheets downward. (59 gsm) Down : For thick sheets VAC-1000... -
Page 54: Adjusting The Delivery Air
2. Operating Procedures 2-2 Preparation for Operation [3] Adjusting the Delivery Air Release the Stop button. Stop Button ▼ Collating - Operation Screen Turn on the Delivery Air On/Off button on the Collating - Operation screen. Delivery Air On Turn the delivery air adjusting knob to adjust the air. Air Nozzles Delivery Air Adjusting Knob Max. NOTE • For the thin sheets or the sheets which are difficult to be transported, use the delivery air. • Turn the delivery air adjusting knob within the range of the arrow mark shown at right. VAC-1000... -
Page 55: Setting The Receiving Tray Unit
2. Operating Procedures 2-2 Preparation for Operation 2-2-10 Setting the Receiving Tray Unit [1] Setting the CCR-DX Attach small tray or large tray to the shaft. Small Tray: A5 through A4 Large Tray: B4 through A3 Shaft NOTE • Two shafts project from the tray. Insert them properly. Hoes for Inserting the Shafts • The direction of sheet to set on the bin of the collator changes depending on the tray. Small Tray Large Tray ( indicates the feeding direction) VAC-1000... - Page 56 2. Operating Procedures 2-2 Preparation for Operation Plug the cable of full tray sensor into the main Full Tray connector. Sensor Cable Place two sheets as shown in dotted lines and adjust the stoppers and the off-set bar to match the size of sheet. Follow the number of order. - Loosen the locking knobs for the stoppers and the off-set bar to move them. (Small Tray) Off-set Bar Sheet Registers NOTE • Provide 5 to 10 mm (0.2" to 0.4") between the sheet edge and stoppers, and between the sheet edge and the off-set bar. Stopper Stopper (Large Tray) Sheet Register Off-set Bar Stopper Stopper Locking Knob VAC-1000...
- Page 57 2. Operating Procedures 2-2 Preparation for Operation CAUTION • Set the receiving tray so that it Stopper does not hit the delivery section of the collator when it rotates by 90 degrees. Adjust the tray position. - Move the tray close to the collator. Position the Collator tray where stopper does not touch the delivery section of the collator when the stopper rotates, and tighten the lock knob for tray. Locking Knob for Tray NOTE • Press the Single Motion button to turn the tray and check the distance between the tray and the collator. Set the operation mode. - When off-set receiving is required, turn on the Off-set On/Off switch. - Set the off-set timing knob to the required position. - When you use the small tray, full tray detection is Off-set On/Off Switch available. Turn on the Full Tray Detection switch. Full Tray Detection Off-set Timing Knob On/Off Switch VAC-1000...
-
Page 58: Setting The St-20/St-20R
(Collator) edge and the side guide. • For the size B4 or larger sheet, attach the guide 5 mm (0.2") Stopper Adjusting Knob strip. Attach the support stopper to align with the Side Guide Adjusting Knob stopper or at the left of the stopper. Set the operation mode. Off-set On/Off Switch Tray Lower Time Knob - When off-set receiving is required, turn the Off-set On/Off switch to - Set the off-set timing knob. Turn the knob clockwise to increase the delay time after a collated set has been delivered on the tray. - Set the tray lower time knob depending on the Off-set Timing Knob thickness of collated set. Turn the knob clockwise to increase the tray lower time. Straight Receiving CAUTION Straight Receiving Guides • Turn off ( ) the Off-set On/Off switch when you do the straight receiving. Attach straight receiving guides and lock them using the knob. See Step 3 above and adjust the stoppers and Locking Knob the side guide in the same way. VAC-1000... -
Page 59: Setting The Collating - Operation Screen
Set the belt speed. NOTE • The belt speed can be adjusted in three steps. Normally, select the middle speed. Do the test collating. If sheets are collated smoothly, you can the high speed. If misfeeding occurs, set the low speed. Attention When the HOF-30 is connected, the belt speed is adjusted to match the speed of the HOF-30. Set the collating speed. Attention NOTE When the SPF-30S (StitchLiner) is connected, • The range of collating speed changes depending the collating speed cannot be adjusted at the on the number of bins to use, the belt speed and VAC-1000. the overlap. • The collating speed can be adjusted while the machine is running. See the condition of collating and downstream device and adjust the speed. • As you press and hold the Stop button on the remote controller, press to set at the maximum speed. Press to set at the minimum speed. • When SPF-200A is connected, the speed is automatically adjusted by pressing the automatic setting button. Set the overlap. NOTE • Overlap can be adjusted in four steps. - Page 60 2. Operating Procedures 2-2 Preparation for Operation ▼ Preset Input Screen When using the preset stop function (to stop the machine after a preset number of sets has been collated), press the entry field. The Preset Input screen appears. Enter a value and press the Enter button. The screen returns to the Collating - Operation screen. If you want to clear the value, press the Clear button. Clear Button Enter Button VAC-1000...
-
Page 61: Setting The Hmu-100 Hand Marry Unit (Option)
2. Operating Procedures 2-2 Preparation for Operation 2-2-12 Setting the HMU-100 Hand Marry Unit (Option) When using the hand marry unit, set the sheet guide and select the mode to insert a sheet on or under collated sheets. Hand Marry Unit Turn the Insert Mode Selecting switch and select the mode. A sheet from hand marry unit is inserted on the collated sheets. H and marry function is not used. Insert Mode Selecting Switch A sheet from hand marry unit is inserted under the collated sheets. ▼ C ollating - Operation screen - The selected mode is indicated on the Collating of the VAC-1000 - Operation screen of the VAC-1000. Place sheets on hand marry table registering with the sheet registration guide and set the Place the sheets registering sheet guide to match the size of sheet. with this guide Sheet Guide VAC-1000... -
Page 62: Collating Operation
NOTE • While the machine is running, if sensor falsely detects double feeding, set the sensitivity If sensor still falsely detects double feeding, set . If the sensor falsely detects misfeeding, set Light Brightness Batch Process Button Important When sensor sensitivity is , the sensor detects misfeeding only. It does not detect double feeding. Set the light brightness. - The light brightness can be adjusted in four steps using the high -power mode together. See page 15 for details. (Normal Setting: High Power Mode Off, Normal) - If you want to change the light brightness at all towers, press the Light Brightness Batch Process button. NOTE • Normally, set the sensor light . If the sensor detects a dark print image on the sheet or detects double feeding falsely, set • When the light brightness is but the sensor detects a signature as double feeding falsely, set the high power mode • You can check the current light brightness of double feed sensor using the Information- Input Monitor screen. See 20 for details. VAC-1000... - Page 63 2. Operating Procedures 2-3 Start Collating 2-3-1 Sheet Calibration (Continued) Press the All Tower Calibration button. All sheets of all towers are collated once. NOTE • When individual calibration button is pressed, sheets only on the tower whose button is pressed are fed once. Check the number of collated sheets. NOTE • When the number of collated sheets is not correct, press individual calibration button of the tower which has a problem. • If double feeding is detected, set the sensor light and check again. • If you missed the double feeding in the collated set, there will be misfeeding during the actual operation. VAC-1000...
-
Page 64: Start Collating
2. Operating Procedures 2-3 Start Collating 2-3-2 Start Collating Start the collating operation. ▼ Collating - Operation Screen Select the Collating - Operation screen. Press the Start button on the screen or on the remote controller. NOTE • The machine will not run unless sheet calibration has been completed. (See Section 2-3-1 Sheet Start Stop Calibration.) • When using the hand marry unit, see Section 2-8 Hand Marry. To stop collating, press the Stop button on the Stop Button screen or on the remote controller. Start Button NOTE • When the Stop button is pressed while the machine is running, the machine stops collating but the motor and blower keep running. When the Stop button is pressed again, the motor and blower stop, but bins stay up. When the Stop button is pressed again, bins lower. Stop Button Pressing Times Feeding Motor and Blower Down VAC-1000... -
Page 65: If The Error Screen Is Displayed
When jam, misfeeding or double feeding occurs, :Double Feeding or Thick Feeding the machine delivers the collating sets and stops. The Error screen will be shown on the panel. :Jam :Misfeeding When the machine stops and the screen displays as shown at right, the numbers 1 and 3 on the right side of the screen indicates that top collated set and 3rd collated set on the receiving tray have error. The error icons indicate all errors when the collator stops. NOTE • Errors at last eight collated sets are indicated. Press the number 1 button on the right side. Check the top collated set on receiving tray. - Jam occurred at the second bin of the second tower. - Double feeding or thick feeding occurred on the first bin of the fourth tower. NOTE • Jam may be indicated even though collated set is on the sheet pass or it is delivered but feed timing is delayed. Check that sheets are not jammed at the receiving tray and the sheet pass. When there is jam, press the Jog button to move the sheet and press the Jog button again to stop. Open the transport door and then remove Jog Button the sheet. Transport Door VAC-1000... - Page 66 2. Operating Procedures 2-4 If the Error Screen Is Displayed Press the number 3 button on the right side. Check the third collated set from the top on the receiving tray. - Double feeding or thick feeding occurred on the first bin of the sixth tower. - Misfeeding or thin feeding occurred on the third bin of the sixth tower. NOTE • If error sets are not delivered to the error feed tray in ST-40/60, BC-20, or HOF-20/30, an This appears when the error set is not properly error icon is displayed in gray. See the user’s delivered to the error feed tray. manual for the machine for details. Gray Icon Press the OK button on the screen or the Stop button on remote controller to go back to the Collating - Operation screen. NOTE ▼Collating - Operation Screen • If you want to see the Error screen again, press the Error Monitor button on the screen. Error Monitor Button VAC-1000...
-
Page 67: Collating Programs
2. Operating Procedures 2-5 Collating Programs 2-5-1 Double Cycle Program The VAC-1000 system can be divided into two sections. When any bin in one section empties, the collator switches over to the second section and continues collating. 1 Tower 5 Towers 3 Towers 2 Towers 4 Towers 6 Towers Load the sheets into the bins so that the front section and the rear section have the same contents. NOTE • When using only 1 tower and 1 collated sets use four bins, load sheets from the bins 1 to 4, and then load the same content sheets from the bins 6 to 9, from the bins 7 to 10, or the bins 6, 8 to 10. • On 1 tower, 3 towers, or 5 towers whose 10 bins are divided into two sections by 5 bins each, load sheets into the bins up to 40 mm (1.5") height or less because separation air may curl the loaded sheets. See Section 2-2 Preparation for Operation and prepare. Select the Collating - Operation Setting screen on the panel. Turn on the Double Cycle program. Enter the double cycle preset number. Double Cycle Preset If the double cycle preset number is entered in this ▼ Collating - Operation Setting Screen counter, the collating section is automatically switched over when the number of collated sets reaches the entered number. - Page 68 2. Operating Procedures 2-5 Collating Programs All Tower Calibration Button Press the All Tower Calibration button on the Bin Setting screen (See Section 2-3-1 Sheet Sheet Calibration Buttons for Each Tower Calibration) All sheets on bins of all towers are collated once. ▼ Collating - Operation Screen Select the Collating - Operation screen and press the Start button. When any bin in the first section empties, the collator switches over to the second section automatically and continues collating. NOTE • Add sheets on bins which are paused. • The programs of Double Cycle and Dual Cover Feed or Tab Insert can be operated together. Start Stop See Section 2-5-2 Dual Cover Feed Program and Section 2-5-3 Tab Insert Program. • When the collating speed is too fast or any bin in either section empties, misfeeding may be Stop Button indicated on screen. In this case, remove the top collated set on the receiving tray and press Start Button the Start button. The collator switches over to the other section automatically to start collating. To prevent this problem, use the double cycle preset function. VAC-1000...
-
Page 69: Dual Cover Feed Program
▼ Collating - Operation Setting Screen Load the cover sheets on the top two bins, and the inside sheets on the other bins. (See Section 2-2 Preparation for Operation.) NOTE • For example, when using bin 3 through bin 9, load the cover sheets on the bin 3 and bin 4. Dual Cover Feed Bin Select Button Select the Collating - Operation Setting Dual Cover screen. Program Preset All Tower Calibration Sheet Calibration Button Button for Each Tower Turn on the Dual Cover Feed program. Press the Dual Cover Preset to enter the dual cover feed preset number. If the dual cover preset number is entered in this counter, the machine is automatically stopped when the number of collated sets reaches the entered number. Press the Bin Select button and select the bin to use first. Press the All Tower Calibration button on the Bin Setting screen (See Section 2-3-1 Sheet Calibration) All sheets of all towers are collated once. Cover sheets on both bins are also collated. VAC-1000... - Page 70 2. Operating Procedures 2-5 Collating Programs ▼ Collating - Operation Screen Select the Collating - Operation Screen and press the Start button. When either bin empties, the collator switches over to the other bin and continues collating. Start Stop Stop Button Start Button NOTE • The programs of Dual Cover Feed and Double Cover Sheets (Bin 1 and Bin 2) Cycle can be operated together. Load the cover sheets for the second section on the top two bins in the second section. Cover Sheets (Bin 6 and Bin 7) • The programs of Dual Cover Feed and Tab Insert cannot be operated together. • When the collating speed is too fast or either bin empties, misfeeding may be indicated on screen. In this case, remove the top collated set on the receiving tray and press the Start button. The collator switches over to the other bin automatically to start collating. To prevent this problem, use the dual cover preset function. VAC-1000...
-
Page 71: Tab Insert
Tab Sheets Up to two tab sheets can be inserted between Collated Set collated sets. Collated Set Collated Set To insert one tab sheet, load the tab sheets on the top bin. To insert two tab sheets, load Collated Set the tab sheets on the top two bins. Load the Tab Sheets inside sheets on the other bins. (See Section 2-2 Preparation for Operation.) Number of Tab Sheet Tab Insert Tab Insert Preset Tab Insert Stop Select the Collating - Operation Setting Screen. Turn on the Tab Insert program. Press the Number of Tab Sheet button and select number of tab sheet to insert. Press the Tab Insert Preset button and select the number of collated sets between the tab sheets. If you want to stop the machine when a preset number of tab sheets have been inserted (preset time of tab insert has done), press the Tab Insert Stop button and enter a value. Calibration Buttons for All Tower Calibration Each Tower Button Press the All Tower Calibration button on the Bin Setting screen. (See Section 2-3- 1 Sheet Calibration.) All sheets of all towers are collated once. When you insert two tab sheets, the machine collates the tab sheets from both two bins one each. VAC-1000... - Page 72 2. Operating Procedures 2-5 Collating Programs ▼ Collating - Operation Screen Select the Collating - Operation screen and press the Start button. Tab sheets are inserted between the preset number of collated sets and the machine stops when the preset number of tabs has been inserted. NOTE • When preset stop function is used, the number of collated sets is indicated in Tab Counter on the Collating - Operation Screen. Start Stop Stop Button Start Button NOTE • The programs of Tab Insert and Double Cycle Tab Sheets (Bin 1 and Bin 2) can be operated together. Load the tab sheets for the second section on the top one or two bin(s) in the second section. Tab Sheets (Bin 6 and Bin 7) • The programs of Tab Insert and Dual Cover Feed cannot be operated together. VAC-1000...
-
Page 73: Block Feed
10/10 Block number = 2 (two towers) 3 (three towers) The first tower is divided into 2 parts and other towers are considered as one block each. The first block is fed from the last tower, the second block from the second from the last 5/5/10 Set the block pattern. tower, and then the third block from ▼ Collating - Operation Setting Screen the lower bins (6 to 10) of the first tower and the fourth block from the upper bins 1 to 5. Block number = 3 (two towers) 4 (three towers) Two towers are considered as one block. The first block is fed from the last two towers, the second block is fed from the second two towers from the last. When three towers 20/20 are connected, towers are divided to first two towers and the last 20/10 Block Number tower. Block number is Block number = 2 (three towers) calculated depending 3 (five towers) on the selected block pattern and indicated here. VAC-1000... - Page 74 Collating - Operation screen Second Block (4.3.2.1 from the bottom) First Block (9.8.7.6. from the bottom) (Ex. 2: Block Feeding Pattern) Stop NOTE • The block feed, the dual cover feed and the double cycle programs can be operated together. Third Block (4.3.2.1 from the bottom) Second Block (9.8.7.6.5 from the bottom) First Block (14.13.12.11.10 from the bottom) VAC-1000...
- Page 75 2. Operating Procedures 2-5 Collating Programs ▼ Collating - Operation Screen Select the Collating - Operation screen and press the Start button. Tab sheets are inserted between the preset number of collated sets and the machine stops when the preset number of tabs has been inserted. NOTE • When preset stop function is used, the number of collated sets is indicated in Tab Counter on the Collating - Operation Screen. Start Stop Stop Button Start Button NOTE Tab Sheets (Bin 1 and Bin 2) • The programs of Tab Insert and Double Cycle can be operated together. Load the tab sheets Tab Sheets (Bin 6 and Bin 7) for the second section on the top one or two bin(s) in the second section. • The programs of Tab Insert and Dual Cover Feed cannot be operated together. VAC-1000...
-
Page 76: Job Memory
2-6 Job Memory Job Memory The collating job information; collating programs, collating speed, belt speed, and overlap can be saved and used in the future operation. Up to nine jobs can be saved. NOTE • The following settings can be saved. Collating Speed Belt Speed Overlap Using Bin Number Preset Stop Collating Programs Delivery Direction Sensor Sensitivity and Light Brightness • The job memory function is not available for c-tower. Select the Memory screen. Job No. Button Write Button Current Setting Button When the Current Setting button is pressed, the current setting is indicated. When the Job No. button is pressed, its saved setting is indicated. If you want to save the current job, select the job No. and then press the Write button. The job already saved is cleared and the current job is saved. Recall Button If you want to recall the saved job, press the job No. button and check the setting indicated. And then press the Recall button. The machine changes the setting following the saved job information. VAC-1000... -
Page 77: Right Side Delivery
▼ Tower Setting Screen Select the Tower Setting screen on the panel of the tower at the left end (a-tower). Select the delivery direction. NOTE • The delivery direction of the towers can be set differently as shown to the right. While tower 1 and tower 2 are delivering to the left, tower 3 and tower 4 can deliver to the right. While tower 1 and tower 2 are Delivery Direction Button running collating operation, tower 3 and tower 4 can deliver to the right. Attention The delivery direction cannot be set on the panel of c-tower. When you change the delivery direction, go to another screen on the panel to determine the delivery direction. See Section 2-2 Preparation for Operation and set the machine. Page Order NOTE • To deliver collated sets to the right, load the sheets from the bottom bin in order as shown at right, and face down the upside of sheets. Collated sheets are delivered upside down. [Right Side Delivery] Do the sheet calibration and run the machine from the panel of c-tower. NOTE • When you select the right side delivery, you can operate the machine only from the panel of c-tower. • Collating programs are also available. VAC-1000... -
Page 78: Hand Marry
When the mode has been selected, the Put the sheets registering collator starts running in one second after the with this guide sheet has been loaded, and then the hand marry unit delivers the sheet. • The mode cannot be changed when the Start button on the collator has been pressed. If you want to change the mode, press the Stop button to stop Sheet to the collator and then change it. Hand Marry Insert Mode Selecting • Additional Information When sheet from hand Switch marry unit jams Hand Marry Unit In mode The VAC-1000 delivers the collated sheets to the finisher. The error is not indicated on the panel. In mode : A sheet from hand marry unit is inserted under the collated sheets. The VAC-1000 delivers the collated sheets and : A sheet from hand marry unit is inserted on its roller keeps running. The finisher waits for the the collated sheets. sheet from hand marry unit. In this case, press the : Hand marry unit is not used. Stop button to stop the VAC-1000. If the sheet jams at the hand marry unit often, see Section 3-6 Sheet from Hand Marry Unit Jams". VAC-1000... - Page 79 2. Operating Procedures 2-8 Hand Marry Press the Stop button on the Collating - Operation Screen or on the remote controller. NOTE • When the Stop button is pressed while the machine is running, the machine stops collating but motor and blower keep running. When the Stop button is pressed again, motor and blower stop, but bins stay up. When stop button is pressed again, bins move down. Stop Button Pressing Times Feeding Motor and Blower Down VAC-1000...
-
Page 80: Warming Up
2. Operating Procedures 2-9 Warming Up If feeding problems occur frequently while the machine is running for the first time of the day, warm up the machine. ▼ Information Screen Press the Warm Up button on the Information screen. Warm Up Button ▼ Warming Up Screen - The panel indicates the Warming Up mode, and the warming up begins. - Warming up completes automatically after about five minutes. To cancel the warming up, press the Stop button on the remote controller. Stop Button VAC-1000... -
Page 81: Troubleshooting
3. Troubleshooting 3. Troubleshooting 3-1 If the Error Screen is Displayed ............72 3-2 If Misfeeding Occurs ............... 75 3-3 If Double Feeding Occurs ............... 75 3-4 Sheets Are Fed on the Skew ............76 3-5 Jam in the Transport Conveyor............76 3-6 Sheet from the Hand Marry Unit is Jammed ........77 3-7 Machine Does Not Start Collating when the Start Button Is Pressed ......77 3-8 Checking the Fuse and Breaker ............. 78 VAC-1000... -
Page 82: If The Error Screen Is Displayed
- Check the size of sheet and do sheet calibration again. are not loaded into the bins. - If delivery sensor is dirty, clean it up. Solution (See Section 4-2-2 Cleaning the Delivery Sensor) - Load sheets and do the sheet calibration. - Set the delivery weight properly. Cause 5 Cause 2 - All bins are powered off. - Sheet jams at the delivery section. Solution Solution - Turn on the power for the bins you use. - Remove the jam. Cause 6 - The number of bins that is powered on does not match • Accessory Error the number of sheets to collate. Solution There is problem with the finisher. Remove the Turn on the power for the bins correctly. problem of the finisher. This icon is indicated Cause 7 when the Emergency Stop button of the finisher is - All sections for the double cycle program are not loaded pressed, and also while the belts of the stitcher and with sheets. folder are not running. Solution - Load sheets. • System Error Cause 8 - For dual cover feed program, the cover sheets are There is a system error. See the error code in the loaded separately in the different sections. table in the next page and solve the problems. Solution - Load the cover sheets in the same section. VAC-1000... - Page 83 Then, turn off the Power switch, wait 10 seconds, and 9791 Calender Error turn it on again. If this error occurs frequently, contact your local dealer. * X is the number for tower counted from the left. VAC-1000...
- Page 84 3. Troubleshooting 3-1 If the Error Screen is Displayed • Tray Full Additional Information Receiving tray is full. Remove the collated sets This Tray Full indication appears when the stacker from the tray. ST-20R is connected to the right side of single VAC- Setting of the stitcher has not been completed. 1000 a-tower and the collated sets are delivered to the left, and also when the stacker ST-20 is connected to the left side of single VAC-1000 a-tower and the collated sets are delivered to the right. This error indication can disappear by adjusting the volume on the printed circuit board. Contact with the dealer. VAC-1000...
-
Page 85: If Misfeeding Occurs
3-3 If Double Feeding Occurs This section lists the causes and solutions for double feeding. Causes Solutions 1. Minimum sheet weight is 53 gsm. 1. Sheets are too thin. (Out of specifications) → 2. Reduce the sheets. 2. Sheets are loaded into bins too much. → 3. Sheets stick together. → 3. Fan sheets well. Dry ink on sheets. → 4. Raise double feed stop pads. 4. Double feed stop pads are too low. 5. T urn the suction air adjusting knob to reduce 5. Suction air is too strong. → the suction air. 6. Separation air is weak. → 6. T urn the separation air adjusting knob and the separation air adjusting lever to increase the air. 7. Sheets are porous → 7. T urn on the porous sheet feed to suction the sheet just before feeding it. (See Section 1-2-3 Screens [1] Collating - Operation Screen.) 8. Sheets are curled up. → 8. Straighten the sheets. VAC-1000... -
Page 86: Sheets Are Fed On The Skew
4. Remove paper dust. 4. P aper dust is collected in the feed section and → the transport section. 5. Double feed stop pads are worn out. 5. S ee Section 4-3 Replacing the Double Feed Stop → Pads and replace the double feed stop pads. 6.- T urn the separation air adjusting lever at the 6. Sheets are curling because of separation air. → bin to reduce the air. - S et the sheet guide to touch the sheet, or change the guide position. 3-5 Jam in the Transport Conveyor Transport Conveyor When the jams in the transport conveyor, pull the lever to left and lock it as shown to the right. NOTE • Normally, unlock the lever. Lever VAC-1000... -
Page 87: Sheet From The Hand Marry Unit Is Jammed
1. S heets on hand marry table are more than 50 1. H and marry unit can accept 50 or less sheets at a → time (5 mm). sheets of 80 gsm (5 mm height). 2. I nstall the hand marry unit so that the 2. T he hand marry unit are not installed → properly. positioning guide (arrow) of this unit fits in the rear cover of VAC-1000. Rear Cover Hand Marry Unit Positioning Guide 3-7 Machine Does Not Start Collating when the Start Button Is Pressed This section lists the causes and solutions for that the machine does not start collating when the Start button on the panel is pressed. Causes Solutions 1. D o the calibration first. See Section 2-3-1 1. Sheet Calibration has not been done. -
Page 88: Checking The Fuse And Breaker
WARNING • Remove power cable before checking the fuse and the breaker. Otherwise high voltage can cause sever personal injury. Locking Screw Turn off the Power switch. Remove the power plug or power cable. When the moving part of the collator is locked, unlock it. Power Cable Loosen a locking screw for the panel cover and open the panel cover. Check the fuses shown at right. If any fuse has blown out, replace it. a-tower and c-tower is attached with the spare fuses. NOTE • When fuses blow out, that causes problems as follows. F1 (5A): The delivery air does not come out and the receiving tray do not run. F2 (2A): Delivery air does not come out. F3 (5A): R eceiving tray on the left side does not run. Fuses F4 (5A): Receiving tray on the right side of c-tower does not run. Spare Fuses Close the panel cover and tighten one locking screw. VAC-1000... - Page 89 3. Troubleshooting 3-8 Checking the Fuse and Breaker Mounting Screws Follow the Step 7 through 13 below and check the breaker. Remove the lid from the blower box. (Four mounting screws) Mounting Screws Blower Box Remove two locking screws inside the blower box. Locking Screws Remove the front cover. (Three mounting screws) Screws (Loosen them. You do not have to remove them.) Front Cover Screws VAC-1000...
- Page 90 3. Troubleshooting 3-8 Checking the Fuse and Breaker 10. Check breakers shown at right. If breaker trips, reset it. NOTE • If breakers trip, there are following problems. Breaker Q00 Q00 (15A): Machine does not run. Q01 (3A): Receiving tray does not run and delivery air does not come out. Breaker Q01 Press further down Return 11. Attach the front cover. (Three mounting screws) 12. Lock the blower box on the collator. (Two locking screws) Locking Screw Mounting Screw 13. Attach the lid on the blower box. (Four mounting screws) Mounting Screw Blower Box VAC-1000...
-
Page 91: Maintenance
4. Maintenance 4. Maintenance 4-1 Daily Cleaning ................. 82 4-2 Monthly Cleaning ................84 4-3 Replacing the Double Feed Stop Pads ........... 85 4-4 Cleaning the Feed Error Sensor ............. 86 4-5 Lubricating the ST-20 Option Stacker ..........87 4-6 Adjusting the Sensitivity of the Feed Error Sensor......88 4-7 Replacing the Battery for the Remote Controller ......89 VAC-1000... -
Page 92: Daily Cleaning
4. Maintenance 4-1 Daily Cleaning 4-1-1 Cleaning the Feed Rings At the end of operation, clean the feed rings. If feed rings are dirty, collated sheets may be smeared. WARNING Feed Rings • Turn off the Power switch before cleaning the feed rings. Otherwise personal injury may result. Wipe four gray feed rings on bin using an alcohol-soaked cloth. NOTE • Feed rotor can be turned manually. • If you cannot reach the ring from above, wipe it from bottom. CAUTION • Do not use thinner and benzine. Otherwise roller or plastic may melt. • Do not use rubber cleaner for roller of the folder machine. Otherwise, the roller may get swollen and be worn. VAC-1000... -
Page 93: Cleaning The Transport Belts And Transport Rollers
4. Maintenance 4-1 Daily Cleaning 4-1-2 Cleaning the Transport Belts and Transport Rollers At the end of operation, clean the transport belts and rollers. If the transport belts and rollers are dirty, collated sheets may be smeared. WARNING Transport Door • Turn off the Power switch before cleaning the belts and rollers. Otherwise personal injury may result. Open the transport door. NOTE • When the transport door cannot be opened completely because a collator is connected on the left side, open the door and lift it to remove. • Transport door weights 9 kg (19.9 lb). Take utmost care when removing it. Transport Belt Wipe the transport belts and rollers with an alcohol-soaked cloth. Transport Roller Close the transport door. VAC-1000... -
Page 94: Monthly Cleaning
4. Maintenance 4-2 Monthly Cleaning WARNING • Turn off the Power switch before cleaning the bin sensor. Otherwise personal injury may result. Cover for Bin Sensor 4-2-1 Cleaning the Bin Sensor Clean bin sensor monthly. If paper dust is collected on the bin sensor, the sensor falsely detects that sheets are loaded into bin without any sheets and misfeeding is indicated. Pull the cover for bin sensor to the right and remove it. Remove paper dust on bin sensor using a brush. Attach the cover for bin sensor. Bin Sensors 4-2-2 Cleaning the Delivery Sensor Clean the delivery sensor monthly. If paper dust is collected on the delivery sensor, the sensor falsely detects jam and the machine stops. Remove paper dust on delivery sensor using a brush. Delivery Sensor VAC-1000... -
Page 95: Replacing The Double Feed Stop Pads
4. Maintenance 4-3 Replacing the Double Feed Stop Pads When the double feed stop pads are worn out and double feeding occurs, replace the double feed stop pads with new ones. WARNING • Turn off the Power switch before Locking Screws replacing the double feed stop pads. Otherwise personal injury may result. Loosen two locking screws on the double feed stop pad. Slide the double feed stop pad upward and remove it. Double Feed Stop Pads Attach a new double feed stop pad and tighten two locking screws. NOTE Double Feed Stop Pads • Do not tighten the screws too tight. Locking Screw VAC-1000... -
Page 96: Cleaning The Feed Error Sensor
4. Maintenance 4-4 Cleaning the Feed Error Sensor When the power switch is turned on, if paper dust is collected on the feed error sensors, the panel shows the sensors that need cleaning. ▼ Maintenance Screen Clean the feed error sensors indicated on the Maintenance screen. Use a brush to clean the sensor. The feed error sensors at the bin 2 and bin 7 of tower 1, and at bin 5 of the tower 2 are dirty. NOTE • Feed error sensor is at the back of feed section. Face down the cleaning brush and insert it through the gap between the separation air nozzle and the rear double feed stop pad. Cleaning Brush Feed Error Sensor Separation Air Nozzle About 70 mm (2.76") Insert the brush through this gap. Double Feed Stop Pad (Rear) Turn off the Power switch, wait 10 seconds, and turn it on again. Machine panel does not show the Maintenance screen if the feed error sensors are clean. If the Maintenance screen is shown again, go Step 1 and clean the sensors. Power Switch VAC-1000... -
Page 97: Lubricating The St-20 Option Stacker
4. Maintenance 4-5 Lubricating the ST-20 Option Stacker Clutch spring of the sheet holder is supplied with grease. Grease will deteriorate or abrasion powder will be collected with long term use, and that causes malfunction. Lubricate the clutch spring every six months. Turn off the Power switch. Add the accessory oil into the oil hole for the clutch spring. NOTE • Add one or two drops of oil. Do not let the oil drip. Oil Hole VAC-1000... -
Page 98: Adjusting The Sensitivity Of The Feed Error Sensor
CON5 CON3 CON4 VR1: Bin 1 - Make these adjustments using the screwdriver VR10: Bin 10 attached inside the panel cover. - Turn the control VR1 through VR10 clockwise until the LED below each control lights. DIP Switch Control Board Turn off the Power switch, wait 10 seconds, QPM-287 and turn it on again. (P108611) - Check that cleaning icon is not displayed on the Maintenance screen. VAC-1000... -
Page 99: Replacing The Battery For The Remote Controller
4. Maintenance 4-7 Replacing the Battery for the Remote Controller If the remote controller is not working, replace the battery. AAA Batteries 11149 40701A1 CAUTION CAUTION • Install the battery in the correct • Do not use rechargeable batteries. direction. They may cause heat generation • Do not throw away the used battery or defective of batteries. as household waste. Dispose of or recycle the battery according to the regulations and/or ordinances of your local government. • Follow the precautions instructed on the batteries. Otherwise, heat generation, explosion and leackage of batteries may cause severe personal injury, or damage or defile the surrounding parts. VAC-1000... - Page 100 4. Maintenance This page is intentionally left blank. VAC-1000...
- Page 101 5. Installation 5. Installation 5-1 Installation ....................92 5-2 Attaching the Blower Box ................93 5-3 Setting the Tower Number Switches ............95 5-4 Connecting the Cables................96 5-5 Installing the Receiving Tray ..............98 5-6 Setting the Remote Controller..............102 5-7 Attaching the CTK-100 a-tower Right Side Unit (Option) ......104 5-8 Attaching the HMU-100 Hand Marry Unit (Option)........114 VAC-1000...
-
Page 102: Installation 5-1 Installation
• Avoid direct sunlight and high humidity. 645 mm 842 mm (33.2”) (25.4”) 550 mm (21.7”) 650 mm 92 mm (3.7) ST -2 0 CCR-DX Prepare space for installing the VAC-1000. (25.6”) Power Cable Blower Blower 342 mm (13.5”) 200V, 220V:5m/196.8” NOTE 230V:3m/118.1” 664 mm (26.2”) 645 mm 842 mm... -
Page 103: Attaching The Blower Box
5. Installation 5-2 Attaching the Blower Box Connect the hoses and wiring to the blower, and attach the blower box to the collator. Remove the lid from the blower box. (There Mounting Screws are four mounting screws.) Mounting Screws Blower Connect the hoses to the blowers. - Run the hoses through the holes in the blower box, and attach them to the blowers. Attach the hoses to the blowers using hose clamps. Connect the signal cable and power cable for each blower to the terminals on the blower. Ground - After running the cables through the cable bushings, run the cables through the holes for the cable bushing in the blower box, and then connect the cables to the blower. - After you connect the cables, fit the cable bushings into the holes in the blower box. Power Cable for Blower Signal Cable for Blower Cable Bushing VAC-1000... - Page 104 5. Installation 5-2 Attaching the Blower Box Attach the blower box to the collator. - Align the holes in the blower box with the holes in the collator, and then attach the box using two screws. These screws are supplied with the blower box. Screws Mounting Screws Attach the lid on the blower box using four mounting screws. Mounting Screws VAC-1000...
-
Page 105: Setting The Tower Number Switches
ORDER:1 ORDER:2 ORDER:3 4 Towers TOTAL:4 TOTAL:4 TOTAL:4 TOTAL:4 ORDER:1 ORDER:2 ORDER:3 ORDER:4 5 Towers TOTAL:5 TOTAL:5 TOTAL:5 TOTAL:5 TOTAL:5 ORDER:1 ORDER:2 ORDER:3 ORDER:4 ORDER:5 6 Towers TOTAL:6 TOTAL:6 TOTAL:6 TOTAL:6 TOTAL:6 TOTAL:6 ORDER:1 ORDER:2 ORDER:3 ORDER:4 ORDER:5 ORDER:6 VAC-1000... -
Page 106: Connecting The Cables
1 2 3 4 5 6 7 8 towers should be set to the old type. Set the SC12 and SC13 of the dip switch on QPM-326 of new tower (S/N038001 or above) to "ALL_Old". ALL_New (These are set to "ALL_New" at the shippment.) ALL_Old Only when using a 230 V power source, install SCI2 SCI3 the ground wire and connect it to the earth in the distribution board. WARNING • If the ground wire is connected directly to the earth on the power distribution board in the building, ask a qualified contractor to do the job. • Be sure to connect the ground wire Ground Wire G round Wire before connecting the power cables. Otherwise, internal electrical parts might cause a leak of electricity, causing a severe personal injury. o distribution board. o distribution board. 21149 50401C1 VAC-1000... - Page 107 5. Installation 5-4 Connecting the Cables Connect the power cables for the all towers to the power source. Power Cable Ground Black Black Green/Yellow Power Cable VAC-1000...
-
Page 108: Installing The Receiving Tray
5. Installation 5-5 Installing the Receiving Tray 5-5-1 Installing the CCR-DX Loosen the locking knob for the delivery unit of the collator and turn down the angle of the delivery direction. Delivery Direction Locking Knob Remove the manual case. Manual Case Handle Hold the handle of the docking plate, raise the CCR-DX, and insert the pins into the holes in the collator. Pins Holes Handle Plug the connecting cable of the CCR-DX into the upper connector of the collator. Upper Connector Connecting Cable Docking Plate VAC-1000... - Page 109 5. Installation 5-5 Installing the Receiving Tray Turn the leveling bolts and level the CCR-DX. Leveling Bolt On the Tower Setting screen, select the CCR-DX for the finisher. Finisher VAC-1000...
-
Page 110: Installing The St-20/St-20R
5. Installation 5-5 Installing the Receiving Tray 5-5-2 Installing the ST-20/ST-20R Loosen the locking knob for the delivery unit of the collator and turn up the angle of the delivery direction. Delivery Direction Locking Knob Attach the stacker guide at the delivery unit of the collator. NOTE • Attach the stacker guide so that it does not touch the rollers. Roller Stacker Guide Raise the docking plate of the ST-20/ST-20R and insert the pins into the holes in the collator. Plug the connecting cables into the connectors of the collator. Small cable into the upper connector Large cable into the lower connector Holes Docking Plate VAC-1000... - Page 111 5. Installation 5-5 Installing the Receiving Tray Off-set Guide 5 mm (0.2”) Plug the power cable of the collator into the power source and turn on the Power switch. Sheet - Press the Tray Up button. Tray moves up and stops at the upper limit. - Load sheets into only one bin. Press the Sheet Calibration button on the Bin Setting screen, and press the Stop button immediately so that the sheet stops before it reaches the delivery section. - Press the Jog button on remote controller to transport the sheet to the position where it overlaps with stacker tray by 10 mm (0.40"). - Loosen thumb nuts, slide stacker back and forth, and position stacker to allow 5 mm (0.2”) gap between the off-set guide and the sheet edge as shown to the right. - Fasten thumb nuts. - Turn the four leveling bolts to level the ST-20/ST-20R. Thumb Nuts Leveling Bolt On the Tower Setting screen, select for the finisher. Finisher VAC-1000...
-
Page 112: Setting The Remote Controller
5. Installation 5-6 Setting the Remote Controller When you use more than one a-tower in a same field, you have to assign a channel between the remote controller and the machine and avoid interference. When you use only one a-tower, you do not have to do this setting. Remove four screws on the back of the Screw remote controller, and remove the batteries. 2. Remote Reemove the QPW-930 remote controller Controller board. Board 1. Batteries QPW-930 (P108111) See the table below and set the DSW 1 to assign a channel. Channel DSW1 Setting DSW1 All switches are tuned off (Channel 0) at the factory. Reset the board. Install the batteries and tighten four screws. VAC-1000... - Page 113 5. Installation 5-6 Setting the Remote Controller ▼ Information Screen On the Information screen, enter the number of channel that you set in Step 3 into the Remote Controller Setting. Remote Controller Setting VAC-1000...
-
Page 114: Attaching The Ctk-100 A-Tower Right Side Unit (Option)
5. Installation 5-7 Attaching the CTK-100 a-tower Right Side Unit (Option) 5-7-1 Accessories Delivery Unit C 1 pc Delivery Connector 16S 1 pc Delivery Connector 10S 1 pc Delivery Belt 1 pc Idler Shafts 3 pcs Cable Clamp 1 pc Delivery Drive Pulley 1 pc Pin 1 pc VAC-1000... - Page 115 5. Installation 5-7 Attaching the CTK-100 a-tower Right Side Unit (Option) Snap Ring (STW-15) 1 pc Screws SB3-8: 1 pc SB5-10: 3 pcs B3-10ZP: 4 pcs B4-8ZP: 4 pcs Washers Flanged Nuts 4 pcs W3: 1 pc W5: Extra-Large 1 pc W5S: 3 pcs Adapter Cable (E513345) 1 pc VAC-1000...
-
Page 116: Attaching Procedures
5. Installation 5-7 Attaching the CTK-100 a-tower Right Side Unit (Option) 5-7-2 CTK-100 Attaching Procedures WARNING • Turn off the breakers in the building before reconnecting the power cable. Otherwise high voltage can cause severe personal injury. ▼ Information Screen Raise the bins. (1) Press button on the Information screen and open the Information - Single Operation screen. (2) Press the + button on the remote controller or Press this button to raise the bins the Bin Up button in the screen to raise the bins. ▼ Information - Single Operation Screen Bin Up Button Turn off the Power switch and disconnect the power cable. Power Switch VAC-1000... - Page 117 5. Installation 5-7 Attaching the CTK-100 a-tower Right Side Unit (Option) Screw (Loosen this screw, you Remove the front cover (three mounting do not have to remove it.) screws) and the rear cover (two mounting screws). Front Cover Screws NOTE • When you remove the rear cover, loosen two mounting screws and pull the top of cover and Mounting lift up the cover. Screws Rear Cover Remove upper guide plate in the transport conveyor. Screw (Loosen this screw, you do not have to remove it.) Upper Guide Plate VAC-1000...
- Page 118 5. Installation 5-7 Attaching the CTK-100 a-tower Right Side Unit (Option) NOTE Upper Guide Plate • Raise the right side of the upper guide plate and move it to the right to remove. Right Side Cover Covers Remove the right side cover (two mounting screws) and the covers (two mounting screws each). Cover Mounting Screws Remove the lower guide plate. NOTE Lower Guide Plate • Raise the right side of the lower guide plate and move it to the right to remove. VAC-1000...
- Page 119 5. Installation 5-7 Attaching the CTK-100 a-tower Right Side Unit (Option) Delivery Unit C Attach delivery unit C (4 mounting screws: B4-8ZP). Remove the locking screw for delivery unit C, and remove the side covers (two mounting screws each) Locking Screws Mounting Screws Side Covers NOTE • Be careful when you remove the locking screw, nut plate will also be removed. Nut Plate Attach the delivery drive pulley to shaft as shown to the right. (1) Insert a pin into hole in the shaft. (2) Attach the delivery drive pulley to the shaft. Delivery Drive Pulley (3) Fit the snap ring in the groove of shaft. Snap Ring VAC-1000...
- Page 120 5. Installation 5-7 Attaching the CTK-100 a-tower Right Side Unit (Option) Attach three idler shafts as shown to the right. [ Mounting Screws: SB5-10, W5S and W5 (extra-large) for the lowest idler shaft, SB5- 10 and W5S for the other two idler shafts] NOTE • Do not lock the lowest idler shaft yet. Do not lock this Idler Shafts shaft yet. A ttach a delivery belt to the pulleys as shown to the right. Delivery Belt M ove the lowest idler shaft in the arrow direction shown at right to apply tension to the belt, and then lock the Idler shaft. Idler Shaft VAC-1000...
- Page 121 5. Installation 5-7 Attaching the CTK-100 a-tower Right Side Unit (Option) A ttach side covers (two mounting screws each) to the delivery unit C, and then attach the locking screw to the nut plate. Locking Screw Side Covers A ttach delivery connector 10S (two locking screws; B3-10ZP and N3F), and delivery Tighten together connector 16S (two locking screws; B3- at the second Delivery 10ZP and N3F). Connect four connectors hole. Connector 10S and two grounds as shown to the right. Ground Cable Delivery Connector Adapter Cable (E513345) Connectors VAC-1000...
- Page 122 5. Installation 5-7 Attaching the CTK-100 a-tower Right Side Unit (Option) Connect sensor connector on rear. Connector NOTE Cable Clamp • Attach a cable clamp (mounting screw; SB3- 8 and W3) on the delivery roller and lock the sensor cable. I nsert air hose into hole in the right side of tower. NOTE Delivery Air Knob Air Hose • Delivery unit C blows air when delivery air knob is turned downward. Normal (Delivery Section at Left Side) Delivery Unit C VAC-1000...
- Page 123 5. Installation 5-7 Attaching the CTK-100 a-tower Right Side Unit (Option) A ttach the lower guide plate to the original position. Lower Guide Plate A ttach the upper guide plate to the original position. A ttach front cover (three mounting screws) and rear cover (two mounting screws) to their original positions. CAUTION • Turn off the power of the device for left side delivery when you deliver the collated sets to the right. • When the CTK-100 right side unit is attached and the ST-20R stacker or the PJ-77R jogger is connected, Upper Guide Plate Front Cover Rear Cover and the collated sets are delivered to the left, the full tray icon will be indicated. Disconnect the lower one of the two connectors, and adjust the control on the board to clear the full tray icon. Contact the dealer. VAC-1000...
-
Page 124: Attaching The Hmu-100 Hand Marry Unit (Option)
5. Installation 5-8 Attaching the HMU-100 Hand Marry Unit (Option) 5-8-1 Accessories Delivery Drive Pulley 1 pc Idler Shafts Assy 2 pcs Delivery Belt 1 pc Sheet Guide 1 pc Delivery Drive Pulley Locking Snap Ring (STW-15) Support Table 1 pc 1 pc Mounting Screws for Idler Shafts Pin (PP5-20) 1 pc W5S: 2 pcs W5 Large: 1 pc (for lowest idler shaft) SB5-12: 2 pcs VAC-1000... -
Page 125: Installing The Hmu-100
5. Installation 5-8 Attaching the HMU-100 Hand Marry Unit (Option) 5-8-2 Installing the HMU-100 When a-tower and m-tower are connected, install the HMU-100 hand marry unit on the right side of m-tower. The HMU-1000 can be installed to maximum two towers. WARNING • Turn off breakers in the building before disconnecting and connecting the power cable. High voltage can cause severe personal injury. Turn off the Power switch and disconnect power cable. Power Switch Screw (Loosen it. You do not have to remove it) Remove the front cover of the tower that the HMU-100 is attached to. Front Cover Screws Mounting Screws Cover for a-tower or m-tower for Hole Cover Remove the covers of VAC-1000; right side cover, Right Side Cover Hole Cover cover for a-tower or m-tower and hole cover. VAC-1000... - Page 126 5. Installation 5-8 Attaching the HMU-100 Hand Marry Unit (Option) SB5-12 Insert a pin into the shaft of VAC-1000. Attach delivery drive pulley to the shaft and lock it using a snap ring. Idler Shaft Assembly Attach two idler shaft assemblies and tighten the screws (SB5-12, W5S, W5) from the rear. (Large) NOTE • Attach washer W5 (Large) only for the lower idler shaft. Shaft of VAC Delivery Drive Pulley Snap Ring Attach the right side cover. Attach the HMU-100 hand marry unit on the right side of the VAC-1000. (1) Attach the hook of the HMU-100 on the support of the VAC-1000. (2) Set the HMU-100 so that the positioning guide (arrow) fits the rear cover of the VAC-1000. Support of the VAC-1000 Hook HMU-100 Rear Cover of VAC-1000 HMU-100 Positioning Guide...
- Page 127 5-8 Attaching the HMU-100 Hand Marry Unit (Option) Remove the front cover of the HMU-100 (three Front Cover screws). NOTE • Loosen two screws at the bottom. You do not have to remove them. Drive Belt Draw a 100 mm (3.94”) line on the drive belt using a pen. Draw a 100 mm (3.94”) line Idler Shaft Drive Belt Pulley A ttach the drive belt on the pulleys and idler shafts of the VAC-1000 and the HMU-100. Pulley Idler Shaft (VAC-1000 Front) (HMU-100 Front) Upper Idler Shaft A djust the position of upper idler shaft of Idler Shaft Assembly HMU-100 so that the 100 mm line on the belt becomes 101.5 mm (4.00”) through 102 mm (4.02”). A ttach the front covers of the HMU-100 and the VAC-1000. Drive Pulley Note the...
-
Page 128: Connecting The Cables
5. Installation 5-8 Attaching the HMU-100 Hand Marry Unit (Option) 5-8-3 Connecting the Cables When a-tower is connected to m-tower, connect Panel Cover the cable from the HMU-100 with m-tower. WARNING • Make sure that the Power switch is turned off before connecting the cable. Open the panel cover of VAC-1000. Control Board Connect a thick cable (input signal) from the HMU-100 with the CON 8 and CON 9 on the QPM-287 control board attached inside the panel cover. Connect a thin cable (input signal) with CON24. NOTE • Remove the connectors CON8, CON9, and CON24 from the board. Insert the cable pin into the removed connectors, and then reset the connectors on the board. • Make sure the inserting direction of pin. When you insert the pin correctly, you will feel a click. The HMU-100 CON8 QPW-506 CON8 CON9 QPM-287 CON9... - Page 129 5. Installation 5-8 Attaching the HMU-100 Hand Marry Unit (Option) Turn off the breaker in the building and connect the power cable. Turn on the breaker in the building. VAC-1000...
- Page 130 Manufacturer: www.horizon.co.jp/ Phone:+81-75-934-6700, Fax:+81-75-934-6708,...
Need help?
Do you have a question about the VAC-1000 and is the answer not in the manual?
Questions and answers