Advertisement
Available languages
Available languages
Quick Links
Installation Guide
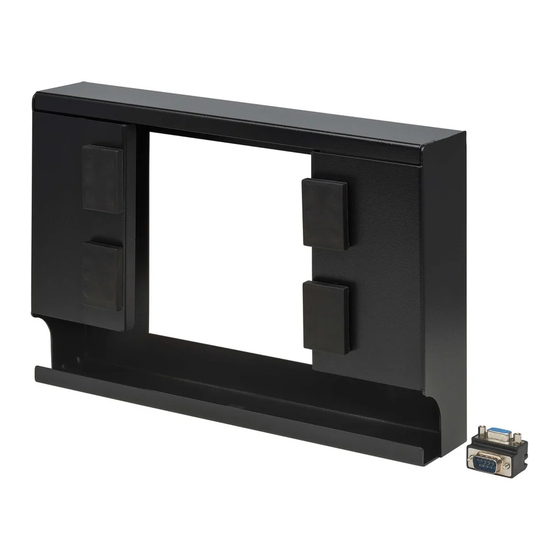
Display Bracket for
SRCOOL3KTP Cooling Units
Model: SRCOOL3KDISPBKT
Español 4 • Français 7
WARRANTY REGISTRATION
Register your product today and be
automatically entered to win an ISOBAR
®
surge protector in our monthly drawing!
tripplite.com/warranty
1111 W. 35th Street, Chicago, IL 60609 USA • tripplite.com/support
Copyright © 2022 Tripp Lite. All rights reserved.
1
Advertisement

Related Manuals for Tripp Lite SRCOOL3KTP


Summary of Contents for Tripp Lite SRCOOL3KTP
- Page 1 WARRANTY REGISTRATION Register your product today and be automatically entered to win an ISOBAR ® surge protector in our monthly drawing! tripplite.com/warranty 1111 W. 35th Street, Chicago, IL 60609 USA • tripplite.com/support Copyright © 2022 Tripp Lite. All rights reserved.
-
Page 2: Installation
Installation To Install the LCD Place the LCD screen into the metal bezel to protect the glass edge of the LCD. Place the LCD screen into the opening in the display bracket. Cable securing points should be at the bottom: Bottom Place the supplied fasteners into the slots of the LCD panel. - Page 3 Cable routing: • It is up to the end user to determine the best routing method for the rack in use. • Cables should be secured to the rack near the connection point on the SRCOOL3KTP to prevent accidental disconnection.
-
Page 4: Guía De Instalación
Guía de Instalación Soporte de Pantalla para Unidades de Enfriamiento SRCOOL3KTP Modelo: SRCOOL3KDISPBKT English 1 • Français 7 1111 W. 35th Street, Chicago, IL 60609 EE. UU. • tripplite.com/support Copyright © 2022 Tripp Lite. Todos los derechos reservados. - Page 5 Instalación Para Instalar el LCD Coloque la pantalla LCD en el bisel metálico para proteger el borde de vidrio del LCD. Coloque la pantalla LCD en la abertura del soporte de pantalla. Los puntos de sujeción del cable deben estar en la parte inferior: Parte inferior Coloque los sujetadores suministrados en las ranuras del panel LCD.
- Page 6 ángulo recto. Después conecte el cable de alimentación a la pantalla LCD. Fije los cables al soporte de pantalla usando cintillos de amarre (suministrados por el usuario). Conducción del cable: • Depende del usuario final determinar el mejor método de enrutamiento para el rack en uso. • Los cables deben fijarse al rack cerca del punto de conexión en el SRCOOL3KTP para evitar una desconexión accidental. • Si los cables son conducidos a través de aberturas existentes o aberturas agregadas por el usuario, debe tenerse cuidado de asegurar que no haya bordes afilados que puedan dañar los cables. Colocación del soporte: • El soporte usa imanes para fijarse a la superficie del rack.
-
Page 7: Guide D'installation
Guide d'installation Support d'écran pour les appareils de refroidissement SRCOOL3KTP Modèle : SRCOOL3KDISPBKT English 1 • Español 4 1111 W. 35th Street, Chicago, IL 60609 USA • tripplite.com/support Droits d'auteur © 2022 Tripp Lite. Tous droits réservés. - Page 8 Raccorder ensuite le câble d'alimentation à l'écran ACL. Fixer les câbles au support d'écran en utilisant des attaches mono-usage (fournies par l'utilisateur). Acheminement des câbles : • Il appartient à l'utilisateur final de déterminer la meilleure méthode de routage pour le bâti utilisé. • Les câbles doivent être fixés au bâti près du point de connexion sur le SRCOOL3KTP pour éviter une déconnexion accidentelle. • Si les câbles sont acheminés à travers les ouvertures existantes ou les ouvertures ajoutées par l'utilisateur, veiller à ce qu'il n'y ait pas de bords tranchants susceptibles d'endommager les câbles.
Need help?
Do you have a question about the SRCOOL3KTP and is the answer not in the manual?
Questions and answers