Advertisement
Quick Links
PROGRAMMING YOUR FAN
AND OPERATING THE REMOTE
CONTROL
Your DC brushless motor is equipped with a
automatically learned type remote control.
Remove the set screw on the back of transmitter, take out
the battery cover. Install one 3V battery cell (included) (Fig. 9).
To prevent damage to transmitter, remove the battery if not
used for long periods of time. When remove or insert the
batteries, use a suitable screwdriver to loosen or tighten the
screws and open the back cover. Exhausted batteries are to
be removed from the appliance and safely disposed of. Non-
rechargeable
batteries
Batteries are to be inserted with the correct polarity. The
supply terminals are not to be short-circuited.
Restore power to ceiling fan and test for proper
operation.
A. Setting for the first time to used:
a) After installing the unit and restoring power to the fan, press
and hold the "0" button 1 - 5 seconds. You must press the "0"
button within 60 seconds of restoring power to the fan.
b) Press and hold "0" button for about 5 seconds and release. If
optional light kit is installed, the light kit will flash twice and the
signal light on the hand held transmitter will come on when
the button is pressed. The fan has completed the pairing
process with the remote control and is ready for use.
The receiver provides the following protective function:
1. Lock position: The DC motor has a built-in safety against
obstruction during operation. If there is an obstruction, the
motor will stop and then the power will automatically go off in
30 seconds. Remove the obstruction and reset.
2. Over 80W protection: When the receiver detects motor
power consumption which is greater than 80W, the receiver
power will be stopped and operation will immediately
discontinue. Wait for 5 seconds and then turn the receiver
power back on.
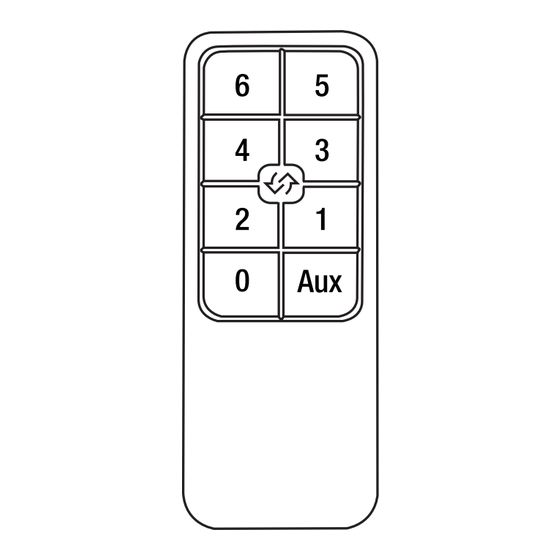
B. 1, 2, 3, 4, 5 and 6 button:
These six buttons are used to set the fan speed as
follows:
1 = minimum speed
2 = low speed
3 = medium low speed
4 = medium speed
5 = medium high speed
6 = high speed
C. 0 button: This button turns the fan off.
D.
Reverse button: This button is to control
fan direction.
E. Aux button: This button is to control light on/off.
are
not
to
be
recharged.
NOTE: During self calibration test, the remote is
non-fuctional.
NOTE: The learning frequency function and self
calibration test will continue to retain the last set
frequency and calibration set even when the AC
power is shut off. If the frequency is changed the
self calibration test will occur again.
Figure 9
Figure 10
Set screw
Advertisement

Related Manuals for Atlas DC-REMOTE


Summary of Contents for Atlas DC-REMOTE
- Page 1 PROGRAMMING YOUR FAN AND OPERATING THE REMOTE CONTROL Your DC brushless motor is equipped with a automatically learned type remote control. Set screw Remove the set screw on the back of transmitter, take out the battery cover. Install one 3V battery cell (included) (Fig. 9). To prevent damage to transmitter, remove the battery if not used for long periods of time.
- Page 2 PROGRAMMING YOUR FAN AND OPERATING THE REMOTE CONTROL Your DC brushless motor is equipped with a automatically learned type remote control. Install one 23A/12V battery (included). To prevent damage to transmitter, remove the battery if not used for long periods of time (Fig. 7) Restore power to ceiling fan and test for proper operation.
- Page 3 INSTRUCTIONS ON HOW TO PROGRAM MULTIPLE FANS ON SINGLE CIRCUIT BREAKER. 1. Turn the power off at the breaker/service box. 2. Hang all fans by convenience cable located in top of motor to hook in ceiling bracket. This will allow you to easily access the leads from house and the leads of the fan.
- Page 4 OPERATING YOUR FAN Speed settings for warm or cool weather depend on factors such as the room size. Ceiling height, number of fans and so on. NOTE: To operate the reverse function on this fan, press the reverse button while the fan is running. Warm weather - (Forward) A downward airflow Figure 9 creates a cooling effect as shown in Fig.
Need help?
Do you have a question about the DC-REMOTE and is the answer not in the manual?
Questions and answers