
Subscribe to Our Youtube Channel
Related Manuals for JAKA MiniCab

Summary of Contents for JAKA MiniCab
- Page 1 Hardware User Manual JAKA MiniCab Original Instructions (en) File Version: 1.3 Robot: Zu Series, Pro Series, C Series...
- Page 2 The manual is the exclusive property of the JAKA Robotics Ltd. (hereinafter referred to as the “JAKA”) and JAKA fully reserves its copyright and interpretation right. This manual and parts thereof must not be reproduced or copied without JAKA’s written permission.
-
Page 3: Table Of Contents
Contents Foreword ..............................5 Product List ..............................5 Manual Instruction ..........................6 About the Manual ..........................6 Manual Reader ..........................6 References ............................6 Prerequisites ........................... 6 Safety Standard ............................ 7 Introduction ............................. 7 Safety Signals and Symbols ......................7 Warnings and Cautions ........................ - Page 4 7.1.4 Network Interface (LAN) ......................26 7.1.5 Control Stick Interface (STICK) ..................... 28 7.1.6 Emergency Stop Interface (E-STOP) ..................28 7.1.7 POWER Button ........................29 7.1.8 Status Indicator ........................29 Side Panel Interfaces ........................30 7.2.1 Power Interface ........................30 7.2.2 Robot Connection Interface ....................
-
Page 5: Foreword
JAKA MiniCab is a compact control cabinet with wide-voltage DC power supply, which can be used with JAKA Zu robots, JAKA Pro robots, JAKA C robots and JAKA Mini robots. This manual only covers the use with Zu series, Pro series, and C series. For instructions on using with the Mini series, please refer to the JAKA Mini Series Hardware User Manual. -
Page 6: Manual Instruction
1 Manual Instruction 1.1 About the Manual The manual contains: ⚫ Precautions for the use of the JAKA MiniCab ⚫ Installation of the JAKA MiniCab ⚫ Cleaning and maintenance of the JAKA MiniCab 1.2 Manual Reader The manual is intended for: ⚫... -
Page 7: Safety Standard
Symbol Description WARNING: ELECTRICITY MiniCab must be installed/configured in strict accordance with the instructions and cautions provided in this manual. The setting and modification of robot parameters must be carried out by authorized personnel to prevent unauthorized modification. -
Page 8: Liability And Risk
It is the responsibility of users of JAKA’s robot to ensure that relevant practical national laws and regulations are followed, and that no significant hazards lie in the whole robot application. - Page 9 Labels Description Product label Beware of electric shock Grounding Warning hot surface File Version: 1.3 9 / 39 JAKA MiniCab Hardware User Manual...
-
Page 10: Quick Start Guide
Inapplicable Pro 16 Inapplicable 3.2 Typical Robot Applications When the JAKA MiniCab is used with JAKA Zu robots, JAKA Pro robots and JAKA C robots, the required components are as shown in figure below. File Version: 1.3 10 / 39... - Page 11 It is also accessible to connect the network port of the control cabinet to the router and the operation terminal to the wireless network of this router at the same time. It is recommended to configure a specialized router for the robot to prevent conflicts with other devices. File Version: 1.3 11 / 39 JAKA MiniCab Hardware User Manual...
-
Page 12: Hybrid Robot Application
3.3 Hybrid Robot Application The JAKA MiniCab control cabinet can be used with mobile platforms such as AGV and can be powered by the 48V power battery inside the AGV. It is compact in size, making integration convenient and simple. -
Page 13: Technical Specifications
4 Technical Specifications The technical specifications of the JAKA MiniCab are as follows. Model MiniCab Weight 2.43 lb 1.1 kg ( Dimension (W×H×D) 180×46.6×128 mm (7.09×1.84×5.04 in) Temperature °C °F 0-50 (32-122 IP classification IP20 Material Steel, aluminum alloy Power supply... -
Page 14: Mechanical Specifications
MiniCab. In order to ensure the MiniCab can be cooled by a fan or natural convection, please refer to the distance shown in the diagram for mounting the control cabinet. -
Page 15: Mounting Methods
Do not use this product near corrosive and flammable gases such as hydrogen sulfide, chlorine, ammonia, sulfur, chlorinated gases, acid, alkali, salt, combustible, etc. Use MiniCab below an altitude of 1000 m (39370 in), and please derate if the altitude is above 1000 m (39370 in). - Page 16 Tightening torque: 0.6-0.8 Nm (5.31-7.08 Ibf in) When the mounting plane is mobile, to reduce Ensure that the mounting surface is smooth the impact of vibration on MiniCab during and free of vibration and confirm that the movement, it is recommended to add a rubber control cabinet is securely mounted.
- Page 17 Tightening torque: 0.6-0.8 Nm (5.31-7.08 Ibf in) When the mounting plane is mobile, to reduce Ensure that the mounting surface is smooth the impact of vibration on MiniCab during and free of vibration and confirm that the movement, it is recommended to add a rubber control cabinet is securely mounted.
- Page 18 5.2.2.3 Guide Rail Mounting The rail mounting accessories and rail clamp are optional accessories. If you need to mount MiniCab on the guide rail, please contact the JAKA technicians to acquire these accessories. The mounting steps are as follows: Steps...
-
Page 19: Electrical Characteristics
6 Electrical Characteristics 6.1 Introduction This chapter mainly introduces the absolute maximum ratings and recommended usage conditions of MiniCab. WARNING It is imperative for users to adhere to the recommended electrical parameters when using the robot and MiniCab. Exceeding the maximum ratings may result in hardware damage. -
Page 20: Typical Power Consumption
The peak output current value is related to the robot model and operating status. For some robots, derating is required when they are used with the MiniCab, the derating value refers to 3.1 Compatibility with Robots. -
Page 21: Electrical Interface
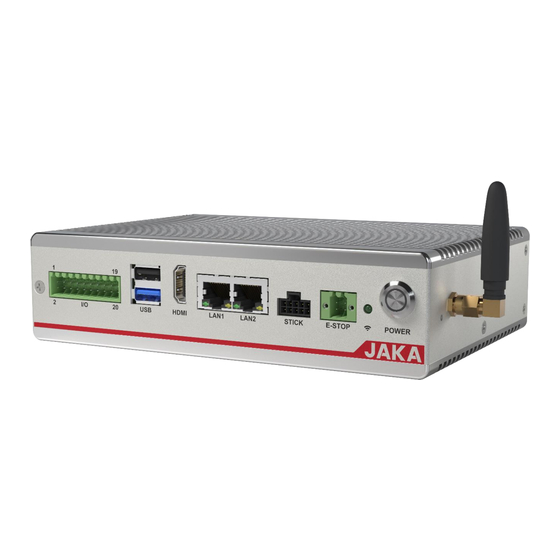
7 Electrical Interface MiniCab has user interfaces on the front panel and side panel. The front panel includes I/O, two USB, a HDMI, two LAN, a control stick and an E-STOP interface, a Wi-Fi status indicator and a POWER button. The side panel includes a power input interface, a robot connection cable interface, a 2.4G Wi-Fi antenna, and a network reset... - Page 22 You can set the function of each interface in the App. Only one interface type can be selected for each channel at the same time. For example, if I/O_1 is set as DI, it cannot be set as DO at the same time. File Version: 1.3 22 / 39 JAKA MiniCab Hardware User Manual...
- Page 23 The safety I/O function is only supported in software versions 1.7.1.37 and above. Therefore, before using the safety I/O function, an upgrade is required. The version requirements are as follows: Type ersion 1.7.1.37 and above Controller 1_7_1_36 and above PSCB 03_02_PR and above File Version: 1.3 23 / 39 JAKA MiniCab Hardware User Manual...
- Page 24 7.1.1.3 Remote On/Off MiniCab can be powered on after power is supplied for 4 seconds. Besides using the power on/off button on the control stick and the POWER button on the front panel of the control cabinet, MiniCab can also be remotely powered on and off by PIN5 and PIN8 of the I/O interface on the front panel of the control cabinet.
- Page 25 The external DC 24V power supply is required. Connect the positive of the power supply to the PIN8 (Remote_ON) interface and the negative to PIN6 (GND). The diagram below shows the wiring diagram for remote powering up the MiniCab. Press K1 for about 1 second and release it to power up the control cabinet. 自恢复开关...
-
Page 26: Usb Interface
485A 485B USB Interface 7.1.2 The USB interface on the MiniCab front panel is for internal debugging use only. If you need to use it, please contact JAKA technicians. HDMI Interface 7.1.3 The HDMI interface on the MiniCab front panel is for internal debugging use only. If you need to use it, please contact JAKA technicians. - Page 27 LAN2 The LAN2 port is a 10M/100M/1000M adaptive port, which is configured as obtaining IP address automatically by default. It can be configured as a static IP through the JAKA App. Refer to the software user manual for configuration steps.
-
Page 28: Control Stick Interface (Stick)
The STICK interface is used to connect the control stick. Simply insert the control stick connection cable into this interface to connect. This interface is only for connecting the JAKA control stick and should not be modified. Emergency Stop Interface (E-STOP) 7.1.6... -
Page 29: Power Button
Power down: Press the POWER button for more than 3 seconds, and then the control cabinet will be powered down. Status Indicator 7.1.8 There is a ring of status indicator around the POWER button on the front panel of MiniCab, which used to indicate the robot state. File Version: 1.3 29 / 39... -
Page 30: Side Panel Interfaces
7.2.1 VP+ VL+ MiniCab power interface contains three input interfaces: control cabinet power input VL+ (PIN1), robot power input VP+ (PIN2) and common negative GND (PIN3). Control cabinet power (VL+) supplies power to the control cabinet, while robot power (VP+) supplies power to the robot. Additionally, VP+ can also supply power to the control cabinet. - Page 31 The power supply models listed here are only for recommendation, you can purchase power supplies of equivalent specifications. Additionally, peak power consumption is dependent on the robot's load and usage scenario. The values listed here are the maximum value. File Version: 1.3 31 / 39 JAKA MiniCab Hardware User Manual...
-
Page 32: Robot Connection Interface
When using an external power supply, it is necessary to set the braking voltage value in the JAKA App to avoid that the control cabinet is powered down by over voltage protection or damage to the control cabinet. For specific operations, please refer to the software user manual. -
Page 33: Transportation
WARNING Ensure that the back or other body parts of operators are not overloaded when the equipment is lifted. Use appropriate lifting equipment. JAKA is not responsible for damage incurred during the transport of the equipment. Please comply with the relevant lifting regulations in each region and country. -
Page 34: Maintenance
All safety instructions in this manual must be strictly followed for maintenance work. For more detailed maintenance instructions, please refer to the JAKA Service Manual. The repair must be performed by an integrator authorized by JAKA or by JAKA’s personnel. After-sales service contact information: E-mail: support@jaka.com; Tel: 400-006-2665. - Page 35 Please store it in an anti-static bag. Other environmental conditions Please keep it in an environment that does not produce poisonous gas, dirt and dust. Do not place heavy objects on it during storage. File Version: 1.3 35 / 39 JAKA MiniCab Hardware User Manual...
-
Page 36: Disposal
EU WEEE Fee for disposal and handling of electronic waste of JAKA robots sold on the German market is prepaid to DPA- system by JAKA. Importers in countries covered by the European WEEE Directive 2012/19/EU must make their own registration to the national WEEE register of their country. - Page 37 GB/T 26572. x indicates that the concentration of hazardous substance in at least one of the homogeneous materials for this part is above the limit as stipulated in GB/T 26572. File Version: 1.3 37 / 39 JAKA MiniCab Hardware User Manual...
-
Page 38: Warranties
Warranty default becoming evident. JAKA has the ownership of the equipment or components that are replaced or returned to JAKA. Any other claim arising out of or relating to the equipment is excluded from the scope of the Warranty. Nothing in this Warranty shall attempt to limit or exclude a Customer’s Statutory Right, nor the manufacturer’s liability for death or personal injury resulting from its negligence. - Page 39 JAKA ROBOTICS CO., LTD. Add.: Building 6, No. 646, Jianchuan Road, Minhang District, Shanghai, China E-mail: support@jaka.com Web: www.jakarobotics.com...
Need help?
Do you have a question about the MiniCab and is the answer not in the manual?
Questions and answers