Advertisement
Quick Links
Advertisement

Related Manuals for EAST OAK Screen House 6x6 Feet


Summary of Contents for EAST OAK Screen House 6x6 Feet
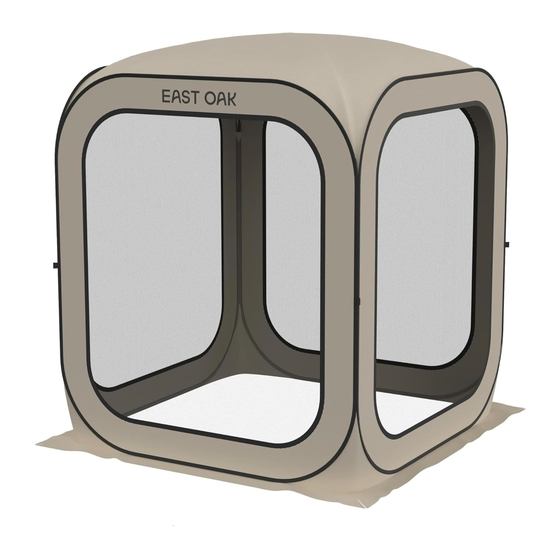
- Page 1 Screen House 6x6 Feet Owner’s Manual EASTOAK.COM OWNER’S MANUAL...
- Page 2 Questions? Comments? Reach out to us for expert support! support@eastoak.com eastoak.com 1-833-EAST-OAK ( USA ) ( 1-833-327-8625 ) Mon-Fri 8am-8pm EST Follow eastoakliving on Claim your 3-year warranty Please scan the QR code to view the installation video at eastoak.com/warranty SCREEN HOUSE EASTOAK.COM OWNER’S MANUAL...
-
Page 3: Parts List
IMPORTANT INFORMATION PARTS LIST DANGER Misuse could result in a serious accident or death. • This screen house is made with flame resistant fabric which meets CPAI- 84 specifications. It is not fireproof. The fabric will burn if left in continuous contact with any flame source. -
Page 4: Installation
Make the screen house upright, pull open each panel from inside INSTALLATION to outside, and adjust it properly to a regular quadrilateral. Take out the screen house from the zip-up bag, and remove the elastic band for securing. Please ensure you are in an open space without another person within 3 meters around. - Page 5 Connect the telescoping poles with both ends downwards, pass through the woven tapes on the ceiling, insert them into the small bags marked with red circles, and secure them with the touch fasteners on the side. After the installation of all 2 poles, draw the woven tape in the center to the tightest extent, and fix the position.
- Page 6 Adjust the shape properly, and secure the screen house with ground stakes. If it is used on cement floor, you may fill the provided sandbags with sand and soil, and connect them with guylines. 45¡ Secure the screen house You may fill the with ground stakes.
- Page 7 Zip up the screen house on the panel, and push it down directly. The 4 FOLD-DOWN panels will be collapsed into 2 panels. Fold them into one panel. Tidy up the excess material. Pull out the screen house pegs from the ground, remove the windproof ropes, and empty the sand and soil in sandbags.
- Page 8 Folding storage of the screen Please ensure that the product is laid flat and in place without bending or folding. house. Fold the top panel of the screen house to the bottom of black gauze. NOTE: For the convenience of quick folding, it is recommended to step on the red circle for folding.
- Page 9 Bind and hold the collapsed screen house in place with the elastic Pull them towards yourself, make the right section overlap the left band, and put in all accessories. section a little, and then hold them with your right hand. Tips: In case of distortion or deformation of the screen house, it may be caused by the displacement of steel wires, which can be restored by holding any of its corners and shaking it.
-
Page 10: Warranty Policy
Sandbags WARRANTY POLICY GUARANTEED 3-YEAR WARRANTY Thank you for choosing East Oak. This product is covered by our company warranty for up to 3 years from its original purchase date. CLAIM WARRANTY If you’d like to claim your product’s warranty, register your new product on our website at www.eastoak.com/warranty. - Page 11 support@eastoak.com eastoak.com 1-833-EAST-OAK (USA) SCREEN HOUSE...
Need help?
Do you have a question about the Screen House 6x6 Feet and is the answer not in the manual?
Questions and answers