
Related Manuals for Senoven SEN 1702


Summary of Contents for Senoven SEN 1702
- Page 1 MODEL SEN 1702 BLOWING CONVEYOR OVEN (DIGITAL SCREEN) USER & MAINTENANCE MANUAL ŞENGÜN MAKİNA İNŞAAT ve KIRTASİYE SAN. TİC. LTD. ŞTİ...
- Page 2 These instructions apply only if the country code is shown on the device. If the country code does not appear on the device, refer to the technical instructions that give instructions for adapting the device to the country. SEN 1702/SENOVEN...
- Page 3 WARRANTY CERTIFICATE SERIAL NUMBER SALE DATE Sold at the above date SEN 1702 MODEL BLOWING CONVEYOR OVEN is guaranteed against production failures for 1 Year by ŞENGÜN MAKİNA İNŞAAT ve KIRTASİYE SAN. TİC. LTD. ŞTİ. Warranty Terms; - Warranty terms start after the product delivery for 1 year.
- Page 4 For information you coo not understand , ask your nearest out horized service Please note that if the technical service personnel is kept waiting you will be billed for each hour. SEN 1702/SENOVEN...
- Page 5 Do not use paper when placing food product through the oven! Usage of flammable materials may cause a fire and should never be placed in the oven. WARNING! Do not put any object to anywhere of the oven except the conveyor. WARNING! Always be careful while you are working. SEN 1702/SENOVEN...
- Page 6 Cleaning and maintenance are the most important factors of oven performance. The processes which are not available in the manual can cancel the appliance of warranty, cause property damage, injury or death. Read and understand the instructions in the manual SEN 1702/SENOVEN...
-
Page 7: Table Of Contents
2.7 Lower Chassis Assembly (High) 2.8 Lower Chassis Assembly (Low) 2.9 Chassis-Oven Assembly 2.10 Double Floor Oven Assembly 2.11 Air Duct Disassembly / Assembly SECTION 3: INSTRUCTIONS FOR USE 3.1 Distance Requirements 3.2 Ventilation 3.3 General Information of Ventilation SEN 1702/SENOVEN... - Page 8 3.4 Ventilation Advice 3.5 Gas Connection 3.6 Installation Elements 3.7 SEN 1702 Technical Specifications Table SECTION 4: PROGRAMMING-START & STOP 4.1 Warnings 4.2 Closing 4.3 Fault / Warnings Messages 4.4 Burner Fault 4.5 Functions 4.5.1 Temperature Cutting Switch 4.5.2 Electrical Installations 4.5.3 Limitation Requirements –...
-
Page 9: Section 1: Introduction
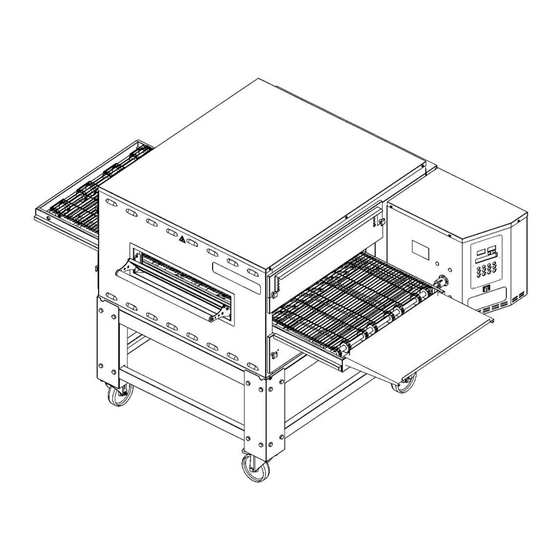
1.1 Introduction of Body Components: NOTE: Entrance of product depends for the cooking style. The out sheet can be attached other side of the oven. 1.2 Functions of Parts: 1.2.1 Oven Body: Every SEN series oven has a main body. SEN 1702/SENOVEN... -
Page 10: Overlap Assembly
Conveyors provide the input and output of the product. Belt is controlled by microprocessor. Cooking time can be set between 1 - 30 minutes. The speed of belt determines the Products cooking time. The width of belt is 610 mm and consist by interlocking wires. SEN 1702/SENOVEN... -
Page 11: General Information
Informations which are located at the following pages will guide you at installation of the oven. First of all check the parts of oven carefully. Before the installation determine a safety place for oven. 1.8 Oven Specifications: SEN 1702 Conveyor Belt Width 610 mm Heating Chamber Length 912 mm Heating Chamber Size... -
Page 12: Electrical And Technical Specifications Table
IMPORTANT: Electrical input connection must be connected according to the order of the input terminals. (PHASE TO PHASE, NEUTRAL TO NEUTRAL, – GROUNDING TO GROUNDING) NOTE: Specifications can be changed by Şengün Makina. Above Specifications are given for information. SEN 1702/SENOVEN... -
Page 13: Dimensions
1.10 Dimensions: Duplex Single Oven (Isometric) Dimensions Outside SEN 1702/SENOVEN... - Page 14 FRONT VIEW GAS INPUT TOP VIEW SEN 1702/SENOVEN...
-
Page 15: Product Out Sheet
SECTION 2: ASSEMBLE OPTIONAL PART NAME UNIT Product Out Sheet Forward/Back Waste Collecting Sheet Entry and Exit Cover Sheet Stopper Sheet (Optional) SEN 1702/SENOVEN... -
Page 16: Forward/Back Waste Collecting Sheet
2.1 Product Out Sheet: Attach the product out sheet to the conveyor chassis as shown in the figure. And Push it. 2.2 Forward/Back Waste Collecting Sheet: Front and back waste collecting sheets are taken out as shown in pictures. SEN 1702/SENOVEN... -
Page 17: Entry And Exit Cover Sheet
2.3 Entry and Exit Cover Sheet: Covers are set as desired through holes which are different levels Covers are attached by bakelite bolts. 2.4 Stopper Sheet (Optional): Stopper, blocks the products and keep them into the belt. Stopper is attached to the belt. SEN 1702/SENOVEN... -
Page 18: Belt Assembly
2.5 Belt Assembly: The conveyor is mounted inside the machine as shown in the picture. The drive shaft is centered on the clutch pipe. SEN 1702/SENOVEN... - Page 19 Clutch pipe is attached by the drive shaft spring as shown in the figure. Belt assembly is completed. For disassembly, use every steps in reverse order. SEN 1702/SENOVEN...
-
Page 20: Belt Wire Assembly
3. If belt wire problem appears, remove a 4. The final wire assembly wire as shown in the figure. For disassembly, use every steps in reverse order. NOTE: Clean the belt wire once a week or month for better performance. SEN 1702/SENOVEN... -
Page 21: Lower Chassis Assembly (High)
07135 CHASSIS LEG SHEET 01957 BOLT 07118 BRACKET SHEET 01961 WASHER 07122 BRACKET SHEET 07120 BRACKET SHEET 07119 BRACKET SHEET 00051 WASHER 01958 BOLT 00048 BOLT 01960 WASHER 01964 WHEEL 01965 01963 WASHER 01959 00047M BRACKET SHEET GROUP SEN 1702/SENOVEN... -
Page 22: Lower Chassis Assembly (Low)
ITEM SPARE PARTS DESCRIPTION UNIT NUMBER NUMBER 07123 CHASSIS LEG SHEET 01960 WASHER 07125 BRACKET SHEET 01965 01958 BOLT 00051 WASHER 07126 BRACKET SHEET 00048 BOLT 01957 BOLT 01964 WHEEL 01961 WASHER 01963 WASHER 01959 00048M BRACKET SHEET SEN 1702/SENOVEN... -
Page 23: Chassis-Oven Assembly
2.9 Chassis-Oven Assembly: SEN 1702/SENOVEN... -
Page 24: Double Floor Oven Assembly
2.10 Double Floor Oven Assembly: Note: Bolts are included in the package ITEM SPARE PART NUMBER SPARE PART DESCRIPTION UNIT 02056 HOLDER 00046 BOLT SEN 1702/SENOVEN... -
Page 25: Air Duct Disassembly / Assembly
7. Remove air canals as shown Fig. 2 and Fig. 3. Apply marking when you remove air canals. Marking Examples; Hood U1, Internal Plate U1, External Plate U1, 8. You can do cleaning after this process. You can do assembly do reverse what you did. SEN 1702/SENOVEN... -
Page 26: Section 3: Instructions For Use
The ventilation mouth (hood) should be in harmony with the general ventilation and heating system. ANTENTİON: Do not allow air to flow through the cooking tunnel. The air must not be directed to the front top of the oven, to the side or to the rear. SEN 1702/SENOVEN... -
Page 27: Ventilation Advice
Do not work around conveyor belt with long hair, loose clothing, or dangling jewelry. Getting caught in the belt could result in serious injury. DANGER! If the power supply cord appears to be damaged, do not attempt to operate the unit. Contact a service agent or qualified electrician to repair! SEN 1702/SENOVEN... -
Page 28: Installation Elements
TTR Cable is Flexible, shatterproof and loosen proof. Grounding has to be proper. Use regulator if voltage is high or low. NOTE: If you fallow the above steps, assembly process can be made smoothly and quickly. We wish you good work. SEN 1702/SENOVEN... -
Page 29: Sen 1702 Technical Specifications Table
3.7 SEN 1702 Technical Specifications Table: Oven Electricity – Gas Technical Specifications Table Ampere Gas Inlet Capacity Full Average Voltage Faze T (PE) Loading Pressure (Kw) Performance Gas Usage Gas Usage 230V 1,586 m³/ 1,3 m³ 75,000 21 mbar 15 kW... - Page 30 Working Temperature : -20 - 70°C Maximum Damp : %90 Rh (without condensation) Height : Up to 2000 meters Environments where device use is not suitable. Corrosive atmospheric environments. Explosive atmospheric environments. Home applications. (The device only can be used industrial applications.) SEN 1702/SENOVEN...
- Page 31 SEN 1702/SENOVEN...
- Page 32 13. Program Set Button : Press this button once for 5 seconds and enter the set section. 14. ON/OFF Button : With this button the device is returred to the “on’’ or “off ’’ state . Button turns off when the device is switehed off screen turns off. SEN 1702/SENOVEN...
-
Page 33: Warnings
The more detailed description is on page 57. 5. Do not keep combustible and explosive material around the machine. 4.2 Closing To turn off the oven, touch ON/OFF and switch off with 0-1 switch . SEN 1702/SENOVEN... -
Page 34: Fault / Warnings Messages
FAULT 26 : Pressing the button for more than 10 seconds causes an error until the reset button is released. 4.4 Burner Fault: Occurs when the burner does not fire or if there is fault in the burner system. SEN 1702/SENOVEN... -
Page 35: Functions
The quick disconnect tool or its pipe should limit the movement of the oven. 3. If the restriction is removed due to cleaning or maintenance, it must be returned back to the original after cleaning or maintenance has finished. SEN 1702/SENOVEN... -
Page 36: Operator Maintenance
If the oven fails to operate, check the circuit breaker to be sure it is turned on. Also, before calling technical service, check that the power cut switch on the control panel is on. Technical service information must be located on the oven or contact the factory to find out the nearest technical service. SEN 1702/SENOVEN... -
Page 37: Cleaning Instructions
Overheating is detrimental to the life of all components mentioned. The periodic intervals for preventative cleaning may vary greatly depending upon the environment in which the oven is operating. You must discuss the need for Preventive Maintenance with your Authorized Service Company to establish a proper program. SEN 1702/SENOVEN... -
Page 38: Section 5: Cooked Products
SEN furnaces is clearly ahead 5.2 Cooking Time and Temperature: PİZZA - ALUMINIUM PAN - TIME: 6 MINUTES - 260 °C - FRESH PİDE - OVER CONVEYOR - TIME: 5 MINUTES - 260 °C - FRESH SEN 1702/SENOVEN... -
Page 39: Total Cooking Calculation
109,8 Amount /Hour Total Producti 109,8 219,6 Amount /Hour Sample 2: Oven Chamber Length: 915 mm. Cooking Time: 5 min. Pan Length: 500 mm. Producti 5 dk. 21,96 Amount /Hour Total Producti 21,96 65,88 Amount Pan Length /Hour SEN 1702/SENOVEN... -
Page 40: Sample Capacity Table
4 ½ 30 cm 36 cm 41 cm Pizza Diameter 5 minutes 5 ½ 6 minutes 6 ½ 30 cm 36 cm 41 cm 8 minutes Pizza Diameter 7 minutes 7 ½ 30 cm 36 cm 41 cm SEN 1702/SENOVEN... -
Page 41: Section 6: Spare Parts Manual
SECTION 6: SPARE PARTS MANUAL SPARE PARTS MANUAL SEN 1702/SENOVEN... - Page 42 SEN 1702/SENOVEN...
- Page 43 00041 BOLT 01867 BOLT 01103M 00006 WASHER AIR PROTESTAT 02580 BOLT 00317 WASHER 00365M 01305 CONTROL BOX 01879 KONTAKTOR 01862 STEP ENGINE SHEET 01831 BOLT 01861 ENGINE SHEET BURNER 00364M SCREEN 02351 COMMUNICATIONS CARD 08091 BUTTON M00342 BURNER SEN 1702/SENOVEN...
- Page 44 01548 WATCHING WINDOW 01762 WINDOW EDGE PLATE 07160 GLASS FRAME CONNECTION 01759 WINDOW EDGE PLATE 01752-1 RUBBER PLUG 01753-1 COVER HANDLE 02342 BOLT 00045 101503 BOLT 04077 WASHER 00157 BOLT 07172 GLASS OPEN/CLOSE LAMA 07170 GLASS OPEN/CLOSE LAMA SEN 1702/SENOVEN...
- Page 45 FAN GUARD SHEET 00279 BOLT 01960 WASHER 00277 WASHER 00398M 00556 BOLT 07156 ENGINE SHEET 101511 F.I.R ENGINE 04074 BOLT 05529 WASHER 01672 BOLT 01728 TERMINALS 01317 REZISTANCE OUTPUT TUBE 07004M BACK COVER 01299 WASHER 00042 WASHER 00041 BOLT SEN 1702/SENOVEN...
- Page 46 01728 TERMINALS 04074 BOLT 01961 WASHER 05529 WASHER 00556 BOLT 01299 WASHER 00042 WASHER 07169 SHAFT 07116 BAHCIVAN ENGINE 07030 STUD 01959 01963 WASHER 07031 FAN GUARD SHEET 00400M 07004M BACK COVER 00041 BOLT 01317 REZISTANCE INPUT MACARON SEN 1702/SENOVEN...
- Page 47 07017M INTERNAL AIR DUCT SHEET 07054 FIX SHEET 07016M AIR DUCT SHEET 00416M BODY 07000 TOP/BOTTOM COVER 00046 BOLT 00124 HANDLE 00417M SIDE PACKAGE 07010M SIDE PACKAGE 07027M ENTRANCE/OUT SHEET 01731 THERMOCOUPLES 01596-1 00441M INTERNAL AIR DUCT SHEET SEN 1702/SENOVEN...
- Page 48 SPARE PARTS These materials are supplied with the machine. According to the cooking quality of the product to be cooked, air feeder are removed and these sheets are attached. SEN 1702/SENOVEN...
- Page 49 M00369 SSR BOX SEN 1702/SENOVEN...
- Page 50 00301 FUSE AIR ROUTING SHEET 02334 POWER SUPPLY 02319 SPONGE 01307 01271 BOLT 02634 SPONGE 01306 01011 SSR SHEET 00292 LIMITER 01296 WASHER TERMINALS (GROUNDING) 00293 02208 FUSE TERMINALS RAIL 01886 00046 BOLT 01822 SSR RELAY 01292 VARISTOR SEN 1702/SENOVEN...
- Page 51 M00347 (BELT) SPARE PARTS LIST ITEM SPARE PART NUMBER SPARE PART DESCRIPTION UNIT 02013 BELT DRIVE BEARING 07093 WASTE PAN 00096 07095 STOPER SHEET 07000M WIRE BELT 07029 PRODUCT OUT SHEET 00374M CONVEYOR CHASSIS 00319M BELT DRIVE SHAFT 00318M BELT IDLE SHAFT SEN 1702/SENOVEN...
- Page 52 M00342 BURNER SEN 1702/SENOVEN...
- Page 53 GAS VALVE 02640 01672 BOLT NIPPLE 07077 01881 VALVE ELBOW 02649 01880 BRAIN ELBOW 02639 07139 RECORD RECORD 01689 101504 CYLINDER HEAD GASKET NIPPLE 07078 101510 CYLINDER HEAD GASKET PIPE 01695 00395M ELBOW BOLT 01670 00052 WASHER 00041 BOLT SEN 1702/SENOVEN...
-
Page 54: Section 7: Electrical Diagram
SECTION 7: ELECTRICAL DIAGRAM SEN 1702/SENOVEN... - Page 55 SEN 1702/SENOVEN...
- Page 56 SEN 1702/SENOVEN...
- Page 57 SEN 1702/SENOVEN...
-
Page 58: Section 8: Troubleshooting
Authorized Service Agency. The name and phone number of the Authorized Service Agency should be located on the oven or contact the factory for the name of the nearest Authorized Service Agency. SEN 1702/SENOVEN... - Page 59 BÖLÜM 9: LABELS (High Temperature) (Grounding) Electrical Input Warning Labels SEN 1702/SENOVEN...
- Page 60 Technical Label (Product Card) Warning Labels SEN 1702/SENOVEN...
- Page 61 NOTE: SEN 1702/SENOVEN...
- Page 62 İkitelli Organize Sanayi Bölgesi, Atatürk Bulvarı, Pufa İş Merkezi No: 98 Bodrum Kat: 2-3 Başakşehir/ İstanbul/ Türkiye Phone: +90 212 671 23 23 (Pbx) Phone 2: +90 212 671 84 84 Fax: +90 212 671 88 28 GSM: +90 533 957 14 53 e-Mail : info@sengunmakina.com web : www.sengunmakina.com SEN 1702/SENOVEN...
Need help?
Do you have a question about the SEN 1702 and is the answer not in the manual?
Questions and answers