
Subscribe to Our Youtube Channel
Related Manuals for Red Mountain Valley 2A-OH023


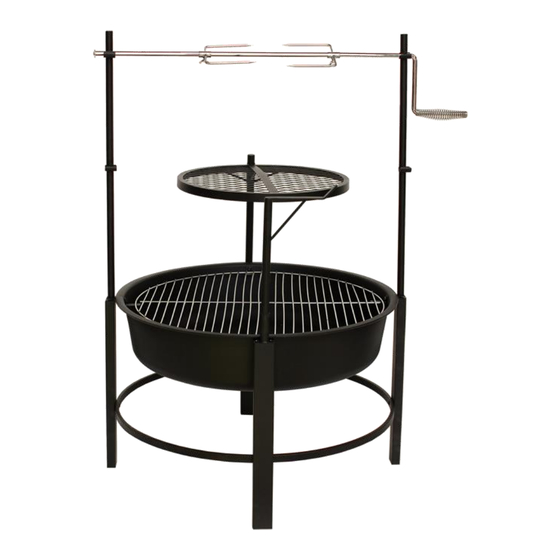
Summary of Contents for Red Mountain Valley 2A-OH023
- Page 1 ITEM# 2A-OH023 SKU# 9190497 Assembly Instructions & User’s Manual Fire Pit Cowboy Style 32in WARNING FOR OUTDOOR USE ONLY (Outside any enclosure)
- Page 2 Table of Contents Warnings………………………………………………………………..…2 Tools and Parts…………………………………………………………...6 Assembly Instructions…………………………………………………..7 Care and Maintenance……………………………………………...……9 Warranty Information………………………………………....10 Note: Before beginning assembly of product, make sure all parts are present. Compare parts with package content list and hardware contents. If any part is missing or damaged DO NOT attempt to assemble the unit.
- Page 3 Warnings 1. DO NOT use this fire pit without reading this entire document and all WARNINGS, cautions and instructions. 2. This item is for outdoor use only, and shall NOT be used in a building, garage or any other enclosed area. 3.
- Page 4 16. DO NOT use this fire pit near automobiles, trucks, vans or recreational vehicles. 17. DO NOT use in an explosive atmosphere. Keep outdoor area clean and free from combustible materials, gasoline and other flammable liquids. 18. DO NOT use this fire pit under an overhead or near any unprotected combustible constructions.
- Page 5 34. DO NOT place hot pit tools onto combustible surface such as grass, wooden deck or furniture. 35. Avoid breathing smoke from the fire and avoid getting it into your eyes. 36. This fire pit should be thoroughly inspected and cleaned on a regular basis. 37.
- Page 6 Parts and Hardware Tools Required (Not Included) Phillips Head Screwdriver Adjustable open end wrench...
- Page 7 Parts List Leg with L pin Bottom support ring Fire bowl Grill support rod I Grill support rod II Cooking grate set - support rod Kettle support rod Stainless Steel Grill Set - Fork Stainless Steel Grill Set – Handle Cooking grate set - grate Cooking grate set –...
- Page 8 Assembly Instructions Step 1: M6x30 4pcs Attach the four legs (A & B) to the bottom support ring (C) by M6x30 screws (O) Step 2: M6x12 6pcs Attach the Grill support rod I & II (E & F) and Cooking grate support rod (G) with M6x12 (P) ,put the Kettle support rod into the Leg with L pin (A)
- Page 9 Assembly Instructions M6x12 8pcs Step 3: Attach the fire bowl (D) to the four legs (A & B) with M6x12 (P) as shown in the picture. Note that the L-pin (N) should be in the screw hole that is attached to the top. Step 4: Place two cooking grate (K &...
- Page 10 Care and Maintenance Lighting 1. Make sure there is only a small amount of ash in the bottom of the bowl. 2. Place a layer of dry kindling or a natural fire-starter onto the center of the fire bowl. 3. Place above that a layer of dry seasoned hardwood that is no more than 3/4 the length of the bowl diameter.
- Page 11 Warranty Information This product has been manufactured under the highest standards of quality and workmanship. We warrant to the original consumer purchaser that all aspects of this product will be free of defects in material and workmanship for one year from the date of purchase. A replacement for any defective part will be supplied free of charge for installation by the consumer.
- Page 12 ITEM# 2A-OH023 SKU# 9190497 Instructions d’assemblage & Manuel de l’utilisateur Foyer de style cow-boy 32" AVERTISSEMENT POUR UNE UTILISATION EN PLEIN AIR SEULEMENT (À l’extérieur de toute enceinte)
- Page 13 Table des matières Avertissements ………………………………………………………..…2 Outils et pièces …………………………………………………………..4 Instructions d’assemblage ……………………………………………...6 Entretien et entretien ……………………………………………………8 Informations sur la garantie ………………………………....9 REMARQUE : Avant de commencer l’assemblage du produit, assurez-vous que toutes les pièces sont présentes. Comparez les pièces avec la liste du contenu de l’emballage et de la quincaillerie.
- Page 14 Avertissements 1. N’utilisez PAS ce foyer d’extérieur sans lire le présent document en entier, ycompris les AVERTISSEMENTS, les mises en garde et les instructions. 2. Ce produit est destinéà l’utilisation à l’extérieur seulement. Il ne doit PAS être utilisédans un bâtiment, un garage ou tout autre endroit fermé. 3.
- Page 15 19.Utilisez toujours ce foyer d’extérieur sur une surface dure de niveau non combustible comme le béton, le roc ou la pierre. Une surface d’asphalte ou de revêtement à liant hydrocarbonépeut ne pas convenir à cette fin. Ne l’utilisez PAS sur des terrasses en bois.
- Page 16 Pièces et matériel Outils requis (Non inclus) Tournevis à tête phillips Clé à extrémité ouverte réglable...
- Page 17 Liste des pièces Jambe avec broche L Jambe Anneau de support inférieur Bol de feu Tige de support de grille I Tige de support de grille II Tige de support de grille de cuisson Tige de support de bouilloire Fourche grill en acier inoxydable Poignée de gril en acier inoxydable Grille de cuisson Boulon en T...
- Page 18 Instructions d’assemblage Étape 1 : M6x30 4pcs Fixez les quatre jambes (A & B) à la bague de support inférieure (C) par des vis M6x30 (O) Étape 2: M6x12 6pcs Fixez la tige de support du gril I & II (E &...
- Page 19 Instructions d’assemblage M6x12 8pcs Étape 3: Fixez le bol de feu (D) aux quatre jambes (A & B) avec M6x12 (P) comme le montre l’image. Notez que la goupille en L (N) doit être dans le trou de vis qui est fixé au sommet.
- Page 20 Soins et entretien Alummage 1. Veillez à ce qu'il ne reste qu'une petite quantité de cendres au fond du bol. 2. Placez une couche de bois d'allumage sec ou un allume-feu naturel au centre du foyer. 3. Placez au-dessus une couche de bois dur sec et sec ne dépassant pas les 3/4 de la longueur du diamètre du bol à...
- Page 21 Informations sur la garantie Ce produit a été fabriqué selon les normes de qualité et de fabrication les plus strictes. Nous garantissons à l'acheteur initial que tous les aspects de ce produit sont exempts de défauts de matériaux et de fabrication pendant un an à compter de la date d'achat.
Need help?
Do you have a question about the 2A-OH023 and is the answer not in the manual?
Questions and answers