Advertisement
Advertisement
Table of Contents

Related Manuals for FLIGHTORY STINGRAY


Summary of Contents for FLIGHTORY STINGRAY
- Page 1 USER MANUAL USER MANUAL...
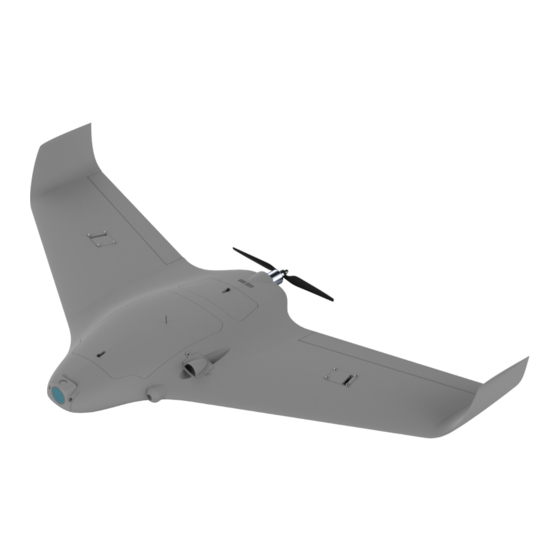
- Page 2 General Aircraft Data 235mm 570mm 1090mm - Wingspan: 1090mm - Length: 570mm - CG: 235mm from nose - Print Weight: around 400g Airframe printed with LW-PLA. This is version for DJI ACTION 2 camera and FPV Walksnail Avatar HD system. You can choose version without action cam and FPV system.
-
Page 3: Print Settings
Settings are prepared a standard 0.4mm nozzle. Download link is available on the Stingray product page and on Flightory Blog. The rest of the detailed settings are Main features of slicer LW-PLA profile saved in the profile. - Page 4 Print Settings All parts are suitable for printing on any standard printer with a small working area. I printed all parts on a 230 x 230mm area. Only the wing segments do not fit in any position. Just set them along the diagonal of the bed and then they fit easily.
- Page 5 Reccomended RC Equipment • Motor: 2830 1200KV Propdrive • ESC: 40A • Propeller: APC 9×5 or 10x5 • Baterry: 3700 mAh 4S LiPo (largest recommended pack) • Servos: 2x Corona 929MG Metal Gear or similar Micro Servos. Of course, you can choose similar equipment yourself, however, the given set is proven and works very well.
- Page 6 Required accesories ITEM QUANTITY LW-PLA preferably 500g PLA or PET-G 100g Thick CA GLUE 2x 20g tube Thin CA Glue 20g tube CA Activator 1 (optional but useful) M3 Threaded Insert (Outer Ø5mm, height 5mm) M3 screw 10mm M3 screw 16mm M3 screw 20mm M3 nut Carbon rod Ø1,5 mm...
- Page 7 PARTS LIST - FUSELAGE PART MATERIAL FUSELAGE LEFT 1 LW-PLA FUSELAGE LEFT 2 LW-PLA FUSELAGE LEFT 2 NO CAM LW-PLA FUSELAGE LEFT 3 LW-PLA FUSELAGE LEFT 3 NO CAM LW-PLA FUSELAGE LEFT 4 LW-PLA FUSELAGE LEFT 5 LW-PLA FUSELAGE LEFT 6 LW-PLA FUSELAGE RIGHT 1 LW-PLA...
- Page 8 PARTS LIST - WINGS PART MATERIAL WING LEFT 1 LW-PLA WING LEFT 2 LW-PLA WINGLET LEFT 1 LW-PLA WINGLET LEFT 2 LW-PLA WING RIGHT 1 LW-PLA WING RIGHT 2 LW-PLA WINGLET RIGHT 1 LW-PLA WINGLET RIGHT 2 LW-PLA AILERON LEFT 1 LW-PLA AILERON LEFT 2 LW-PLA...
- Page 9 PARTS LIST - ACCESSORIES PART MATERIAL HATCH LOCK 1 (PRINT 2 pcs) PLA / PET-G HATCH LOCK 2 (PRINT 2 pcs) PLA / PET-G BATTERY PAD PLA / PET-G FIREWALL PLA / PET-G DJI ACTION 2 MOUNT PLA / PET-G AVATAR NANO CAMERA COVER PLA / PET-G AVATAR VTX COVER...
-
Page 10: Available Options
Available options Version with DJI Action 2 camera and Walksnail Avatar HD Nano KIT Version without action camera and FPV system Instead of FUSELAGE LEFT 2 and 3 print FUSELAGE LEFT 2-3 NO CAM USER MANUAL... -
Page 11: Fuselage Assembly
Fuselage assembly Prepare all fuselage segments. Before gluing, you can gently sand the surface of all elements, especially the gluing surfaces. Prepare the right amount of joiners printed from a hard material such PLA or PET-G. The joiners fit into the prepared holes in each of the fuselage segments First, glue the... - Page 12 Fuselage assembly Now glue the fuselage segments together in the same way. It’s best to use thick CA glue. Channels for 1,5mm carbon rods For additional fuselage reinforcement, you can glue the carbon rods into channels running along the entire fuselage.
- Page 13 Fuselage assembly The fuselage is already in one piece. Nowe glue the Battery Pad into the prepared place. It’s best to use thick CA glue. USER MANUAL...
- Page 14 Hatches FRONT HATCH 1 FRONT HATCH 2 JOINER SMALL Now glue the front hatch from It’s best to use thick CA glue. two pieces. use small joiners USER MANUAL...
- Page 15 Hatches It’s best to use thick CA glue Now prepare LOCK 1 and LOCK 2 glue into the prepared places in the rear and front hatch. Put a small spring in the back of the lock. You can use an ordinary pen spring. PLACE FOR THE SPRING USER MANUAL...
- Page 16 Hatches Ready hatches can be tried on to the fuselage. They should fit tight, if it's too tight you can lightly sand the edges. USER MANUAL...
- Page 17 Threaded Inserts Now you can take the M3 threaded inserts and push them into the designated places on the front on the side of fuselage It’s best to take a slightly heated soldering iron and press the inserts with it. For additional reinforcement, you can use CA glue.
-
Page 18: Wings Assembly
Wings assembly Glue all wing elements together with thick CA glue. Use the same joiners as for the fuselage. For additional strength, you can glue carbon rods into the prepared channels. Press the threaded inserts in the same way as in the fuselage. The hinges of the aileron should preferably be polyester with dimensions of 20x25mm. - Page 19 Wings assembly Attach the servo to the wing. It should fit very well and tightly to the designed place. Use some hot glue to stick them on. There is a channel in the wing that leads the servo cable to the fuselage. It is sized to fit a standard servo plug.
- Page 20 Wings assembly After assembling two wings, insert a 9mm carbon tube with an into the fuselage. You can put the wings on and fit the whole structure. USER MANUAL...
- Page 21 Wings assembly Route the servo cable to the extension channel in the fuselage. If there are difficulties, you can push the cable through with a thin screwdriver. If you have too short servo cable, you may need to connect extension cables to them in the fuselage or extend the cables before.
-
Page 22: Motor Installation
Motor installation Now glue the firewall with thick CA glue. Then screw the motor to the frame and screw it to firewall with M3 screws. Place the nuts on the inside of the fuselage. You can get there through the rear hatch. - Page 23 Action cam installation Now insert the camera into the DJI ACTION 2 Mount and screw it in the nose of the fuselage using short M3 screws if you chose the type of nose without a camera, of course you can skip this step USER MANUAL...
-
Page 24: Electronics Installation
Electronics installation Finally, you can start assembling the electronics. The front part of the fuselage is wide enough to accommodate 3700mah 4s batteries horizontally. It is best to fix it with battery straps using the battery pad. Move the battery to achieve proper balance. In the center of the fuselage it is best to place the flight controller if you are using and the receiver. - Page 25 Electronics installation This version is prepared for Walksnail Avatar HD NANO KIT. Solution prepared here fits perfectly for this option. During assembly you have only to unclip the coaxial cable and the antennas to lead them along the channels prepared. Versions for DJI FPV and Analog will be ready soon If you chose non FPV version, skip this step.
-
Page 26: Center Of Gravity
Center of Gravity After placing all the equipment, measure 235mm from the nose and mark the center of gravity there. Support the plane at this point and check if it is in balance. If not, adjust the position of the battery and balance the model accordingly. Correct center of gravity is very important before a flight Check CG... - Page 27 USER MANUAL...
Need help?
Do you have a question about the STINGRAY and is the answer not in the manual?
Questions and answers