Advertisement
Quick Links
Installation Manual for '18 - Current Wrangler JL / Gladiator JT
Vehicles With Active Cruise Control (ACC) #97109-1138
TO REDUCE RISK OF SERIOUS INJURY OR PROPERTY DAMAGE: READ ALL
SAFETY MESSAGES AND UNDERSTAND ALL INSTRUCTIONS AND
PROCEDURE NOTICES BEFORE ATTEMPTING TO INSTALL OR USE THIS
PRODUCT.
RISK OF EYE INJURY! SAFETY GLASSES MUST BE WORN AT ALL TIMES
WHILE INSTALLING OR MAINTAINING THIS PRODUCT. DO NOT USE IF
DAMAGED.
CHECK STATE AND LOCAL HIGHWAY SAFETY LAWS REGARDING USE OF
AUXILLARY LIGHTING.
THESE ARE INTENDED FOR OFF ROAD USE ONLY.
WHEN ROUTING ELECTRICAL WIRES, ALWAYS AVOID PINCHING WIRES.
ALWAYS AVOID HOT OR MOVING COMPONENTS. ALWAYS SECURE WIRES
WITH CABLE TIES.
HOT SURFACE! DO NOT TOUCH LIGHT HOUSING WHILE IN OPERATION.
Advertisement

Related Manuals for Stealth 97109-1138


Summary of Contents for Stealth 97109-1138
- Page 1 Installation Manual for ’18 - Current Wrangler JL / Gladiator JT Vehicles With Active Cruise Control (ACC) #97109-1138 TO REDUCE RISK OF SERIOUS INJURY OR PROPERTY DAMAGE: READ ALL SAFETY MESSAGES AND UNDERSTAND ALL INSTRUCTIONS AND PROCEDURE NOTICES BEFORE ATTEMPTING TO INSTALL OR USE THIS PRODUCT.
- Page 2 Before You Begin Installation: Congratulations on to shipping. If any part is missing or broken, your purchase of the Stealth LED Lightbar for your please call Customer Service at 800-745-6037 Jeep Wrangler. When unpacking, check to make as soon as possible.
-
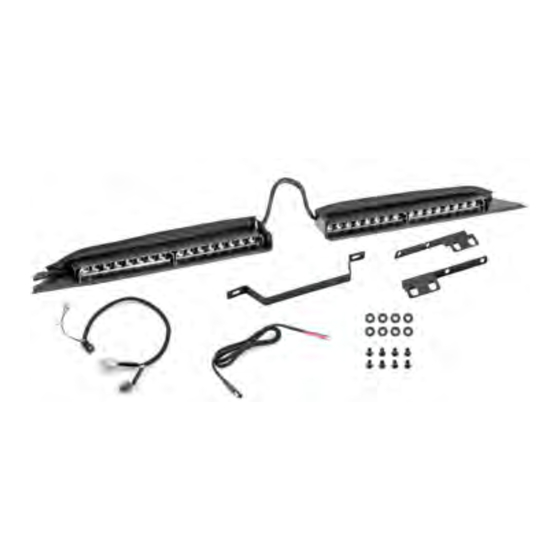
Page 3: Parts List
Quadratec Stealth Light Bar Parts & Tools: PARTS LIST: REQUIRED TOOLS: Safety Glasses A) Light Bar QTY 1 Forked Clip/Trim Removal Tool B) Left Mounting Bracket QTY 1 Stubby Phillips Head Screwdriver C) Right Mounting Bracket QTY 1 Small Flat Head Screwdriver... - Page 4 FIG3 - FIG10 ARE FOR 2024 AND NEWER WRANGLERS AND GLADIATORS ONLY. IF YOUR VEHICLE IS 2023 OR EARLIER THEN PLEASE PROCEED TO FIG11. FIG3 FIG4 Pop off passenger side cover plate using trim Using a 7mm socket or stubby Phillips head removal tool as shown.
- Page 5 2024 - current): LED Lightbar Installation ( FIG9A FIG9B Using trim removal tool gently pry grab handle trim cover and center dash control center away from console. (FIG 9A and 9B) FIG10 Disconnect any wiring harnesses and set control panel aside . (FIG 10) This is the end of 2024 only instructions.
- Page 6 LED Lightbar Installation: FIG11 FIG12 Remove the center screw using a Phillips Gently pry out the window control panel head screwdriver and set aside.(FIG 11) from the top and work your way down. (FIG 12) FIG13 FIG14 Tilt panel away enough to access the 12v Connect new Power Tap Harness white socket connection.
- Page 7 LED Lightbar Installation FIG16 FIG17 Push up on the glove box stop, tilt glovebox (FIG 17) You may now replace all of the down, remove it and set aside.(FIG16) Now, center dash parts in the reverse order of route the Power Tap Harnes s through the removal.
- Page 8 LED Lightbar Installation: FIG21 FIG22 Unlatch and open the soft top or remove hard Remove the hardware using a T-40 Torx socket top front panels. Remove the felt padding on and loosely install the supplied brackets as top of the brackets hardware. (FIG 21) shown.
- Page 9 LED Lightbar Installation: FIG27 FIG28 Using a small flat blade screwdriver connect Re-install the grab handle taking care not to the light bar's power cord to the power tap pinch any wires. (FIG 28) harness. (FIG 27) You may now re-install the Also, re-install the speaker cover.
-
Page 10: Lifetime Limited Warranty
Lifetime Limited Warranty Your Quadratec ® branded accessories are covered by alteration, modification, combination with other parts, the following Limited Warranty provided exclusively failure to maintain or improper repair or service, (b.) by Quadratec, Inc., 1028 Saunders Lane, West Chester normal wear &...
Need help?
Do you have a question about the 97109-1138 and is the answer not in the manual?
Questions and answers