Advertisement
Available languages
Available languages
Quick Links
EASY STORE GARMENT STEAMER
DÉFROISSEUR À VAPEUR COMPACT
us e an d ca re manual
gui d e d' u til is at ion e t d 'entretien
GS0311-0PD
GS0311-0PDC
GS0311-1PD
Please do not throw this product away with normal household waste. If possible,
take it to an official collection point in your area that recycles this type of product.
Thank you for considering the environment.
Veuillez ne pas jeter ce produit avec les ordures ménagères normales. Si possible,
apportez-le à un point de collecte officiel de votre région qui recycle ce type de
produit. Merci d'avoir pensé à l'environnement.
Importé par : Spectrum Brands Consumer Products Canada, Inc.
1460 The Queensway, Etobicoke, Ontario, M8Z 1S4, Suite 223
BLACK+DECKER® and the BLACK+DECKER® logos are trademarks of The Black & Decker
Corporation, used under license by Empower Brands, LLC, a subsidiary of Spectrum Brands, Inc. for
its manufacturing and sale of this product. All rights reserved. All other marks are trademarks of
Empower Brands, LLC.
BLACK+DECKER® et les logos BLACK+DECKER® sont des marques de commerce de Black & Decker
Corporation, utilisées sous licence par Empower Brands, LLC, une filiale de Spectrum Brands, Inc.
pour la fabrication et la vente de ce produit. Tous droits réservés. Toutes les autres marques sont
des marques de commerce de Empower Brands, LLC.
© 2023 Empower Brands, LLC. All rights reserved / Tous droits réservés.
Empower Brands, LLC, Middleton, WI 53562
Made in China.
Fabriqué en Chine.
HOW TO USE
ATTACHMENTS
Fabric Brush
The fabric brush is recommended for thicker fabrics. It helps
steam penetrate deeper into the fibers to smooth wrinkles.
Fitting/Removing (Fig. A)
1. Make sure that the steamer and attachment are cool.
2. Hook the top of the attachment over the top edge of the
steamer. Click the bottom edge into place. Make sure it
is fully fitted and not loose or it may detach itself during
use.
3. Remove the attachment using the tab. When removing
the attachment, watch out for condensation that may
have built up during use.
FILLING
1. Place the steamer on its base on a stable surface.
2. Open the water inlet cover (Fig. B).
3. Pour slowly, to allow the air in the reservoir to escape,
and avoid an airlock (Fig. C).
4. Don't fill past the max mark on the reservoir, or water will
escape in use.
T RO UBL ES HO OT ING
Problem
Possible Cause
The steamer is plugged
The auto shut-off has
activated.
in but not heating.
Not enough steam or
The steamer isn't heated up
to full temperature.
no steam is coming out
of the steamer.
There is not enough water
in the water tank.
The water pump hasn't been
primed.
Calcium deposits have built
up.
Discolored water is
Residue has built up in the
water tank.
coming through the
holes and staining the
Perfumed or scented
additives were used.
fabric.
Starch was used.
Steamer is leaking or
Steamer is not hot enough.
spitting.
Condensation has built up.
Tap water or other filtered
water is being used.
Unit is tilted while using.
GS0311Series_30348_EF_IB_A.indd 1
GS0311Series_30348_EF_IB_A.indd 1
Customer Care Line: 1-800-465-6070
For online customer service:
www.prodprotect.com/blackanddecker
Ligne Service à la Clientèle: 1-800-465-6070
Pour le service à la clientèle en ligne:
www.prodprotect.com/blackanddecker
h
A
1200W 120V~ 60Hz
12/2023
h
A
h
A
h
B
h
B
h
C
B
h
TIPS
Solution
• Sensitive items
(such as items with
Press the steam trigger or press the power
button to activate the steamer.
embellishments)
should be steamed
from the inside of
Always allow steamer to preheat at least 45
the garment to avoid
seconds.
damage.
Follow the instructions on "How to Use".
• Allow clothing
to cool for about
h
C
After preheating, always prime the water
5 minutes after
pump by holding the steam trigger until
steaming to set the
steam forms.
C
h
press.
Follow the instructions under TIPS on how
• To remove mineral
"To remove mineral buildup".
buildup, mix 1/2
white vinegar with
Empty the water tank after each use. Only
use fresh distilled water.
1/2 fresh distilled
water. Plug in
Regularly clean steamer and refrain from
steamer and run
using perfumed or scented additives.
half of the solution
Always clean steamer ironing plate after
through the steamer.
using starch.
Unplug and let it
sit for 30 minutes.
Allow the steamer to heat for about 45
Dump out. Repeat as
seconds.
needed until steam
Gently wipe the steam head with a soft,
output improves.
damp cloth to remove condensation.
Run fresh distilled
water through
Only use fresh distilled water.
steamer before using
on clothes.
Only use in upright position.
When using electrical appliances, basic safety precautions should always be followed, including the following:
• READ ALL INSTRUCTIONS BEFORE USING.
• To reduce the risk of contact with hot water emitting from steam vents, check
appliance before each use by holding it away from body and operating steam
button.
• Use steamer only for intended use.
• To reduce the risk of electric shock, do not immerse the steamer in water or
other liquids.
• Always turn the unit off before plugging or unplugging the unit from the
electrical outlet.
• Never pull on the cord to disconnect from the electrical outlet; instead grasp
plug and pull to disconnect.
• Do not allow cord to touch hot surfaces. Let steamer cool completely before
putting away. Loop cord loosely around appliance when storing.
• Always unplug steamer from the electric outlet before filling with water,
emptying, or cleaning, and when not in use.
• Do not operate the steamer with a damaged cord, or if the appliance has been
dropped or damaged, or if it is leaking. To reduce the risk of electric shock, do
not disassemble or attempt to repair the steamer; take it to a qualified service
person for examination and repair, or call the appropriate toll-free number in this
manual. Incorrect reassembly or repair could cause a risk of fire, electric shock,
or injury to persons when the steamer is used.
• Close supervision is necessary for any appliance being used by or near children.
Do not leave the steamer unattended while connected.
• Burns can occur from touching hot metal parts, hot water, or steam. Use care
when you turn a steam appliance upside down – there may be hot water in the
reservoir. Avoid rapid movement of steamer to minimize hot water spillage.
POLARIZED PLUG (120V models only)
This appliance has a polarized plug (one blade is wider than the other).
To reduce the risk of electric shock, this plug is intended to fit into a
polarized outlet only one way. If the plug does not fit fully into the outlet,
reverse the plug. If it still does not fit, contact a qualified electrician. Do
not attempt to modify the plug in any way.
Note: If the power cord is damaged, please contact the warranty
department listed in these instructions.
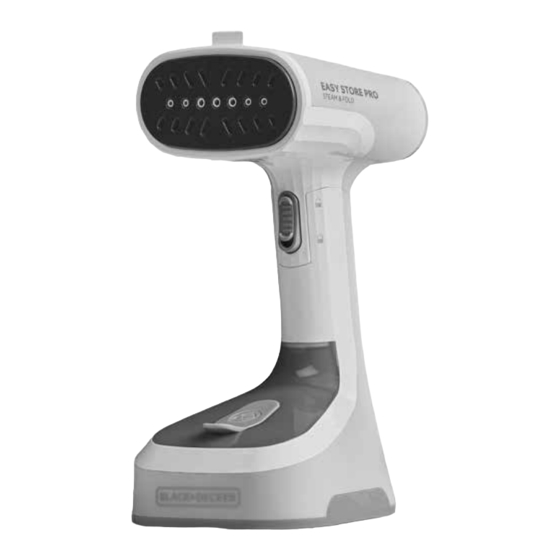
PARTS AND FEATURES
l
m
1. Steam Trigger Lock
2. Steam Trigger
3. Handle
4. Water Inlet Cover
T22-9003703-A
5. Power Button
E/F
30348
Product may vary slightly from what is illustrated.
5. Wipe up any spillage.
•
To refill at any time during use, turn the steamer off by
pressing the power button until the blue indicator light
goes out, unplug from outlet, and follow the above
procedure.
•
After refilling, allow to reheat for 45 seconds and then
prime the pump by holding the steam trigger until
steam forms.
USING
h
D
h
•
If the label says "do not steam", do not steam the
garment.
h
D
1. Hang the garment in an area that will not be affected or
damaged by the heat and steam, such as on a shower
curtain rail, or in an open doorway.
2. Fit any attachment you wish to use.
3. Plug the steamer in then press the power button. The
power button light will slowly flash, indicating that the
steamer is heating.
4. After about 45 seconds the power light will stay on,
indicating the steamer is preheated.
5. Prime the water pump by holding steam trigger until
steam forms.
6. To generate steam, press the steam trigger. As long as
h
E
the trigger is held, steam will emit from the steamer.
h
E
CLE AN IN G A ND CA RE
This product contains no user serviceable parts. Refer repairs
to qualified service personnel.
h
A
CAUTION: Allow the iron to fully cool before storing.
1. Make sure steamer is off, unplugged and completely cool.
2. Wipe all surfaces with a clean damp cloth.
3. After the steamer has been thoroughly dried, turn it
back on and lightly steam over an old cloth. This will help
remove any residue left in the steam holes.
4. To avoid mineral buildup, empty the tank after each use.
5. For storage purposes it is possible to fold the steamer by
pushing the head downwards (Fig. D).
6. The cord can be wrapped around the heel of your steamer
for storing. Use the clip to secure the last section of cord as
shown (Fig. E).
CLEANING ATTACHMENTS
•
Wipe with damp cloth to clean.
h
Please Read and Save this Use and Care Book.
IMPORTANT SAFEGUARDS
• To reduce the likelihood of circuit overload, do not operate another high wattage
appliance on the same circuit.
• If an extension cord is absolutely necessary, a minimum 10-ampere rated cord
should be used. Cords rated for less amperage may overheat. Care should be
taken to arrange the cord so that it cannot be pulled or tripped over.
• Do not use outdoors.
• Do not use anything other than distilled water in the steamer while in use or
during cleaning.
• Never steam clothing while on a body.
• Never aim the steam directly towards people, animals or plants. The steam
is very hot and can results in burns. Burns can occur from touching hot parts
(including the steamer head and frames), hot water, or steam.
• This unit should be used in an upright position only. Never hold the steam head
down while at rest or tilt it as this may result in hot water discharge and possibly
injury.
• This appliance is not intended for use by persons (including children) with
reduced physical, sensory, or mental capabilities, or lack of experience and
knowledge, unless they have been given supervision or instruction concerning
use of the appliances by a person responsible for their safety.
• Children should be supervised to ensure that they do not play with the appliance.
• The steamer should be used or placed on a flat, firm surface.
- When placing the steamer on the heel rest, make sure the surface
is flat and firm.
- The steamer should not be used if it has been dropped, damaged
or leaking.
SAVE THESE INSTRUCTIONS.
This product is for household use only.
TAMPER-RESISTANT SCREW
Warning: This appliance is equipped with a tamper-resistant screw to
prevent removal of the outer cover. To reduce the risk of fire or electrical
shock, do not attempt to remove the outer cover. There are no user-
serviceable parts inside. Repair should be done only by authorized
service personnel.
GETTING STARTED
• Remove all labels, tags and stickers attached to the body, or
cord of the steamer and the plastic band around the power
plug.
• Remove and save literature.
• Please go to www.prodprotect.com/blackanddecker to
register your warranty.
• Read all the instructions before using your steamer.
• Use fresh distilled water only. DO NOT FILL PAST MAX LINE.
e
• Any water droplets visible inside the tank are from individual
quality control tests.
f
• Do not use perfumes, oils, or other additives.
g
j
k
• Always review the garment manufacturer's care label
i
instructions before steaming. Test fabrics for colorfastness in
inconspicuous areas (such as an inseam). Do not use on
leather, suede, vinyl, or plastic.
• During use the steamer and accessories will become HOT.
Never try to fit or remove attachments while still hot.
• After preheating, prime the water pump by holding the steam
trigger until steam forms.
• It is normal to feel or hear the water pump inside the device.
It may become louder when the water level in the tank is low.
6. Light
Check and refill the tank when required.
7. Fabric Brush
• Small amounts of dripping might occur during use. If
8. Cord Clip
excessive, your steamer needs time to get back up to full
9. Heat-proof Storage Bag
temperature. Just allow the steamer a minute to reheat.
GS0311-1PD model only
• Wearing clothes immediately after ironing or steaming can
(not shown)
actually create wrinkles. Always allow the clothing to cool for
h
D
about 5 minutes before wearing.
When the trigger is released, the steam will stop.
•
To generate a constant flow of steam without holding
the trigger, press the steam trigger and then slide the
steam trigger lock downwards. You can then release
pressure on the steam trigger. To turn the steam off,
press the trigger, slide the steam trigger lock upwards,
then release the trigger.
7. With your free hand keep the fabric taut. Steam the
garment with slow, downward strokes, keeping the head
of the steamer in contact with the fabric.
E
8. When you have finished, press and hold the power
button until the light goes out (about 3 seconds) and
unplug.
9. Stand the steamer on its base and allow it to completely
cool off before storing. To avoid mineral buildup, empty
the tank after each use.
Auto shut off
Your steamer will automatically switch to auto shut-off
mode after being left inactive for 15 minutes. The power
button light will flash rapidly to indicate this. To resume
steaming, press the steam trigger or power button and wait
for your steamer to fully reheat.
A
h
B
h
B
h
D
h
D
h
E
h
E
12/5/23 10:12 AM
12/5/23 10:12 AM
Advertisement

Related Manuals for Black & Decker EASY STORE


Summary of Contents for Black & Decker EASY STORE
- Page 1 • Do not use outdoors. other liquids. • Do not use anything other than distilled water in the steamer while in use or EASY STORE GARMENT STEAMER • Always turn the unit off before plugging or unplugging the unit from the during cleaning.
- Page 2 Veuillez lire et conserver ce guide d’entretien et d’utilisation. IMPORTANTES MISES EN GARDE PIÈCES ET CARACTÉRISTIQUES AVANT LA PREMIÈRE UTILISATION • Retirer toutes les étiquettes et tous les autocollants apposés sur l’appareil Lorsqu’on utilise des appareils électriques, il faut toujours respecter certaines règles de sécurité fondamentales, notamment les suivantes : ou son cordon ainsi que la bande de plastique entourant la fiche.
Need help?
Do you have a question about the EASY STORE and is the answer not in the manual?
Questions and answers