Table of Contents
Advertisement
Available languages
Available languages
Advertisement
Chapters
Table of Contents

Subscribe to Our Youtube Channel
Related Manuals for Travel Buggy AEROLUX


Summary of Contents for Travel Buggy AEROLUX
- Page 1 AEROLUX by Travel Buggy Ultra Lite Power Wheelchair Carbon Fiber...
-
Page 2: Table Of Contents
TABLE OF CO NTENTS NOTICES TRANSPORTING SAFETY INFORMATION BATTERY MAINTENANCE BATTERY SAFETY INFORMATION CHARGING SPECIFICATIONS MAINTENANCE,CARE, TROUBLESHOOTING UNBOXING LIMITED WARRANTY SETUP CONTACT & SUPPORT CONTROLLER FREE WHEEL MODE FOLDING CAUTION: Read all precautions and instructions in this manual before using this equipment. Improper use or maintenance can void the warranty. -
Page 3: Notices
Users should also pay special attention to information marked in this manual beginning with NOTICE. Travel Buggy, its affiliates and partners cannot be held responsible for personal injury or property damage resulting from the unsafe or improper operation or maintenance of the AEROLUX Power Wheelchair. -
Page 4: Safety Information
DO NOT carry additional passengers on other incline and when driving near a your AEROLUX raised surface or unprotected ledges • DO NOT use your AEROLUX as a seat in a and drop offs (curbs, porches, stairs, moving vehicle etc.) •... -
Page 5: Battery Safety Information
7. DO NOT place battery in microwave over, 2. DO NOT disassemble or modify the high pressure containers or on induction battery. The battery contains safety and cookware AEROLUX... - Page 6 Failure to do so may cause the battery battery in devices other than the to become hot, explode or ignite and AEROLUX can lead to damage or a cause serious injury reduction in its lifespan. Additionally, abnormal current flow caused by •...
-
Page 7: Specifications
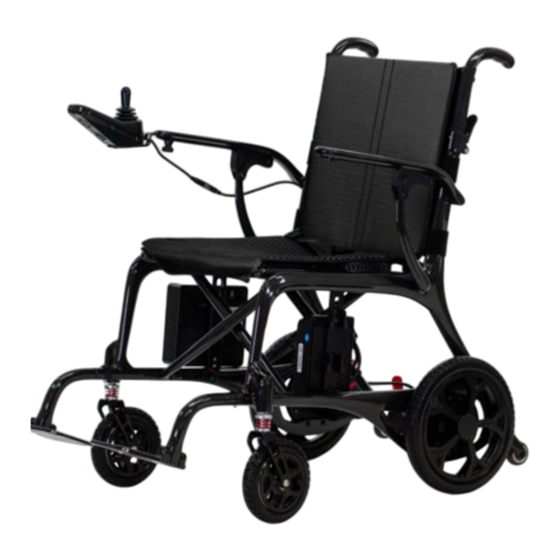
WASHABLE SEAT CUSHION LITHIUM-ION LEG SUPPORT STRAP BATTERY SHOCK ABSORBERS FOLDING 250 WATT FOOT REST BRUSHLESS MOTORS 6.5” NON-PUNCTURE ANTI-TIP WHEELS FRONT WHEEL 11” NON-PUNCTURE REAR WHEEL SEAT DEPTH 16” SEATING WIDTH 19” OVERALL LENGTH 39” OVERALL WIDTH 21” AEROLUX... - Page 8 SPECIFICATIONS PERFORMANCE SPECIFICATIONS SEATING WIDTH: 19” DRIVING RANGE: 11.2 MI / 18 KM FRONT WHEEL DIAMETER: 6.5” MAXIMUM SPEED: 3.7 MPH / 6 KPH REAR WHEEL DIAMETER: 11” DRIVE SYSTEM: TWO MOTOR DRIVE FLOOR TO SEAT HEIGHT: 19.5” SYSTEM BACK SUPPORT HEIGHT: 16” MOTOR TYPE: 250 WATT BRUSHLESS INCLINE CAPABILITY: 9°...
-
Page 9: Unboxing
• Grab the arm rests and begin to pull your Travel Buggy out BOTTOM • Locate the components provided with your power wheelchair JOYSTICK CONTROLLER... -
Page 10: Setup
SETUP U N FO L D I N G • With the AEROLUX standing upright, pull • Press down on the seat until you hear the seat both armrests in opposite directions to lock in place start the unfolding process WARNING: When unfolding the seat, please keep your hand flat on the surface. - Page 11 I N STAL L FO OT R ESTS & L EG S U PP O RT • The AEROLUX is shipped with the foot rests not installed. The foot rests need to be inserted prior to driving •...
- Page 12 • DO NOT step on the footplate when entering or exiting the AEROLUX as it may cause the power chair to move in an unsafe manner • To enter from the side of...
-
Page 13: Controller
6-Lights On 6 KPH / 3.7 MPH All 7-Lights On Max Speed • AEROLUX Power Chair has an easy to use 360 degree joystick controller featuring multiple speeds and a battery life indicator • Take some time in a safe, controlled environment to learn the operation of the controller, the speed and the maneuverability of the AEROLUX •... -
Page 14: Free Wheel Mode
FREE WH EEL M O DE • In order to have a care giver push the AEROLUX, it must be put in Free Wheel mode • This mode disengages the drive mechanism to the wheels, making them free to push manually •... -
Page 15: Folding
90° downwards WARNING: To ensure your safety when folding the AEROLUX, please confirm that your feet are positioned outside of the wheelchair's wheels before proceeding. This precaution is vital to prevent the risk of your feet being pinched or injured by the wheels. -
Page 16: Transporting
WARNING: Never transport the AEROLUX in a tie down system, as the AEROLUX is not compatible with them. Never sit in the AEROLUX and be transported in a moving vehicle. Do not place the folded AEROLUX in the front seat with the driver... -
Page 17: Battery Maintenance
Use only the provided battery(s) in your page 6 of this manual. This section provides product. detailed information about charging the battery, ensuring proper use and care. Use only the provided charger to charge your battery(s). AEROLUX... - Page 18 BATTERY MAINTENANCE STORAGE battery if, while using, charging or storing the battery, the battery emits an • Charge or discharge the battery to unusual smell, feels hot, changes color, approximately 50% of capacity before or shape, or appears abnormal in any storage.
-
Page 19: Charging
ONBOARD CHARGING (PREFERRED BATTERY METHOD) CHARGE PORT (XLR) • Turn OFF the power to the AEROLUX • Connect the charger (XLR male) to the controller port (XLR female) • Connect the input plug of the charger with Offboard Charging your local power source •... - Page 20 CHARGING • When charging the indicator light on the power charger brick is red • After 4 to 6 hours of charging (depending on the remaining battery power quantity), the indicator light changes from red to green, which Charging means the battery is fully charged Fully Charged •...
-
Page 21: Maintenance,Care, Troubleshooting
Locate the area of the squeak, usually AEROLUX Power Chair should it be required. the front wheel (bearing) or front fork Please be sure to keep a log of the service areas. -
Page 22: Limited Warranty
Due to its straightforward design, most parts can be easily exchanged by the end user Travel Buggy will, at its sole discretion, without a professional service tech required. replace any warrantable item that fails However, it is always recommended you within the warranty period. -
Page 23: Contact & Support
Additional images and videos are hassle-free. However, if you have any available on our website. queries or need assistance, feel free to OUR WEBSITE reach out to us at Travel Buggy. travelbuggy.com (Canada) OUR CUSTOMER HOTLINE us.travelbuggy.com (USA) 1.888.56.BUGGY (Canada) 1.855.56.BUGGY (USA) - Page 24 TABLE DES MATIÈRES REMARQUES TRANSPORT INFORMATIONS SUR LA SÉCURITÉ ENTRETIEN DE LA BATTERIE INFORMATIONS SUR LA CHARGEMENT SÉCURITÉ DE LA BATTERIE ENTRETIEN ET MAINTENANCE, SPÉCIFICATIONS DÉPANNAGE DÉBALLAGE GARANTIE LIMITÉE CONFIGURATION CONTACT ET SUPPORT UNITÉ DE COMMANDE MODE ROUE LIBRE PLIAGE ATTENTION: Lisez toutes les précautions et instructions de ce manuel avant d'utiliser cet équipement.
-
Page 25: Remarques
Dans le cadre de notre initiative d'amélioration continue des produits, Travel Buggy se réserve le droit de modifier les spécifications et la conception sans préavis. En conséquence, il peut y avoir des différences mineures entre votre AEROLUX et les photos, illustrations et instructions de ce manuel. -
Page 26: Informations Sur La Sécurité
(si possible) en votre AEROLUX. montant ou en descendant une pente. • Réduisez la vitesse de votre AEROLUX • N'utilisez PAS votre nouvel AEROLUX lorsque vous conduisez dans un virage pour la première fois sans avoir complètement lu et compris le manuel... - Page 27 Dans une explosion ou un incendie. le cas contraire, la batterie pourrait Ne placez pas la batterie dans ou à devenir chaude, exploser ou s'enflammer proximité d'un feu, sur des cuisinières et provoquer des blessures graves. AEROLUX...
- Page 28 Lors de la décharge de la batterie UTILISEZ UNIQUEMENT LE CHARGEUR N'utilisez PAS la batterie avec un SPÉCIFIÉ FOURNI AVEC LE PRODUIT appareil autre que l'AEROLUX. L'utilisation Ne branchez pas la batterie à une de la batterie dans des appareils prise d’alimentation ou directement à...
-
Page 29: Spécifications
SANGLE DE SUPPORTDE JAMBES BATTERIE AMORTISSEURS MOTEURS SANS BALAIS PLIANT DE 250 WATTS REPOSE PIEDS ROUES 6,5" NON PERFORANT ANTIBASCULEMENT ROUE AVANT 11" NON PERFORANT ROUE ARRIÈRE LARGEUR DES SIÈGES 19" PROFONDEUR DU SIÈGE 16" LARGEUR HORS TOUT 21" LONGUEUR TOTALE 39" AEROLUX... - Page 30 SPÉCIFICATIONS LES SPÉCIFICATIONS DE DIMENSIONS PLIÉES: PERFORMANCE 28"H X 9"W X 31"L DISTANCE DE CONDUITE: 11,2 MI / LARGEUR DE SIÈGE: 19” 18 KM DIAMÈTRE DE LA ROUE AVANT: 6,5” VITESSE MAXIMALE: 3,7 MPH / 6 KPH DIAMÈTRE DE LA ROUE ARRIÈRE: 11” SYSTÈME D'ENTRAÎNEMENT: SYSTÈME D'ENTRAÎNEMENT À...
-
Page 31: Déballage
à ce que lorsqu'il est posé au sol, les accoudoirs soient horizontalement parallèles au sol. • Saisissez les accoudoirs et commencez à sortir votre Travel Buggy • Localisez les composants fournis avec votre fauteuil roulant électrique CONTRÔLEUR DE MANETTE BATTERIE... -
Page 32: Configuration
D É PLO I E M E NT • Appuyez sur le siège jusqu'à ce que vous • Avec l'AEROLUX debout, tirez les deux accoudoirs dans des directions opposées entendiez le verrouillage du siège en place. pour démarrer le processus de dépliage. - Page 33 I N STAL L E R D ES R E P O S E- P I E D S E T U N S U PP O RT D E JAM B E • L'AEROLUX est expédié avec les repose-pieds non installés. Les repose-jambes doivent être...
- Page 34 • NE PAS marcher sur le repose-pieds lorsque vous entrez ou sortez de l'AEROLUX car cela pourrait faire bouger le fauteuil motorisé de manière dangereuse. • Pour entrer depuis le côté...
-
Page 35: Unité De Commande
épuisée. Toutes les 7 lumières à vitesse maximale • Le fauteuil motorisé AEROLUX est doté d'un joystick à 360 degrés facile à utiliser, doté de plusieurs vitesses et d'un indicateur d'autonomie de la batterie. • Prenez le temps dans un environnement sûr et contrôlé pour apprendre le fonctionnement du contrôleur, la vitesse et la maniabilité... -
Page 36: Mode Roue Libre
MODE ROUE LIBRE • Pour qu'un soignant puisse pousser l'AEROLUX, il faut le mettre en mode Roue Libre. • Ce mode désengage le mécanisme d'entraînement des roues, les rendant libres de pousser manuellement • Pour mettre l'AEROLUX en mode roue libre, arrêtez-vous complètement et... -
Page 37: Pliage
à 90° vers le bas. AVERTISSEMENT: Pour garantir votre sécurité lors du pliage de l'AEROLUX, veuillez confirmer que vos pieds sont positionnés à l'extérieur des roues du fauteuil roulant avant de continuer. Cette précaution est indispensable pour éviter tout risque de pincement ou de blessure des pieds par les roues. -
Page 38: Transport
AVERTISSEMENT: Ne transportez jamais l'AEROLUX dans un système d'arrimage, car l'AEROLUX n'est pas compatible avec eux. Ne vous asseyez jamais dans l'AEROLUX et ne soyez jamais transporté dans un véhicule en mouvement. Ne placez pas l'AEROLUX plié sur le siège avant avec le conducteur où il pourrait bouger ou glisser. -
Page 39: Entretien De La Batterie
FOURNIES DANS VOTRE PRODUIT. une utilisation et un entretien appropriés. ENTRETIEN DE LA BATTERIE Utilisez uniquement le chargeur fourni pour Observez et notez l'autonomie qu'offre une charger votre ou vos batteries. nouvelle batterie entièrement chargée AEROLUX... - Page 40 ENTRETIEN DE L A BATTERIE STOCKAGE minutes, lifting upper and lower lids, until no evidence of the fluid remains. • Chargez ou déchargez la batterie à Seek medical attention. environ 50 % de sa capacité avant le • Immediately discontinue use of the stockage.
-
Page 41: Chargement
• Évitez les recharges inutiles pour maintenir la durée de vie de votre batterie CHARGEMENT À BORD (MÉTHODE PRÉFÉRÉE) BATTERY • Coupez l'alimentation de l'AEROLUX CHARGE PORT (XLR) • Connectez le chargeur (XLR mâle) au port du contrôleur (XLR femelle) •... - Page 42 CHARGM ENT • Lors du chargement, le voyant lumineux du chargeur électrique est rouge • Après 4 à 6 heures de charge (selon la quantité de charge restante de la batterie), le voyant passent du rouge au vert, ce qui signifie que la batterie est Mise en charge complètement chargée Complètement chargé...
-
Page 43: Entretien Et Maintenance, Dépannage
• Lubrifiez les composants du raccord Nous vous recommandons d'inspecter votre avec un lubrifiant pour fauteuil roulant AEROLUX deux à trois fois par an dans les ou vélo avant de les remonter domaines suivants : • Ne serrez pas trop les boulons lorsque vous les remontez. -
Page 44: Garantie Limitée
GARANTIE LIM ITÉE L'acheteur de ce produit a droit à une professionnel pour l’entretien et le service, garantie limitée offerte par Travel Buggy et afin de s’assurer que le travail est effectué ses sociétés affiliées sur les composants correctement. et délais suivants à compter de la date La garantie couvre uniquement les d'achat :... -
Page 45: Contact Et Support
CONTACT ET SUPPORT EMAIL L’utilisation et la maintenance de votre AEROLUX sont conçues pour être simples et contact@travelbuggy.com sans tracas. Cependant, si vous avez des Des images et vidéos supplémentaires questions ou avez besoin d'aide, n'hésitez sont disponibles sur notre site Web. - Page 46 AEROLUX par Travel Buggy Fauteuil roulant électrique ultra léger Carbon Fiber...
Need help?
Do you have a question about the AEROLUX and is the answer not in the manual?
Questions and answers
with the ultra-lite, I put in the battery (which I believe to be charged) , but the chair does not have power (the joy stick is blank). Suggestions??