Table of Contents
Advertisement
Available languages
Available languages
Quick Links
Advertisement
Chapters
Table of Contents

Subscribe to Our Youtube Channel
Related Manuals for Travel Buggy DASH Ultra Lite Power


Summary of Contents for Travel Buggy DASH Ultra Lite Power
- Page 1 Travel Buggy Ultra Lite Power Wheelchair...
-
Page 2: Table Of Contents
TA B LE O F CO N TE N T S NOTICES FOLDING SAFETY INFORMATION BATTERY MAINTENANCE BATTERY SAFETY INFORMATION CHARGING SPECIFICATIONS MAINTENANCE & CARE GETTING STARTED LIMITED WARRANTY OPERATING CONTACT & SUPPORT FREEWHEEL (MANUAL) OPERATION CAUTION: Read all precautions and instructions in this manual before using this equipment. Improper use or maintenance can void the warranty. -
Page 3: Notices
Users should also pay special attention to information marked in this manual beginning with NOTICE. Travel Buggy, its affiliates and partners cannot be held responsible for personal injury or property damage resulting from the unsafe or improper operation or maintenance of the DASH Ultra Lite Power Wheelchair. -
Page 4: Safety Information
SA FE T Y I N FO R MAT I O N • DO make certain that the seat is in a • DO NOT drive your DASH across the side locked position when you are operating of a hill or diagonally up or down a hill, your DASH and do not stop (if possible) while driving up or down an incline... -
Page 5: Battery Safety Information
• DO NOT expose battery to water or way. Contact Travel Buggy if any of these salt water, or allow the battery to get problems are observed DO NOT place battery in microwave over,... - Page 6 BAT TE RY SAFE T Y I N FO R MATI O N CHARGING PRECAUTIONS WHEN DISCHARGING THE BATTERY BE SURE to follow the warnings listed DO NOT discharge the battery using any below while charging the battery. Failure other device except for the specified to do so may cause the battery to device.
-
Page 7: Specifications
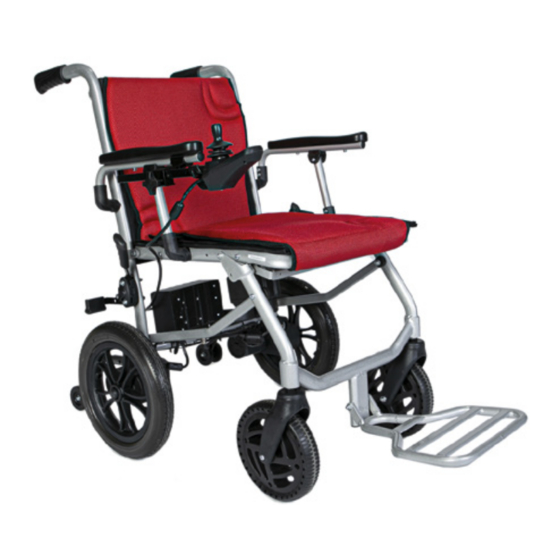
S PEC I FI CATI O N S MANUAL PUSH HANDLE EASY TO USE CONTROLLER LIFT-UP ARM RESTS BREATHABLE CUSHION LITHIUM BATTERY 250 WATT BRUSHLESS MOTORS (DUAL) ANTI-TIP WHEELS FOOT PEDAL 12 INCH POLY- URETHANE WHEEL 8 INCH FRONT WHEEL 46CM / 18IN 43CM / 17IN 37CM / 14.5IN... - Page 8 S PEC I FI CATI O N S PERFORMANCE SPECIFICATIONS FOLDED DIMENSIONS: 23”L X 13”W X 36”H FRONT WHEEL DIAMETER: 8” DRIVING RANGE: 12.5 MI / 20 KM REAR WHEEL DIAMETER: 12” MAXIMUM SPEED: 4 MPH / 6 KPH FLOOR TO SEAT HEIGHT: 19.5” DRIVE SYSTEM: TWO REAR MOTOR DRIVE BACK SUPPORT HEIGHT: 14.5”...
-
Page 9: Getting Started
G E T TI N G STAR T E D INCLUDED: • Unbox your new DASH Ultra Lite Power Wheelchair A. DASH power wheelchair • Remove all packaging and protective B. Lithium-ion battery pack wrap C. Battery charger • Locate the components provided with the power wheelchair D. - Page 10 G E T TI N G STAR T E D • Unfold the power wheelchair like a lawn chair until there is a “CLICK” indicating it is in the fully extended and locked seating position • Ensure the footplate does not get stuck under the chair as you begin to unfold it •...
- Page 11 G E T TI N G STAR T E D • Next, create the joystick mount by first locating the three joystick mount components provided with your DASH • Align the steel profile (C), to the existing mount assembly already attached to the right arm rest of your DASH in order to create a square opening as shown in image 1 •...
- Page 12 G E T TI N G STAR T E D BOTTOM • Locate the seat cushions provided with you DASH • Secure the TOP cushion to the Velcro on the bottom of the back rest and around to the back of the chair •...
-
Page 13: Operating
O PE R ATI N G • First, turn on the systems power by locating the CPU at the rear of the power chair and pushing the switch to the ON position Indicates the power to the unit is OFF Indicates the power to the unit is ON •... -
Page 14: Fr E E Wh E E L (M An Ual) O Pe R Ati O N
FR E E WH E E L (M AN UAL) O PE R ATI O N • DASH power wheelchair can be operated as a manual push chair as required • Turn OFF the CPU at the back of the chair, the wheels should now roll freely with a slight bit of pressure applied •... -
Page 15: Folding
FO LD I N G • To fold the power chair we first • Next, release the arm rests by pressing recommend removing the joystick up on the locking mechanism at the and placing it on the seat of the chair back of the arm rest (image 2) (image 1) •... - Page 16 FO LD I N G • To release the chair from the seated position for folding, reach beneath the front of the seat and push up on the release bar to unlock. • Slowly fold the power chair on to the rear wheels.
-
Page 17: Battery Maintenance
BAT TE RY M A I NT E NA N CE BATTERY MAINTENANCE Lithium-Ion rechargeable batteries require routine maintenance and care in their use and Observe and note the run time that a new fully- handling. Read and follow the guidelines in this charged battery provides for powering your document to safely use Lithium-Ion batteries and product. - Page 18 Charge the battery to approximately 50% of hot, changes color, or shape, or appears capacity at least once every six months. abnormal in any way. Contact Travel Buggy if any of these problems are observed • Remove the battery and store it separately from the product.
-
Page 19: Charging
C HARG I N G • We recommend that you remove the battery from your DASH power wheelchair before charging • Remove the battery from the power wheelchair by depressing the red switch and pulling it off the holster • Connect the output plug of the charger into the charging socket of the battery, second connect the input plug of... -
Page 20: Maintenance & Care
M AI N TE NA N CE & CA R E LUBRICATION • Keep your DASH ultra lite power wheelchair clean from debris, moisture and dirt. Wipe clean often • According to use condition, please clean or lubricate the front axle, rear axle, front •... -
Page 21: Limited Warranty
Travel Buggy will, at its sole discretion, Due to its straightforward design, most parts replace any warrantable item that fails can be easily exchanged by the end user within the warranty period. -
Page 22: Contact & Support
CO N TACT & S U PPO R T You will find the operation and care of your Additional images and videos are available DASH very simple and easy, but should you on our website. have any questions please contact Travel OUR WEBSITE Buggy. - Page 23 TA B LE D ES M AT I È R ES REMARQUES PLIANT INFORMATIONS SUR LA SÉCURITÉ ENTRETIEN DE LA BATTERIE LORS DE L’UTILISATION DE LA BATTERIE 27 CHARGEMENT SPÉCIFICATIONS ENTRETIEN ET MAINTENANCE MISE EN MARCHE GARANTIE LIMITÉE FONCTIONNEMENT CONTACT ET SUPPORT FONCTIONNEMENT DE LA ROUE LIBRE (MANUELLE) ATTENTION: Lisez toutes les précautions et instructions de ce manuel avant d’utiliser cet équipement.
-
Page 24: Remarques
également porter une attention particulière informations marquées dans ce manuel en commençant par AVIS. Travel Buggy, ses filiales et partenaires ne peuvent être tenus responsables des blessures corporelles ou des dommages matériels résultant d’une utilisation ou d’un entretien dangereux ou incorrect du Fauteuil Roulant Électrique DASH Ultra Lite. - Page 25 I N FO R MAT I O N S S U R L A S ÉCU R I TÉ • ASSUREZ-VOUS que le siège est en position flanc d’une colline ou en diagonale dans une verrouillée lorsque vous utilisez votre DASH montée ou une descente, et ne vous arrêtez pas (si possible) lorsque vous montez ou •...
-
Page 26: Informations Sur La Sécurité
LO R S D E L' U T I LI SATI O N D E L A BAT TE R I E LORS DE L'UTILISATION DE LA Ne démontez pas et ne modifiez pas la batterie. La batterie contient des BATTERIE dispositifs de sécurité... -
Page 27: Lors De L'utilisation De La Batterie
LO R S D E L' U T I LI SATI O N D E L A BAT TE R I E quelque manière que ce soit. Contactez Ne continuez pas à charger la batterie si Travel Buggy si l'un de ces problèmes est elle ne se recharge pas dans les délais observé... - Page 28 S PÉC I FI CATI O N S POIGNÉE DE POUSSÉE MANUELLE CONTRÔLEUR FACILE SOULEVEZ À UTILISER L’ACCOUDOIR COUSSIN RESPIRANT BATTERIE AU LITHIUM 250 WATTS SANS BALAIS MOTEURS (DUAL) ROUES ANTI-BASCULEMENT PÉDALE DE PIED ROUE EN POLYURÉTHANE DE 12 POUCES ROUE AVANT DE 8 POUCES 46CM / 18PO 43CM / 17PO...
-
Page 29: Spécifications
S PÉC I FI CATI O N S LES SPÉCIFICATIONS DE PERFORMANCE TAILLE DU COUSSIN DE SIÈGE: 17PO L X 16,5PO D DIMENSIONS PLIÉES: 23PO L X 13PO L X 36PO H DISTANCE DE CONDUITE: 12,5 MI / 20 KM DIAMÈTRE DE LA ROUE AVANT: 8 PO. -
Page 30: Mise En Marche
M I S E E N M ARCH E • Déballez votre nouveau Fauteuil Roulant INCLUS: Électrique DASH Ultra Lite A. Fauteuil roulant électrique DASH • Retirer tous les emballages et les films B. Batterie au lithium-ion de protection C. Chargeur de batterie •... - Page 31 M I S E E N M ARCH E • Dépliez le fauteuil roulant électrique comme une chaise de jardin jusqu’à ce qu’il y ait un «CLIC» indiquant qu’il est complètement position assise allongée et verrouillée • Assurez-vous que le repose-pieds ne se coince pas sous la chaise lorsque vous commencez à la déplier •...
- Page 32 M I S E E N M ARCH E • Ensuite, créez le support de manette en localisant d’abord les trois manettes un montage des composants fournis avec votre DASH • Alignez le profilé en acier (C) sur l’ensemble de montage existant déjà fixé à l’accoudoir droit de votre DASH afin de créer une ouverture carrée comme le montre l’image 1 •...
- Page 33 M I S E E N M ARCH E SIÈGE SUPÉRIEUR SIÈGE INFÉRIEUR • Repérez les coussins d’assise fournis avec votre DASH • Fixez le coussin TOP au velcro au bas du dossier et autour du dos de la chaise •...
-
Page 34: Fonctionnement
FO N CTI O N N E M E N T ARRÊT/OFF MARCHE/ON • Tout d’abord, mettez le système sous tension en plaçant l’unité centrale à l’arrière du fauteuil électrique et en appuyant sur le bouton en position MARCHE/ON Indique que l’appareil est hors tension Indique que l’appareil est sous tension •... -
Page 35: Fonctionnement De La Roue Libre (Manuelle)
FO N CT I O N N E M E N T D E L A R O U E LI B R E (M A N U E LLE) ARRÊT/OFF MARCHE/ON • Le fauteuil roulant électrique DASH peut être exploité comme un fauteuil roulant manuel comme obligatoire •... -
Page 36: Pliant
PLIANT • Pour plier le fauteuil motorisé, nous • Ensuite, relâchez les accoudoirs recommandons d’abord de retirer le en appuyant sur le mécanisme de joystick et de le placer sur le siège du verrouillage à l’arrière de l’accoudoir fauteuil (image 1) (image 2) •... - Page 37 PLIANT • Pour libérer le fauteuil de la position assise pour le plier, passez sous l’avant du siège et poussez sur la barre de dégagement pour le déverrouiller. • Repliez lentement le fauteuil motorisé sur les roues arrière. Assurez-vous que les roues avant sont tournées vers l’avant pour s’effondrer complètement.
-
Page 38: Entretien De La Batterie
E N TR E TI E N D E L A BAT T E R I E ENTRETIEN DE LA BATTERIE Les batteries rechargeables au lithium-ion nécessitent un entretien et des soins de routine Observez et notez la durée de fonctionnement lors de leur utilisation et de leur manipulation. - Page 39 E N TR E TI E N D E L A BAT T E R I E Utilisez uniquement le chargeur fourni pour ce qu'il ne reste aucune trace du liquide. charger votre batterie. Cherchez des soins médicaux. • Arrêtez immédiatement d'utiliser la batterie si, ESPACE DE RANGEMENT lors de l'utilisation, de la charge ou du stock- •...
-
Page 40: Chargement
C HARG E M E N T • Nous vous recommandons de retirer la batterie de votre fauteuil roulant électrique DASH avant de le charger • Retirez la batterie du fauteuil roulant électrique en appuyant sur l’interrupteur rouge et en la retirant de l’étui •... -
Page 41: Entretien Et Maintenance
E N TR E TI E N E T M A I N T E N A N C E LUBRIFICATION • Gardez votre fauteuil roulant électrique DASH Ultra Lite propre et sans débris, humidité et saleté. Essuyez-le souvent • Selon les conditions d’utilisation, veuillez nettoyer ou lubrifier l’essieu avant, •... -
Page 42: Garantie Limitée
En raison de sa conception simple, la plupart des pièces peuvent être facilement Travel Buggy remplacera, à sa seule échangées par l’utilisateur final sans qu’il soit discrétion, tout article sous garantie qui nécessaire de faire appel à un technicien tomberait en panne pendant la période de... -
Page 43: Contact Et Support
Des images et des vidéos supplémentaires l’entretien de votre DASH très simple et sont disponibles sur notre site web. facile, mais si vous avez des questions, NOTRE SITE WEB veuillez contacter Travel Buggy. www.travelbuggy.com NOTRE SERVICE CLIENTÈLE 1.888.56.BUGGY (Canada) 1.855.56.BUGGY (ÉTATS-UNIS) EMAIL contact@travelbuggy.com... - Page 44 Travel Buggy www.travelbuggy.com...
Need help?
Do you have a question about the DASH Ultra Lite Power and is the answer not in the manual?
Questions and answers
Where is the pin on the battery that are supposed to pull to the right to release during initial set up? Where and how do you charge the battery