Table of Contents
Advertisement
Quick Links
Advertisement
Table of Contents

Related Manuals for Panasonic Pro-Meet PI-WML2432NP


Summary of Contents for Panasonic Pro-Meet PI-WML2432NP
- Page 1 Model Number: PI- WML2432NP Operating Instructions WIRELESS PRESENTATION SYSTEM POWER LAN 1 LAN 2 HDMI DCNI – Meet Thank you for purchasing Panasonic product. Please read these instructions carefully before operating this product and retain them for future reference.
-
Page 2: Table Of Contents
Contents Introduction ....................1 1.1 Package contents .................. 1 1.2 Trademarks ................... 2 1.3 About the Descriptions in This Manual ..........2 Important information................. 3 2.1 For your safety ..................3 2.2 For best performance ................3 2.3 About AC adaptor................. 3 2.4 Other important information .............. - Page 3 5.5 Configure Security Settings ..............20 5.6 Firmware Updating ................21 5.7 Licence Upload ..................22 5.8 Moderator Configuration..............22 Joining a Pro-Meet Meeting............... 23 6.1 Use the Pro-Meet app for Windows laptops and Mac laptops ....23 6.1.1 Download Pro-Meet app from Pro-Meet Web user interface portal .................
-
Page 4: Introduction
Introduction Outline ibes the information about installation and operation of This manual descr Pro-Meet. 1.1 Package contents PI-WML2432NP Antenna x 2 Operating Instructions Quick Start Guide Note: These pictures are only for reference. -
Page 5: Trademarks
• Wi-Fi and WI-Fi Protected Setup are registered trademark or trademark of Wi-Fi Alliance • Pro-Meet is the trademark of Panasonic Life Solutions India All other trademarks identified herein are the property of their respective owners. 1.3 About the Descriptions in This Manual •... -
Page 6: Important Information
2. Important information 2.1 For your safety PI-WML2432NP is designed and tested to meet the latest standards of safety for information technology equipment. However, to ensure your safety, it is important that you read the following safety instructions. Setting up your system 1. -
Page 7: Other Important Information
For the purpose of recycling to facilitate effective utilization of resources, please return this product to a nearby authorized collection centre, registered dismantler or recycler, or Panasonic service centre when disposing of this product. Please see the Panasonic website for further information on collection centres, etc., or call the toll-free number below... -
Page 8: Before You Start
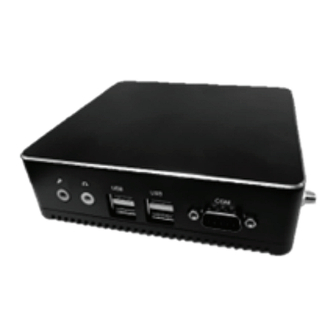
3 Before You Start 3.1 Controls This is how your Pro-Meet looks. Figure 1: Pro-Meet Panel Feature Function Power Button Click to turn on Pro-Meet unit Power LED Shows power on status (green) Hard Drive LED Shows Hard drive activity (red blink) LAN RJ-45 Connector 1 Connect to LAN network LAN RJ-45 Connector 2... -
Page 9: Key Features
3.2 Key Features • Full HD Screen sharing – Share your device screen in Full HD wirelessly (using the Pro-Meet application). • Airplay and Miracast support. • Wireless Device Connectivity • Wireless Connection for up to 254 Devices – Utilizing Compatible External Wireless Network. -
Page 10: Installation And Setup
4 Installation and Setup 4.1 Installation Pro-Meet This section provides instructions for the installation of Pro-Meet. Before installing, Pro-Meet must be placed in the correct horizontal position. 4.2 Setup Pro-Meet Before connecting a device to your Pro-Meet unit, always turn the power off. Plug the device after attaching it to your Pro-Meet unit, and then turn it on to use it. -
Page 11: Connecting Main Display
To connect Pro-Meet as illustrated in Figure 2 and Figure 3: 1. Connect the keyboard and mouse to the USB 3.0 Connector on the rear panel. 2. Connect one of the following to be used as the main display for the meeting: •... -
Page 12: Welcome Screen
4.3 Welcome screen After booting up and setting the necessary configuration correctly, you can see the Welcome screen on the main display. Figure 4 : Welcome screen... -
Page 13: Administrator Operation
5 Administrator Operation Pro-Meet Administrator console enables you to do the following: • Logging in to Pro-Meet Web user interface • Configuring Pro-Meet Settings 5.1 Logging in to Pro-Meet Web user interface The Web user interface enables you to configure your Pro-Meet unit. The Web user interface is accessed from any computer through your local network. - Page 14 Figure 6: Default page of Web user interface Click the tabs in the navigation panel on the left to access information and configuration files. Pro-Meet enables you to configure settings that apply to the Pro-Meet unit such as power, time, file format and management settings: Name Detail System Information...
-
Page 15: System Information
5.2 System Information Pro-Meet enables you to verify system settings such as firmware version, date, uptime, disk space, iOS Mirroring status, Miracast status and LAN parameters. ® To verify system settings: • Click System Information on the navigation panel. The System Information page appears. -
Page 16: Configuring System Settings
5.3.1 Configuring System Settings Configure DND mode, iOS Mirroring settings and Miracast settings. • Click Device > SYSTEM on the navigation page. The System settings page appears. Figure 8: System Settings 5.3.1.1 Activating Do Not Disturb Feature Pro-Meet enables you to activate the Do Not Disturb mirroring feature that does not allow any participant using the Pro-Meet app to mirror on the main display except active presenter. -
Page 17: Configuring Miracast Settings
5.3.1.3 Configuring Miracast Settings Pro-Meet enables you to activate Miracast mirroring for meeting participants. Once enabled, participants can use the native Miracast feature on their Windows laptop or Android device to mirror their screen on the main display. To activate Miracast mirroring: 1. -
Page 18: Configuring Qr Code
5.3.2.2 Configuring QR Code Pro-Meet enables participants to join the meeting by scanning a QR code visible on the Welcome screen. 1. Click on Device> DISPLAY settings on the navigation panel. The QR Code settings appear. Figure 10: Configuring QR Code 2. -
Page 19: Configuring End Of Meeting Settings
5.3.3.2 Configuring End of Meeting Settings Pro-Meet enables you to configure the End of Meeting Setting. 1. Click Device> PRESENTER Figure 12: End of Meeting Settings 2. Under End of Meeting Setting section, select what you want to do with the whiteboard content when the meeting is over. -
Page 20: Configuring Date And Time Settings
5.3.4 Configuring Date and Time Settings Pro-Meet enables you to change the date and format displayed on the embedded web portal and the Pro-Meet Application. It also enables you to set the time zone for the Pro-Meet unit. • Click on Device>DATE & TIME settings on the navigation panel. The display settings page appears. -
Page 21: Configuring Network Settings
To set the Date & Time format for the Pro-Meet: 1. Click on Device> DATE & TIME Select Reboot Time on the navigation panel. 2. From the dropdown select the time of reboot. The system enables you to set reboot time from 12 AM to 11:30PM. 5.4 Configuring Network Settings Pro-Meet enables you to change network settings such as whether to use a DHCP server, and the IP address of your Pro-Meet unit. -
Page 22: Configuring Wireless Settings
Figure 16: IP configuration 2. Under IP Configuration, select Static. 3. In the Network Information table, change the IP settings. 4. Click Apply Settings. The IP address of your Pro-Meet unit is changed. 5.4.2 Configuring Wireless Settings Your Pro-Meet unit can function as a hotspot to allow presenters and participants to connect and join the presentation. -
Page 23: Configure Security Settings
2. Under Connection Type, select Hotspot. 3. Under Hotspot Settings, Input Hotspot name and password of your choice. 4. Click Apply. The hotspot is now active. Join the network to connect to your Pro-Meet unit. To connect to Wi-Fi Network 1. -
Page 24: Firmware Updating
Figure 19: Security Settings 2. Click Web Server Certificate > Browse, and select your SSL certificate. 3. Click New Key File> Browse, and select the relevant key file for your SSL certificate 4. In case the SSL key file is password protected, the password for accessing the file needs to be entered in the Key Password textbox. -
Page 25: Licence Upload
5.7 Licence Upload To start using Pro-meet Wireless Presenter, user need to upload the license provided to the customer at the time of billing. Once the licence is uploaded, the device will restart and allow the user to use features basis the Pro-meet license selected (Basic or Plus). Figure 21: Licence Upload 5.8 Moderator Configuration To enable or disable the moderator feature for Pro-meet wireless presenter, use... -
Page 26: Joining A Pro-Meet Meeting
6 Joining a Pro-Meet Meeting By using one of the following methods, you can join a Pro-Meet meeting. • Use the Pro-Meet app for Windows laptops and Mac laptops. • Use the Pro-Meet app for tablets and smartphones. • Use iOS/OS X Airplay Service to mirror Mac laptops and iPhones. •... -
Page 27: Joining A Pro-Meet Meeting
6.1.2 Joining a Pro-Meet meeting Follow the steps below to manually join a Pro-Meet meeting: Figure 24: Pro-Meet app screen for laptop 1. Ensure that your device is connected to the same network as your Pro-Meet unit. 2. Launch the Pro-Meet application on your device. 3. -
Page 28: Download Pro-Meet App From The Google Play Store Or App Store
6.2.1 Download Pro-Meet app from the Google Play Store or App Store Downloading Pro-Meet on Google Play Store(For Android): 1. Open the Google Play Store app on your Android device. 2. Type "Promeet" in the search bar located at the top of the screen and press enter. -
Page 29: Joining A Pro-Meet Meeting Manually
6.2.2.1 Joining a Pro-Meet meeting manually Follow the steps below to join a Pro-Meet meeting manually: Figure 25: Pro-Meet app for tablet and smartphone screen 1. Ensure that your device is connected to the same network as your Pro-Meet unit. 2. -
Page 30: Use Ios/Os X Airplay Service To Mirror Mac Laptops And Iphones
3. Scan the QR code displayed on the main screen using the capture screen. Once you have completed these steps, you will be automatically logged in to the Pro-Meet meeting, and the Pro-Meet dashboard will appear on your device. 6.3 Use iOS/OS X Airplay Service to mirror Mac laptops and iPhones. -
Page 31: Mirroring Windows Laptops Using Miracast
6.4.1 Mirroring Windows laptops Using Miracast To mirror your Windows laptop on the main display using Miracast: 1. On your laptop, press Windows + K to open the Wireless Display options. Figure 26: Windows project option screen 2. Select the name of your Pro-Meet collaboration device from the list of available wireless displays. - Page 32 "Connect." Your device name will then appear on the main display, and your Android device screen will be mirrored on the main display. Help Line: Panasonic Customer care 18004190373 | Email: helpline@in.panasonic.com Register office: Panasonic Life Solutions India Private Limited, 12th Floor, Ambience Tower, Ambience Island, NH-8, Gurgaon -122002, Haryana, India.
-
Page 33: Pro-Meet App Features
7 Pro-Meet app features With Pro-Meet app, these features you can use: • Moderator • Whiteboard • Chat • Sharing files • Show Main Display • Collaborate on the main display Follow the instructions below to learn how to use Pro-Meet app to collaborate with other participants with ease. -
Page 34: Starting Whiteboard
Name Function Line draw To draw a line, click on the line draw tool, then click and drag your cursor on the whiteboard to draw a straight line. Square draw To draw a square, then click and drag your cursor on the whiteboard to draw the square. -
Page 35: Chat
• Click on the Whiteboard icon to open the whiteboard tool. • Choose the line draw, square draw, triangle draw, circle draw, highlighter, pencil, eraser or text box tool from the toolbar. • To draw a line, click on the line draw tool, then click and drag your cursor on the whiteboard to draw a straight line. -
Page 36: File Sharing
2. Find the participant you want to chat with and click on their name. This will open the chat window for that participant. 3. Type your message in the text field at the bottom of the window and click "SEND" to send your message. The selected participant will receive your message. -
Page 37: Show Main Display On Your Device
If the receiving participant wants to view or cancel a file transfer in progress, they can click the "File Transfer" icon on the Dashboard. 7.5 Show Main Display on Your Device With Pro-Meet, you can mirror the main display on your device to get a closer look at the presentation and add your own annotations. -
Page 38: General Information
8 General information 8.1 Specifications Realtek RTL8111F LAN, 10/100/1000Mb x2 WiFi 2T2R 2.4G/5G Audio HD ALC662 Rear Port 4* USB3.0 2* RJ45 1* 12V/5A DC Input 1* HDMI & VGA 1* Line-out & Mic 1* COM port 1* LED Operating : -5 0C ~ 60 0C Temperature Storage :... -
Page 39: Error Message
8.3 Error Message In this chapter, some error messages that can be shown on the main display are listed. For each problem, possible causes are given, and a solution is proposed. If you cannot solve the problem, please get in touch with your local RMA administrator. - Page 40 Help Line: Panasonic Customer care 18004190373 | Email: helpline@in.panasonic.com Register office: Panasonic Life Solutions India Private Limited, 12th Floor, Ambience Tower, Ambience Island, NH-8, Gurgaon -122002, Haryana, India. AO0124-01...
Need help?
Do you have a question about the Pro-Meet PI-WML2432NP and is the answer not in the manual?
Questions and answers