Table of Contents
Advertisement
Quick Links
Advertisement
Table of Contents

Related Manuals for Griesser Vento

Summary of Contents for Griesser Vento
- Page 1 Installation instructions Sliding shutter Vento...
-
Page 2: Table Of Contents
Only trained personnel may mount and put the systems into operation. Griesser | Installation instructions | Sliding shutter Vento... -
Page 3: Notes On The Installation Instructions
No modifications may be made to the product other than the activities described in the operating and in- stallation instructions for the product; otherwise, the right to claim under guarantee will also be invalidated. Griesser | Installation instructions | Sliding shutter Vento... -
Page 4: Product Description
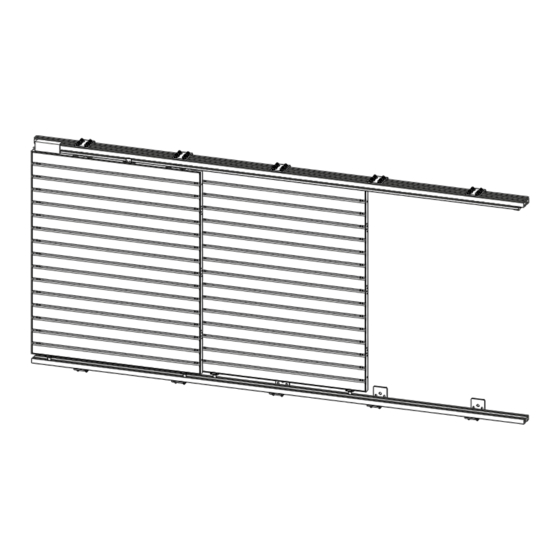
3.1 Components sliding shutter 3.1.1 Sliding shutter Vento 1 Sas B 2 Bearing 3 Sash A 4 Guide rail 5 Runner rail 6 Suspension brackets for runner and guide rail 7 Motor Griesser | Installation instructions | Sliding shutter Vento... -
Page 5: Assembly
• the specifications of the assembly instructions are observed. Representation in the graphics In these instructions, the illustration of the toothed belt is partially omitted in favour of clarity. Griesser | Installation instructions | Sliding shutter Vento... -
Page 6: Schemes
4.5 Schemes The motor can be mounted on the left or right. Execution according to order. The yellow sash ( ) moves the further way each time. = Motor Griesser | Installation instructions | Sliding shutter Vento... - Page 7 The yellow sash ( ) moves the further way each time. = Motor Griesser | Installation instructions | Sliding shutter Vento...
-
Page 8: Sashes Positions Telescope And Carrier
4.6 Sashes positions telescope and carrier 4.6.1 Telescope scheme 2R and 3R motorised (2L and 3L mirror image) The yellow sash ( ) moves the further way each time. = Motor Griesser | Installation instructions | Sliding shutter Vento... - Page 9 4.6.2 Carrier scheme 2R and 3R motorised or manual (2L and 3L mirror image) The yellow sash ( ) moves the further way each time. = Motor Griesser | Installation instructions | Sliding shutter Vento...
-
Page 10: Runner Rail Ceiling Istallation
Use suitable fasteners for on-site fastening! * All combinations of loads and spacing of fixing points are shown in the offer documents. The fixing points can be selected according to the structural conditions. Griesser | Installation instructions | Sliding shutter Vento... - Page 11 4.7.3 Assembly with motor 4.7.4 Installation situations Ceiling installation 1-track Ceiling installation 2-tracks Ceiling installation 3-tracks Sashthickness + 15 Sashthickness + 15 Sashthickness Griesser | Installation instructions | Sliding shutter Vento...
-
Page 12: Runner Rail Bracket Installation
4.8.2 Distance between the brackets 1-track/2-tracks/3-tracks without motor * The distance between the brackets is determined by the number of brackets supplied. The brackets must be evenly dis- tributed along the length. Griesser | Installation instructions | Sliding shutter Vento... - Page 13 * The distance between the brackets is determined by the number of brackets supplied. The brackets must be evenly dis- tributed along the length. 4.8.3 Assembly Attention Use suitable fasteners for on-site fastening! Griesser | Installation instructions | Sliding shutter Vento...
- Page 14 To finely adjust distances from the wall or sliding shutters (2 mm instead of 4 mm), both slot tenant must be rotated by 180°. 4.8.4 Installation situations Bracket installation 1-track Bracket installation 2-tracks Bracket installation 3-tracks Griesser | Installation instructions | Sliding shutter Vento...
-
Page 15: Installation Of The Curtain
In the case of multi-sash systems, the process must be repeated as often as needed. For systems with carri- 13 mm ers or telescopic systems, the sashes must be hung in accordance with the sash position diagram (see 4.6). 13 mm Griesser | Installation instructions | Sliding shutter Vento... -
Page 16: Guide Rail Bottom Installation
Use suitable fasteners for on-site fastening! * All combinations of loads and spacing of fixing points are shown in the offer documents. The fixing points can be selected according to the structural conditions. 4 mm Griesser | Installation instructions | Sliding shutter Vento... - Page 17 11,5 13,5 3001 … 3500 10,5 11,5 13,5 14,5 Nominal setting X (mm)* Only for guide rail Type G, Vento + Roller bolt Sash height Frame temperature (mm) -10°C … 0°C 1°C … 10°C 11°C … 20°C 21°C … 30°C 31°C …...
-
Page 18: Guide Rail Bracket Installation
Washer ∅6,6/∅22×2 4.11.2 Distance between the brackets 1-track/2-tracks/3-tracks * The distance between the brackets is determined by the number of brackets supplied. The brackets must be evenly dis- tributed along the length. Griesser | Installation instructions | Sliding shutter Vento... - Page 19 Use suitable fasteners for on-site fastening! 10 mm 4 mm 180° 180° To finely adjust distances from the wall or sliding shutters (2 mm instead of 4 mm), both slot tenant must be rotated by 180°. Griesser | Installation instructions | Sliding shutter Vento...
- Page 20 4.11.4 Installation situations Situation 4 Type L motorised Situation 4 Type L manual Situation 4 Type G motorised Situation 4 Type G manual X = Nominal setting (See 4.10.3) Griesser | Installation instructions | Sliding shutter Vento...
-
Page 21: Fine Adjustment
4.12 Fine adjustment 4.12.1 Sliding shutter manual (E.g. scheme 1R) 3 mm 5 mm Y = Sash protrusion 3 mm 5 mm 3 mm 5,5 Nm 3 mm 5,5 Nm Griesser | Installation instructions | Sliding shutter Vento... - Page 22 4.12.2 Sliding shutter motorised (E.g. scheme 1L 1R and 2) = Motor 3 mm = Motor Y = Sash protrusion = Motor 3 mm = Motor 8 mm = Motor Griesser | Installation instructions | Sliding shutter Vento...
- Page 23 4.12.3 Sliding shutter motorised (E.g. scheme 2L 2R 3L and 4 with carrier) = Motor Y = Sash protrusion 3 mm = Motor Griesser | Installation instructions | Sliding shutter Vento...
- Page 24 = Motor = Motor 3 mm 8 mm = Motor Griesser | Installation instructions | Sliding shutter Vento...
- Page 25 4.12.4 Sliding shutter motorised (E.g. scheme 2L and 2R with telescope) = Motor Pull sash Y = Sash protrusion 3 mm = Motor Pull sash Griesser | Installation instructions | Sliding shutter Vento...
- Page 26 = Motor Pull sash 3 mm = Motor Pull sash Griesser | Installation instructions | Sliding shutter Vento...
- Page 27 = Motor Pull sash = Motor Pull sash 8 mm Griesser | Installation instructions | Sliding shutter Vento...
- Page 28 4.12.5 Sliding shutter motorised (E.g. scheme 3L and 3R with telescope) = Motor Pull sash = Motor Pull sash 2,5 mm Griesser | Installation instructions | Sliding shutter Vento...
- Page 29 = Motor TR25 Pull sash = Motor Pull sash Griesser | Installation instructions | Sliding shutter Vento...
- Page 30 = Motor = Motor Zugflügel 3 mm 8 mm Pull sash Y = Sash protrusion Griesser | Installation instructions | Sliding shutter Vento...
-
Page 31: Function Test
4.13 Function test Note after installation: • Carry out a test run over the entire travel distance (opening and closing) • Teach in the motor Griesser | Installation instructions | Sliding shutter Vento... -
Page 32: Sliding Shutter Lock
4.14 Sliding shutter lock Griesser | Installation instructions | Sliding shutter Vento... -
Page 33: Sliding Shutter Stopper
4.15 Sliding shutter stopper 13 mm Griesser | Installation instructions | Sliding shutter Vento... -
Page 34: Troubleshooting
Sliding shutters must be disposed of in an environmentally friendly manner at the end of the product›s service life. 7 Pictograms used Information Horizontal Hex key … mm Correct Vertical Torx TR TR… Visual check X Marking Cleaning Sound control Drilling/screwing Locking Measuring Spanner Unlocking griesser.com...
Need help?
Do you have a question about the Vento and is the answer not in the manual?
Questions and answers