Table of Contents
Advertisement
Quick Links
Advertisement
Table of Contents

Subscribe to Our Youtube Channel
Related Manuals for Gram LP7517F


Summary of Contents for Gram LP7517F
- Page 1 User manual LP7517F/FP Weighing Indicator...
-
Page 3: Table Of Contents
TABLE OF CONTENTS Summary ......................1 Main function..................1 Installation ....................... 2 Electrical connection................. 2 2.1.1 Connection indicator with Load cells ..........2 2.1.2 Power connection................2 Operation ......................3 Key and display ................3 Operation ..................6 3.2.1 ON/OFF .................... 6 3.2.2 kg/lb Conversion ................ -
Page 4: Summary
1. Summary LP7517F/FP indicator is developed for weighing transpalette. The indicator can be placed on the top cap of a transpalette. Two versions are available: LP7517F without a printer incorporated; LP7517FP with incorporated printer. 1.1 Main function 》General weighing: Zero / Tare / Total 》Automatic power off and power saving function... -
Page 5: Installation
Load cell interface depiction DC power supply 2.1.2 Power connection LP7517F is powered by 5V/1A adaptor, plug the adapter directly into the “DC” pin at the back cover of the indicator. LP7517FP is powered by 8.4V/1A charger, plug the charger directly into the... -
Page 6: Operation
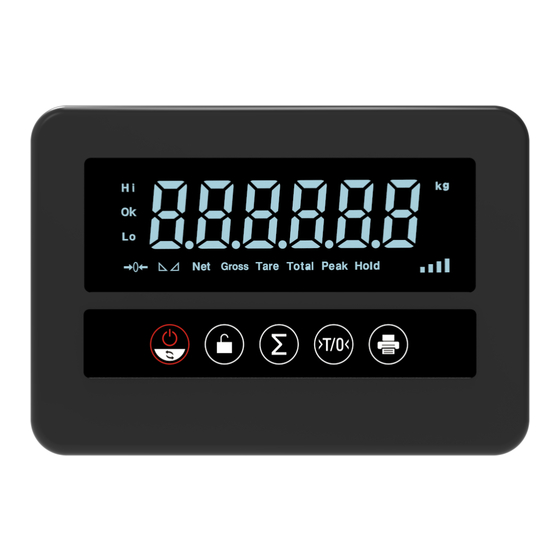
3. Operation 3.1 Keys and display Display... - Page 7 Weighing indicator display instruction: LED display Instruction Weighing data display Weight unit kg Weight unit lb* Hold Hold the data Peak Hold the peak weight Tare Display Tare status Gross Gross weight display Net weight display Total Total weight The weighing data is stable Zero, indicating zero weight Upper limit Within limit...
- Page 8 Keys’ function: Symbol Name Function 1. Press 3 seconds to power on or power off On/Off 2. Press key to convert units* unit convert* Enter and exit “Hold” mode Hold Accumulating operations Use with “Print” to check the total weight Total 1.
-
Page 9: Operation
3.2 Operation 3.2.1 ON/OFF Press the button for 3 seconds to power on or power off. 3.2.2 kg/lb Conversion If you select kg/lb conversion, in normal weighing mode, press “On/Off” key to perform kg/lb conversion. 3.2.3 Tare/Zero During the weighing process, if the zero range(±2%)is exceeded and the reading is stable, press “Tare/Zero”... -
Page 10: Peak Hold
Settings Menu (4.2.2): C11=0 “Hold” function unavailable C11=1 Peak hold C11=2 Hold C11=3 Auto-hold 3.3.1 Peak hold Press the “Hold” key, this will cause the Hold light to switch on, and the maximum data will be displayed on the weighing indicator. Press “Hold” key again to exit the hold function. -
Page 11: Check The Total Weight Operation
is achieved, then press “Total”, display will show “n002” message, then the loaded weight will be displayed. This operation can be repeated maximum 999 times. 3.4.2 Check the total weight operation Hold “Print”, then press “Total” at the same time, the display will show “n**”, (accumulating times) and then the total weight will be displayed. -
Page 12: Calibration & Parameter Settings
“Hi” light will switch on, and indicator will produce an sound; when the weight is below the lower limit, the “Lo” light will switch on. In case the weight is within the limit, the “OK” light will switch on. 4. Calibration & parameter settings 4.1 Enter calibration There have two ways to enter the settings menu: 1. -
Page 13: Calibration
4.2.1 Calibration C01 UNIT [C01 ] Press 1] Selected unit is kg 2] Selected unit is lb* Press , go to the next step C02 Set decimal digits [C02 ] Press option:0/1/2/3/4 no decimal point one decimal point two decimal points three decimal points four decimal points Press... - Page 14 Set [0100.00] Press , go to the next step C05 Zero calibration Option: 0=no zero calibration 1= zero calibration necessary In order to calibrate zero, please choose option 1 and ensure the scale is empty and the stability indicator light is on. Count down [CAL 10] ~ [CAL 0], then the indicator will show [0.00] (example for two decimals).
-
Page 15: Application Parameter Settings
4.2.2 Application parameter settings C08 Warning tone Open warning tone Close warning tone C09 Power off automatically Do not power off automatically. [C9 10] Keep on for 10 min, then power off automatically [C9 30] Keep on for 30 min, then power off automatically [C9 60] Keep on for 60 min, then power off automatically C10 Power saving setting... -
Page 16: Communication Settings
4.2.3 Communication settings C18 Serial interface settings [C18 No sending [C18 Big display [C18 Print format output [C18 Command mode (Z=Zero T=Tare R=Reply weight) [C18 Continuous sending C19 Baud rate [C19 1200bit/s [C19 2400bit/s [C19 4800bit/s [C19 9600bit/s [C19 600bit/s 4.2.4 Application settings C20 Manual Zero Settings [C20 00]... -
Page 17: C24 Overload Range
[C21100] Initial zero range±100% Max. Capacity C22 Zero tracking range [C22 0.0] No zero tracking [C22 0.5] ±0.5d [C22 1.0] ±1.0d [C22 2.0] ±2.0d [C22 3.0] ±3.0d [C22 4.0] ±4.0d [C22 5.0] ±5.0d C23 Zero tracking time [C23 0] No zero tracking [C23 1] 1 second [C23 2]... -
Page 18: C29 Noise Filter
[C28 1] Low dynamic filter [C28 3] Medium dynamic filter [C28 5] High dynamic filter C29 Noise filter [C29 0] Close noise filter [C29 1] Low filter [C29 2] Medium filter [C29 3] High filter C30 Date format [C30 0] 99.09.29 [C30 1] 09/29/99... -
Page 19: Exit Settings
4.2.5 Exit settings In order to exit settings, for example, after introducing the option [C10 1], press in order to confirm it, then press to exit and save the settings. -
Page 20: Maintenance
5. Maintenance 5.1 Troubleshooting method Error Error description Solution 1. The loaded weight 1. Decrease loaded weight exceeds the overload Check load cell range of Max. Capacity connection. Display 2. Wrong or no 3. Check the load cell input UUUUUU connection with the load and output resistance for cell. -
Page 21: Daily Maintenance
During calibration, input 1. Check the connection. the reading is negative. 2. Check if the load cell is damaged. ERR3 3. Restart calibration, if the error reappears, please replace the PCB. Ensure the added weight and During calibration, the ERR4 the scale are stable, restart reading is unstable calibration. -
Page 22: Restore Default Parameters
6-8 hours. The battery grid will then appear full. The indicator has a built-in intelligent charge management chip, which can continue to use power supply after being fully charged, preventing battery overcharge. LP7517FP charger red light will change into green to indicate a fully-charged battery. - Page 23 Inner code display Date Time Serial interface data output method Serial interface Baud rate 3=9600 Manual zero setting Initial zero setting Automatic zero tracking range Automatic zero tracking time Overload range Negative display range Standstill time Standstill range Dynamic filter Noise filter Date format 0 (1*)
Need help?
Do you have a question about the LP7517F and is the answer not in the manual?
Questions and answers