Table of Contents
Advertisement
Quick Links
Advertisement
Table of Contents

Related Manuals for Shiantech SA1300P


Summary of Contents for Shiantech SA1300P
- Page 1 CO2 MONITOR - SA1300P Instruction Manual CO2/TEMP/RH...
- Page 2 This manual and its content inevitably contain errors or discrepancies from reality, and are for reference only. If there are discrepancies or doubts, please contact our company. The functions and specifications are subject to change without prior notice. contact us Web: www.shiantech.com Tell:86-10-89498895 E-mail:shian@shiantech.com...
-
Page 3: Table Of Contents
Contents Packing List Warning Getting Started Features at a Glance Restore Factory Defaults Switch On/Off Power Source Overview LCD Display Menu bar Alarm Buzze Plant Mode and Human Mode ADV-Alarm Value Alarm Indicator Temperature Unit Time and Date Calibration Specification... -
Page 4: Packing List
Packing List 1. CO2 Monitor Unit 2. USB Cable for Power 3. User’s Manual Warning - The provided USB cable can be ONLY used as power supply for this device. - Do NOT disassemble this device or change internal wiring. - Do NOT store or use this product in high temperature, high humidity, flammable, explosive and strong electromagnetic environment. -
Page 5: Getting Started
Getting Started Thanks for purchasing SA1300P air quality monitor(CO2/TEMP/RH). This product is applied to display CO2 concentration, temperature and humidity for indoor air quality monitoring. Features at a Glance - HD Large Display - Wall mounted and Desktop - Touch Button Operation - 15°Bevel Design, Easy to Read... -
Page 6: Restore Factory Defaults
Restore Factory Defaults In Detection Panel (See Pic.1 in Page 3), hold for 4 seconds until an audible ENTER beep is heard. (Pic.1: Detection Panel) (Pic.2: Operation Panel) -
Page 7: Switch On/Off
Switch On/Off Press down the switch to activate this monitor, wait for 3 minutes for warm-up. Press the switch again to switch it off. Switch it off if you don't use it for more than 1 week. Switch on: Switch off:... -
Page 8: Power Source
Power Source Plug in USB power When the device is ON, plug in USB cable power. Battery indicator Low battery: steady green indicator (Charge the device within 20 minutes to avoid battery damage) Charging: flashing green indicator Fully charged: steady green indicator Battery recharging When the device is ON, plug in USB cable power Charging time: 2.5 hours (Charge extra 30 minutes after the indicator turning from... -
Page 9: Overview
Overview Drawing Sketch and Components List Orange Condition Indicator Front Panel Green Condition Indicator UP Button USB Port Down Button Hole for Buzzer Menu Button Hole for Rope Enter/OK Button Hole for Screws Battery Indicator ON/OFF Switch Red Condition Indicator Label... -
Page 10: Lcd Display
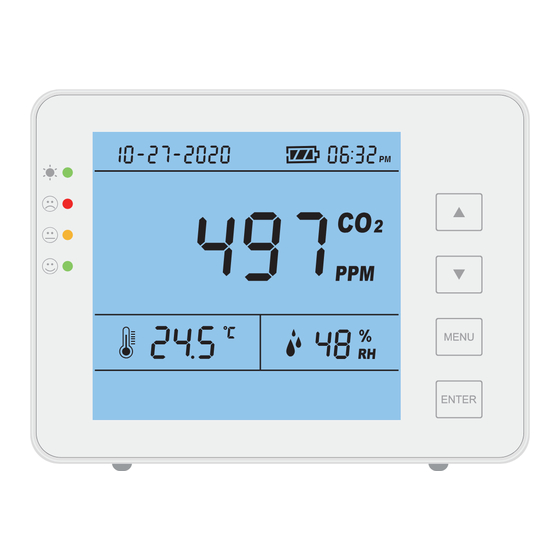
LCD Display Date (Month/Day/Year) Time CO2 Reading Temperature Reading ℃/℉ Humidity Reading % Main Menu Bar Mute Human Mode Audible Alarm Degree Celsius Degree Fahrenheit Manual Calibration Alarm Point Setting Time Plant Mode... -
Page 11: Menu Bar
Menu Bar Press once to activate the menu bar, press arrow buttons to cycle and switch MENU function options (press to switch each option in turn until exit). MENU Notice: if the device is not operated in 30 seconds, the menu bar will disappear and the display will return to the normal state. -
Page 12: Alarm Buzze
To set a certain function, press to enter this function when ENTER the icon is flashing, use arrow buttons to adjust the setting or figure, when it’s done press to confirm and exit. ENTER Alarm Buzze When it displays , an audible alarm will sound if the co2 level exceeds present CO2 alarm value;... -
Page 13: Plant Mode And Human Mode
Plant Mode and Human Mode When flashes, press to choose and enter certain mode, and it will skip ENTER to the next icon. Press ENTER ADV-Alarm Value Use this function to set high and low alarm values for Human Mode and Plant Mode Default alarm values are 800ppm and 1200ppm for both modes. -
Page 14: Alarm Indicator
Alarm Indicator In the Human mode, the GREEN light is on when the CO2 reading is lower than the low alarm value, the YELLOW light is on when it is between the high and low alarm values, and the RED light is on when it is higher than the high alarm value. In the Plant mode, the RED light is on when the CO2 reading is lower than the low alarm value, the GREEN light is on when it is between the high and low values, and the YELLOW light is on when it is higher than the high value. -
Page 15: Time And Date
Time and Date 12-hour and 24-hour systems are both available for choice. 24-hour setting: when flash at the same time, press to save the setting. ENTER Press Press ENTER Press ENTER Press Press ENTER Press Press MENU ENTER Press... -
Page 16: Calibration
Calibration Before calibration, run this device for at least 20 minutes with window open or in outdoor environment with backup battery to reach an atmosphere with 400ppm CO2. Wait till the CO2 reading is stable, then follow above steps for calibration.After calibration,leave it 10 minutes before normal use. -
Page 17: Specification
Specification Typical test conditions: Ambient Temp:23±3℃, RH=50%~70%, Altitude=0~100 meters Measurement Specifications Operating Temperature 32°F ~ 122°F (0°C ~ 50°C) Storage Temperature -4°F ~ 140°F (-20°C ~ 60°C) Operating & storage RH 0-95%(non-condensing) CO2 Measurement Measuringe range (0-5000)ppm Display resolution 1ppm (0-1000); 5ppm (1000-2000); 10ppm (>2000) (0~3000)ppm: ±... - Page 18 Temperature Measurement Operating temperature 32°F ~ 122°F (0°C ~50°C) Accuracy ±2°F / ±1°C Display resolution 1°F / 0.1°C Response time <20 minutes (63%) RH Measurement Measuring range 5~95% ±5% Accuracy Display resolution 1% Main interface display, 1% Max/Min display Operating Voltage DC(5±0.25)V 120*90*35mm Dimension...
Need help?
Do you have a question about the SA1300P and is the answer not in the manual?
Questions and answers