Table of Contents
Advertisement
Quick Links
SA1500P
Multifunctional indoor air quality monitor
CO2/CO/TEMP/RH
Introduction
Thanks for purchasing this Multifunctional indoor
air quality monitor. This device is used to monitor
the real-time concentration of Carbon Dioxide
(CO2) and Carbon Monoxide (CO) as well as the
values of Temperature and Humidity. It will send
audible and visible alert when user' s health or life
is under threaten.
Advertisement
Table of Contents

Related Manuals for Shiantech SA1500P


Summary of Contents for Shiantech SA1500P
- Page 1 SA1500P Multifunctional indoor air quality monitor CO2/CO/TEMP/RH Introduction Thanks for purchasing this Multifunctional indoor air quality monitor. This device is used to monitor the real-time concentration of Carbon Dioxide (CO2) and Carbon Monoxide (CO) as well as the values of Temperature and Humidity. It will send audible and visible alert when user’...
- Page 2 This manual and its content inevitably contain errors or discrepancies from reality, and are for reference only. If there are discrepancies or doubts, please contact our company. The functions and specifications are subject to change without prior notice. contact us Web: www.shiantech.com Tell:86-10-89498895 E-mail:shian@shiantech.com...
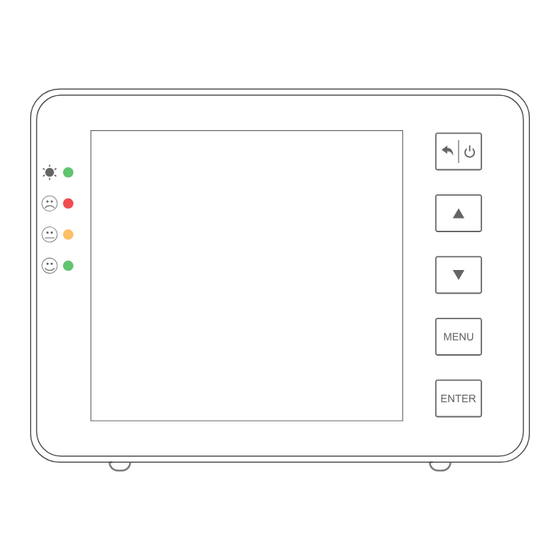
- Page 3 Overview Power Indicator ( Green ) High alarm Indicator ( Green ) Low alarm Indicator ( Yellow ) Good air condition Indicator ( Green ) Quit / Exit / ON-OFF Up button Down button Menu button Enter button...
- Page 4 LCD Display Status Max Value Min Value Time Date CO Reading Reading Humidity Temperature Reading Reading Buzzer on/off Fan indicator Set alarm value Unit for temperature Set for date and time Manual calibration...
-
Page 5: Power Off
ON/OFF Power on Press and hold to turn on and turn off the device. * During the warm-up process, high and low alarm points for CO2 and CO will be displayed before the 40 seconds countdown. Power off Press and hold to shut down the instrument. -
Page 6: Power Lamp
Operation instructions Notice When the backlight is OFF, press any key to light it. Power lamp In the process of charging, the green light flashes, and it is always on when it is fully charged. Detection Interface The detection interface shows real-time readings of CO2, CO, Temperature, Humidity as well as the Battery Status Indicator and Time &... -
Page 7: Alarm & Alert
Operation instructions Alarm & Alert When the CO2 and/or CO level are/is higher than the lower alarm point, the yellow indicator will turn on, at the same time the gas name and the will flash (indicating ventilation is needed) When the CO2 and/or CO level are/is higher than the high alarm point, the red indicator will turn on, at the same time the gas name and the will flash... -
Page 8: Troubleshooting
Operation instructions Check MAX and MIN values Under detection interface, press in turn to check the Max and Min values of CO2, CO, temperature and humidity in turn, along with time when these values recorded. These data are recorded from the moment when this monitor is powered ON to the present time scale. -
Page 9: Menu Setting
Setting Menu Setting In detection interface, press to activate the menu bar, press to select each function, press to enter and save setting and press quit and exit. Set Buzzer When is blinking, press to mute the buzzer; when is blinking, press to turn on the buzzer. -
Page 10: Set Alarm Points
Setting Set Alarm Points When is blinking, press to enter alarm value setting interface, press to select gas names CO2/CO and alarm items HI/Lo, press enter alarm value setting interface, press to adjust values, press to save the setting. - Page 11 Setting for example Calibration Before calibration, fully charge this device and run it for at least 10 minutes in outdoor environment to reach an atmosphere with 400ppm CO2 and 0ppm When is blinking, press to enter calibration interface. Press to select among CO2, CO, Temp and Humidity.
- Page 12 Setting Calibrate CO2: when CO2 is blinking, press start calibration, wait for 3-5 minutes till CO2 reading is stable, press to finish calibration. Calibrate CO: when CO is blinking, press start calibration, wait for 3-5 minutes till CO reading is 0, press finish calibration.
-
Page 13: Set Time And Date
Setting When is blinking, press to enter unit switch function ( for temperature ), press choose unit, press to save the setting. Set Time and Date When is blinking, press to set time and date. Press to switch each item and press adjust the digits. -
Page 14: Restore To Factory Setting
Setting Restore to Factory Setting When is blinking, press and hold for 4 seconds to restore to factory setting. An audible chirp can be heard when it’ s done. - Page 15 Specification Parameter Typical test conditions: Ambient Temp: 23 3°C, RH=50%~70%, Altitude= 0~10 meters Measurement Specifications 32°F ~ 122°F (0°C ~ 50°C) Operating Temperature Storage Temperature -4°F ~ 140°F (-20°C ~ 60°C) Operating & storage RH 0-95%(non-condensing) CO2 Measurement Measuringe range (0-5000)ppm 1ppm (0-1000);...
- Page 16 CO Measurement Measuringe range ( 0-1000 )ppm Display resolution 1ppm ( 0~50 ) ppm: 5ppm Accuracy ( 50~1000 ) ppm: Real value±10% Temperature Measurement Operating temperature 32°F ~ 122°F (0°C ~50°C) Display resolution 1°F / 0.1°C Accuracy ±2°F / ±1°C Response time <20 minutes (63%) RH Measurement...
- Page 17 Disclaimers The USB cable is only used for power supply, not for communication with PC. if the power plug is disconnected or loose, the product may not work normally, and the LCD display information may be incorrect. This product can't replace the CO2 detector in dangerous workplace, and can't replace the detector in human or animal health places, life and livelihood, medicine related fields.
Need help?
Do you have a question about the SA1500P and is the answer not in the manual?
Questions and answers