Table of Contents
Advertisement
Quick Links
Advertisement
Table of Contents

Related Manuals for EPLO E18PRO


Summary of Contents for EPLO E18PRO
- Page 1 ENJOY SMART LIFE Remote Control Instructions Model:E18PRO/E13PRO Thank you for choosing our product. Please read the instructions carefully before installation and keep it available for future maintenance or reference. E-mail:service@eplo.com...
-
Page 2: Table Of Contents
Content Installation preparation 01. Remote control installation 02. Battery installation Usage instruction 01. Remote control illustration 02. Rear/Front washing 03. Drying/Dryer temperature 04. Water volume adjustment 05. Nozzle position adjustment 06. Energy saving 07. Water temperature adjustment 08. Seat temperature adjustment 09. -
Page 3: Installation Preparation
Installation Preparation Remote control installation Remote control holder installation 1: 1. Drill a 6 mm diameter hole in the wall to a depth of about 35 mm. 2. Remove the double-sided adhesive tape on the back of the holder. 3. Install an anchor into the hole, stick the holder to the wall and secure with screws and then stick the patch with tape. -
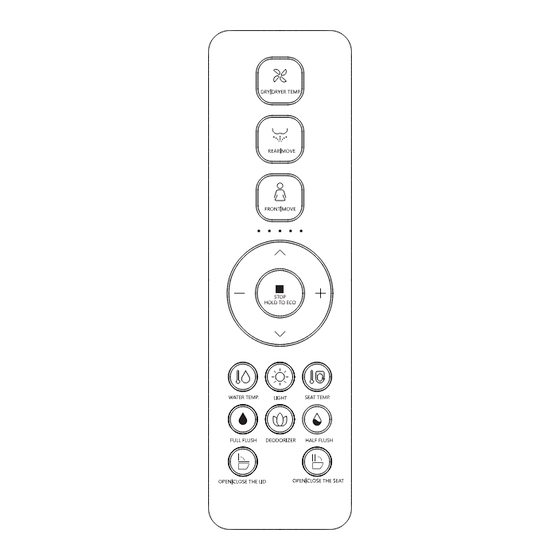
Page 4: Remote Control Illustration
Installation Preparation Remote control illustration Drying/ Dryer temperature Rear washing/ oscillating washing Front washing/ oscillating washing Indicator light Nozzle moving forward Water reducing Water increasing Stop/Energy saving Nozzle moving backward Night light Water Seat temperature temperature Deodorizer Full flush Half flush Open/ Open/Close the seat Close the lid... -
Page 5: Rear/Front Washing
Usage Instruction Notice : · Only when the user is seated and the buzzer beeps can the functions of front/rear washing and drying be activated. · Please sit backward on the seat for correct washing position and to avoid splashing. ·... -
Page 6: Drying/Dryer Temperature
Usage Instruction DRY|DRYER TEMP (Only for the product with drying function) ① Press " " button, the indicator is on, showing the current air temperature level. It will stop drying automatically after one cycle or after leaving. ② Under drying, press " "... -
Page 7: Water Temperature Adjustment
Usage Instruction Water temperature adjustment Short press " " button to adjust the water temperature between 0-5 level. The indicator light is on showing current water temperature level. When the indicator is off, the temperature is at level 0 (room temperature). Room Level 1 Level 2... -
Page 8: Auto Lid Open/Close
Usage Instruction Auto lid open/close Short press " " button,open or close the lid. Short press " " button,open or close the seat. Long press " " button to turn on/off auto lid open/close function. Auto deodorization Short press " "... -
Page 9: Other Operations
Usage Instruction · IR remote control ① Power on the toilet and the self-inspection starts. It beeps once when the self-inspection completes. ② Press and hold " " button, then press " " button, the indicator light will flash. ③ Press the Pressure " + " or " - " button to select user 1-9 (as shown below). The indicator light displays the corresponding user code and flashes. - Page 10 Usage Instruction APP code matching · Press and hold " " and " " button simultaneously for longer than 3 seconds to start APP code matching. (Only for the toilet with APP) Voice function · Press and hold the " "...
- Page 11 The picture of product may not entirely consistent with actual appearance and color because of product improvements, please in kind prevail. ASVFAC3300001A-1.2...
Need help?
Do you have a question about the E18PRO and is the answer not in the manual?
Questions and answers
is there a container for deodorant? if so how do I add deodorant in E13 Bidet toilet? don't see any instruction