
Related Manuals for Bose ArenaMatch AM10


Summary of Contents for Bose ArenaMatch AM10
- Page 1 Bose ArenaMatch ® AM10, AM20 and AM40 Loudspeaker Service Manual ©2017 Bose Corporation Reference Number 794042-SM Rev.01...
-
Page 2: Table Of Contents
THIS DOCUMENT CONTAINS PROPRIETARY INFORMATION OF BOSE CORPORATION WHICH IS BEING FURNISHED ONLY FOR THE PURPOSE OF SERVICING THE IDENTIFIED BOSE PRODUCT BY AN AUTHORIZED BOSE SERVICE CENTER AND SHALL NOT BE REPRODUCED OR USED FOR ANY OTHER PURPOSE. WARRANTY ®... -
Page 3: Product Description
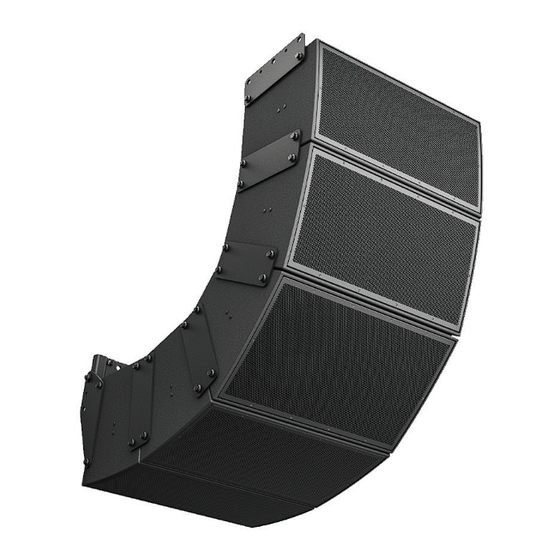
Product Description ArenaMatch is an outdoor rated passive speaker for stadiums with a capacity up to 30,000 seats. Three variants will be available (10°, 20° and 40° vertical coverage) and will utilize six drivers and a new 14-inch woofer. All variants will be IP55 rated, black and shipped standard with a crossover/ transformer/ 80°... -
Page 4: Specifi Cations
Footnotes Frequency response and range measured on-axis in anechoic environment with recommended bandpass and EQ. Bose extended-lifecycle test using pink noise filtered to meet IEC268-5, 6-dB crest factor, 500-hour duration. AES standard 2-hour duration with IEC system noise. Sensitivity measured in anechoic environment with recommended bandpass and EQ. - Page 5 Footnotes Frequency response and range measured on-axis in anechoic environment with recommended bandpass and EQ. Bose extended-lifecycle test using pink noise ltered to meet IEC268-5, 6-dB crest factor, 500-hour duration. AES standard 2-hour duration with IEC system noise. Sensitivity measured in anechoic environment with recommended bandpass and EQ.
- Page 6 Footnotes Frequency response and range measured on-axis in anechoic environment with recommended bandpass and EQ. Bose extended-lifecycle test using pink noise ltered to meet IEC268-5, 6-dB crest factor, 500-hour duration. AES standard 2-hour duration with IEC system noise. Sensitivity measured in anechoic environment with recommended bandpass and EQ.
-
Page 7: Packaging View
Packaging View Item Number Description Material Note CARTON 805908-0010 INSERT, PE FOAM, 10 DEG 805938-1010 INSERT, PE FOAM, 20 DEG 805938-2010 INSERT, PE FOAM, 40 DEG 805938-4010 Figure 1. Packaging View... -
Page 8: Main Parts List
Main Parts List Item Number Description Material Note ASSY, COVER, I/O PANEL, SVCE 802312-011S DRIVER, COMPRESSION, BLK, SVCE 770438-011S GASKET, WOOFER, BLK 826169-0110 WOOFER, 14IN, 8 OHM, B&C 14NW100, 807968-001S SVCE ASSY, GRILLE, 10 DEG, SVCE 796021-101S ASSY, GRILLE, 20 DEG, SVCE 796021-201S ASSY, GRILLE, 40 DEG, SVCE 796021-401S... -
Page 9: Disassembly Procedures
Disassembly Procedures 1. Grille Removal 1.1 Remove the ten screws that secure the grille to the cabinet indicated by arrows in fi gure 3. NOTE: There are four screws on each side of the grille. and 1 each on the top and bottom. Figure 3 2. - Page 10 Disassembly Procedures 3. Woofer Removal 3.1 Perform procedures 1 and 2. 3.2 Remove the eight screws indicated by circles that secure the woofer to the enclosure. Figure 5. 3.3 Carefully lift out the woofer. Figure 5 3.4 Remove the Faston connectors. Note: There is a locking tab that must be released to remove the Faston connectors.
- Page 11 Disassembly Procedures 4.1 Driver Removal 4.2 Perform procedures 1 and 2 4.3 Remove the two access panels as shown in fi gure 7. 4.4 Each driver is secured with two screws on the front panel as shown in fi gure 7 and 8. Figure 7 Figure 8 4.3 There are two screws for each driver on...
-
Page 12: Test Procedures
Test Procedures Pass: The woofer where the cone moves Equipment Required: outward. Fail: The woofer where the cone does not Audio signal generator move outward. Audio amplifi er Test Connection Information 2. Air Leak Test Ensure the Panel has all jumpers (green) in place as shown. -
Page 13: Revision History
Revision History DATE DESCRIPTION 02/2019 INITIAL RELEASE 05/2019 Woofer service part number... - Page 14 Bose Corporation The Mountain Framingham Massachusetts USA 01701 P/N: 794042 -SM REV 01, 02/2019 http://serviceops.bose.com...
Need help?
Do you have a question about the ArenaMatch AM10 and is the answer not in the manual?
Questions and answers