
Related Manuals for Philips CE133/98


Summary of Contents for Philips CE133/98
- Page 1 Always there to help you Register your product and get support at www.philips.com/support CE133 Question? Contact Philips User manual...
-
Page 3: Table Of Contents
Contents 9 Additional information Charge your USB device Reset the system 1 Safety Replace the fuse 2 Your car audio system 10 Product information Introduction What's in the box 11 Troubleshooting Overview of the system 12 Notice 3 Install the car audio system Disposal of your old product Connect wires Trademark notice... -
Page 4: Safety
1 Safety Read and understand all instructions before you use this device. If damage is caused by failure to follow instructions, the warranty does not apply. in hazardous radiation of EMC or other unsafe operation. The device is designed for negative ground (earth) 12 V DC operation only. -
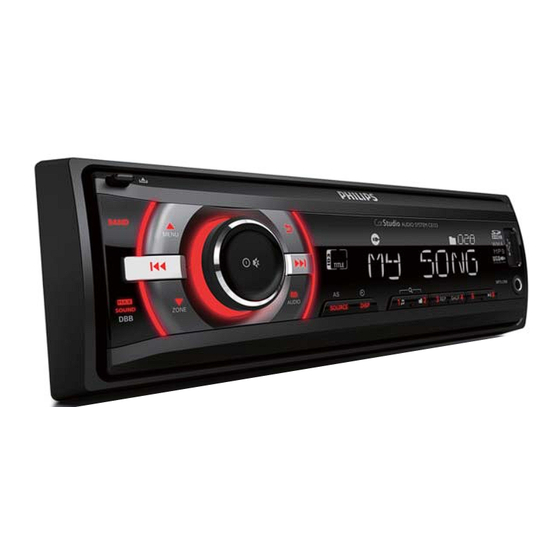
Page 5: Your Car Audio System
2 Your car audio system .m4p, .mp4, and .aac) Congratulations on your purchase, and What's in the box support that Philips offers, register your product at www.philips.com/welcome. Check and identify the contents of the package: Introduction With this system, you can:... -
Page 6: Overview Of The System
Overview of the system t srq l k j i h f MP3-LINK Unlock the front panel. Connect to the audio output socket (usually the headphone socket) of an external device. For .wma and .mp3 tracks, press to select the previous folder. Press and hold to access the system Start, pause, or resume the play of menu. - Page 7 For .wma and .mp3 tracks, press to In radio mode, press to select the access the track list. preset radio station of No. 5. /DSP In radio mode, press and hold to store Press repeatedly to display available the current radio station at channel information about the current track.
- Page 8 t BAND Press repeatedly to select a tuner band. Insert an SD/SDHC card. v RESET Press to reset the system to factory default settings.
-
Page 9: Install The Car Audio System
3 Install the car Connect wires audio system Note Make sure that all loose leads are insulated with electrical tape. Caution Consult a professional to connect wires as instructed below. Use the controls only as stated in this user manual. Check the car's wiring carefully and Always follow the instructions in this chapter in connect them to the the ISO male... -
Page 10: Mount Into The Dashboard
Make sure that the car dashboard opening illustrated, if applicable. is within these measurements: REAR Remove the mounting sleeve with the supplied disassembly tools. Sockets on rear External sockets or panel connectors For ISO male As indicated above connectors REAR L Rear left speaker REAR R Rear right speaker... -
Page 11: Attach The Front Panel
Slide the unit into the sleeve until you hear a "click". Press the left end of the front panel inwards until it is securely locked with a "click". Attach the trim plate. Detach the front panel Note Before you insert an SD/SDHC card or reset the system, detach the front panel. -
Page 12: Get Started
Rotate clockwise to set the minute. Press to turn on the system. » [PHILIPS] is displayed and then Display the clock [SELECT OPERATING REGION] (select a radio region) scrolls. /DISP until [CLK] and the set... -
Page 13: Mute The Button Beep
Mute the button beep The beep sound of buttons is enabled by default. Press and hold to access the system menu. repeatedly until [BEEP ON] Press or [BEEP OFF] is displayed. [BEEP ON]: Enable the beep sound of buttons. [BEEP OFF]: Mute the beep sound of buttons. -
Page 14: Listen To Radio
5 Listen to radio Search for a radio station Search for a radio station automatically Switch to radio mode Press to search for the previous or next radio station with strong signals. Press AS/SOURCE repeatedly to switch the source to [RADIO]. Search for a radio station manually Press repeatedly to select a band. -
Page 15: Play With Rds
Item Program Description Play with RDS type NEWS News services The RDS (Radio Data System) function AFFAIRS Politics and current operates only in areas with FM stations affairs broadcasting RDS signals. If you tune to an RDS INFO Special information station, the station name is displayed. - Page 16 Use alternate frequencies If the signal of an RDS station is poor, enable to switch the system to the previous mode. the AF (Alternate Frequency) function to search for another station that broadcasts the same program. Press and hold to access the system Synchronize the system clock menu.
-
Page 17: Play From A Storage Device
6 Play from a [USB]: For a USB storage device that is connected to the USB socket on the storage device front panel [SD/SDHC]: For an SD/SDHC card that is inserted into the slot If the play does not start, press are copied onto a compatible storage device. -
Page 18: Switch Tracks
Switch tracks During play, you can switch tracks or folders quickly. Switch tracks directly Press to access the track list. » Rotate to toggle through tracks. Press to play the selected track. Switch folders for a track Press to access the folder list. »... -
Page 19: Listen To An External Player
7 Listen to an external player You can use the system to amplify the audio input from an external player, for example, MP3 player. MP3-LINK Press AS/SOURCE repeatedly to switch the source to [MP3--LINK]. Connect an audio input cable with a 3.5 mm connector on both ends between the MP3-LINK socket on the front panel, and... -
Page 20: Adjust Sound
8 Adjust sound The following operations are applicable to all supported media. Button Function Rotate to increase or decrease the volume level. Press to mute the speakers or release them from mute status. Press to enable or disable the MAX Sound feature. -
Page 21: Additional Information
9 Additional Replace the fuse information If there is no power, check the fuse and replace it if it is damaged. Check the electric connection. Remove the damaged fuse from the rear panel. Charge your USB device Insert a new fuse with the same You can charge your USB device, for example, smart phone, with this product. -
Page 22: Product Information
10 Product information Note notice. General Power supply 12 V DC (11 V - 16 V), negative ground Fuse 15 A Suitable speaker 4 - 8 impedance Maximum power 50 W x 4 output Continuous power 22 W x 4 RMS (4 output T.H.D.) Pre-Amp output... -
Page 23: Troubleshooting
If you encounter problems when using this device, check the following points before requesting service. If the problem remains unsolved, go to the Philips Web page (www. philips.com/support). When you contact the Consumer Care, make sure that the product is nearby and the model number and serial number are available. -
Page 24: Notice
Philips and the Philips’ Shield Emblem are The correct disposal of these products helps registered trademarks of Koninklijke Philips N.V. prevent potentially negative consequences on and are used by WOOX Innovations Limited the environment and human health. - Page 26 Specifications are subject to change without notice 2014 © WOOX Innovations Limited. All rights reserved. Philips and the Philips’ Shield Emblem are registered trademarks of Koninklijke Philips N.V. and are used by WOOX Innovations Limited under license from Koninklijke Philips N.V.
Need help?
Do you have a question about the CE133/98 and is the answer not in the manual?
Questions and answers