Table of Contents
Advertisement
Quick Links
Advertisement
Table of Contents

Subscribe to Our Youtube Channel
Related Manuals for HL HDFFA-RNG9

Summary of Contents for HL HDFFA-RNG9
- Page 1 HDFFA-RNG9 APEXX Polaris Ranger Front Forward Control Arm Kit Traction. Strength. Style. sales@highlifter.com 800-699-0947 8 00am - 5 00pm CST 7455 Atkinson Drive, Shreveport, LA 71129 www.highlifter.com Parts Available For These Popular Brands and Others...
-
Page 2: Product Disclaimer
PRODUCT DISCLAIMER The installation of products sold or manufactured by High Lifter Products including, but not limited to suspension components such as lift kits, gear reduction lifts, frame stiffener kits, snorkels, and tires that exceed the original specifications for the vehicle, may change the vehicle's center of gravity and handling characteristics both on- and off-road. -
Page 3: Parts Diagram
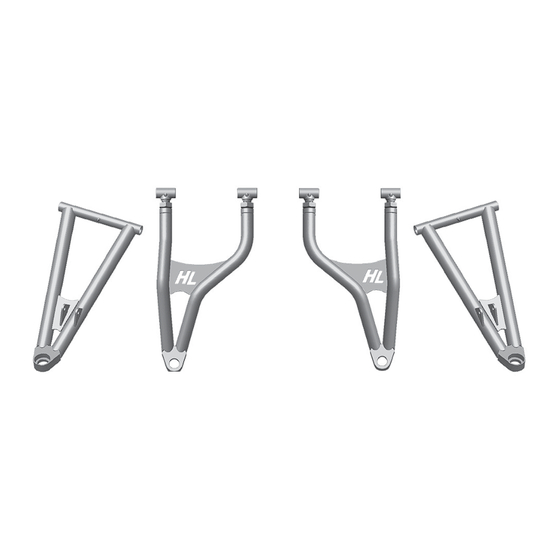
PA RTS DI A G R A M 106Q-L 106J-L 106J-R 106Q-R Upper Left Lower Left Lower Right Upper Right Control Arm Control Arm Control Arm Control Arm (1ea) (1ea) (1ea) (1ea) HC812314FZ GF-1428-ST NLN12F FW12SAE 1/2” x 3-1/4” 1/2 Flat Short Cone Grease 1/2 Lock... -
Page 4: Passenger Side
Wheels & Shocks REMOVING STOCK COMPONENTS NOTE: Procedures were preformed from the FRONT PASSENGER SIDE. Once steps are completed, repeat them on the opposite side. KEEP ALL FACTORY HARDWARE. The bushings, sleeves, and ball joints will need to be removed to install in the new arms, unless it is a pre-installed kit. Place a jack under the FRONT center lift until the weight is off the suspension. - Page 5 Upper Arm REMOVING STOCK COMPONENTS Shock Mount Pinch Bolt Disconnect the upper arm FIRST bolts from the shock, upper pinch bolt, and frame. KEEP ALL FACTORY HARDWARE. Remove bushings and sleeve. Lower Arm REMOVING STOCK COMPONENTS Disconnect the Lower arm by the bolts from the lower pinch bolt, and frame.
-
Page 6: Upper Arm
Install BUSHINGS, SLEEVE, & GREASE FITTING UPPER ARM mallet or press to push the bushings into the arm. Repeat process for the UPPER arms. TIP: It helps to place grease on the bushings. Install the making sure NOT Bushing Grease Fitting Sleeve Removal BALL JOINTS... - Page 7 BALL JOINTS Install Flip the control arm over, and using the same process, press the ball joint in using a vice or press. BALL JOINT ORIENTATION Upper Arm Lower Arm Snap the retaining clip down on to the base of Install LOWER CONTROL ARM LEFT tab on the...
- Page 8 Install UPPER CONTROL ARM and shock using the factory hardware. Reinstall the Axle and attach the arms to the knuckle assembly using factory hardware. Install LOWER CONTROL ARM REPEAT STEPS ON OPPOSITE SIDE OF VEHICLE...
- Page 9 Install HEIM JOINT Disconnect the stock tie rod ends from the ½” drill bit, drill a larger hole where the tie knuckle. rod connects to the knuckle. ½ x 3 ¼” hex bolt and the two high alignment bushings, connect the heim joint to the knuckle, then place the ½”...
-
Page 10: Before Starting
Lower Control Arms ADJUSTING WHEEL CAMBER BEFORE STARTING Tires must be off the ground Suspension components must be completely assembled The new High Lifter lower control arms will come pre-adjusted to factory length, which is .937 surface. Measure from eyelet to center mount arms to those lengths. -
Page 11: Front Wheel Alignment
FRONT WHEEL ALIGNMENT IF YOU HAVE ADJUSTBLE CONTROL ARMS, YOU MUST ADJUST THE CAMBER FIRST BEFORE PROCEEDING. DO NOT INSTALL WHEELS ONTO UTV UNTIL PROPER ALIGNMENT HAS BEEN ACHIEVED. • Straighten steering wheel • Take a tape measure and measure from inside to inside on the front and back ends of the rotors. INCORRECT TOE If the toe alignment is incorrect, measure the distance ADJUSTING TOE... - Page 12 Setting to ZERO STEERING CHECK IF THE STEERING IS ALREADY CENTERED THEN YOU DO NOT HAVE TO FOLLOW THESE NEXT STEPS. Factory steering for some makes and models may NOT be centered. This can cause the tie rod ends center. CORRECT INCORRECT (B) If the steering wheel is...
- Page 13 HIGH LIFTER LIMITED LIFETIME WARRANTY High Lifter offers a Limited Lifetime Warranty to the original purchaser that our product shall be free from defects in material and workmanship for the life of the product if utilized in accordance with the manufacturer’s instructions for installation and operation of said products.
Need help?
Do you have a question about the HDFFA-RNG9 and is the answer not in the manual?
Questions and answers