Table of Contents
Advertisement
Quick Links
Advertisement
Table of Contents

Related Manuals for Meaco MeacoCool Pro Series


Summary of Contents for Meaco MeacoCool Pro Series
- Page 1 MeacoCool Pro Series 12,000 - 16,000 Air Conditioner Instruction Manual...
- Page 2 Thank you for choosing Meaco Our powerful air conditioners are great cooling solutions for single rooms, creating a comfortable atmosphere in your home or office. They have the added benefit of fan and dehumidifying functions for circulating air and removing excess moisture. They’re self-...
-
Page 3: Table Of Contents
Contents Safety information ........Register your Meaco warranty ....What’s included .......... Product identification ......... First steps ........... Installation ..........Operation ............ Maintenance ..........Storing ............Troubleshooting .......... Meaco customer care ........ Specifications ..........Warranty terms & conditions ...... [EN]... -
Page 4: Safety Information
Safety information Important safety instructions This air conditioner must not be used in rooms under the following conditions: • Potentially explosive atmosphere • Aggressive atmospheres • Featuring a high concentration of solvents • An extremely high radio of dust • Rooms smaller than 5.2m² Keep children away: Do not allow children to play with or around this air conditioner, as it could result in injury. - Page 5 • If there is any damage to the air conditioner then do not use it and contact Meaco or your retailer. • As with all air conditioners, always keep upright and leave the air conditioner standing upright for 24 hours before using it upon receipt.
- Page 6 R290 guidance. Servicing should only be carried out by a Meaco approved engineer using original Meaco parts to prevent damage to the unit and potential injury to the engineer.
- Page 7 E or coloured GREEN or GREEN/YELLOW. Always ensure that the cord grip is positioned and fastened correctly. Only ever use the same fuse as fitted in the original product, if in doubt please contact Meaco first, or a qualified electrician.
-
Page 8: Register Your Meaco Warranty
Register your Meaco warranty Your Meaco air conditioner comes with a free 2 year warranty, simply register your details online and you’ll be covered for parts and labour for 2 years from the date of purchase, subject to the terms and condition of the warranty. - Page 9 Meaco App Control your new air conditioner with the Meaco app. Scan the QR code to install the Meaco app or download the Meaco app from the App store or Google Play. Open the app and follow the instructions to create a new account and pair your air conditioner.
-
Page 10: What's Included
Carefully unpack the air conditioner. Keep all packaging materials away from children. We recommend flat packing and keeping hold of the box should you need it in the future. 1. MeacoCool Pro Series Air Conditioner 7. Flexible window kit 2. Duct 8. -
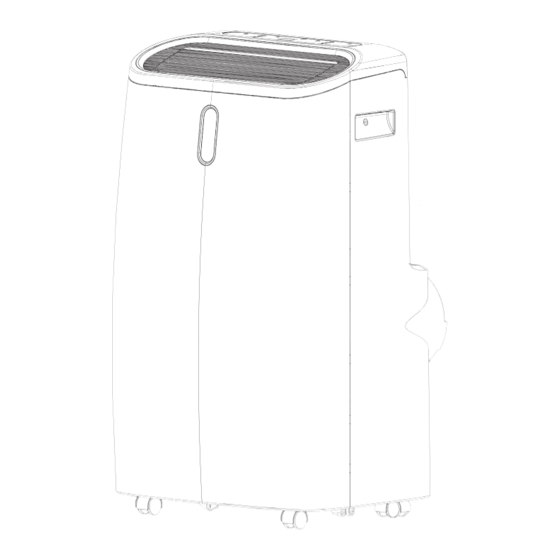
Page 11: Product Identification
Product identification 1. Control panel 8. Lower drainage port 2. Air outlet 9. Central drainage port 3. Louvre 10. Castors 4. Filter & air inlet 11. Cable tidy 5. Handle The 2 x drainage bungs can be found inserted into 6. -
Page 12: First Steps
First steps When you first receive your air conditioner, it is important you follow the steps below carefully: 1. Check your air conditioner and its box and packaging for any transport damage. In case of damage, inform the sender immediately. 2. -
Page 13: Installation
The duct provided is 1.8 metres long and cannot be extended. A 2m duct is available to purchase from meaco.com. There are two different window kits provided: the Standard window kit and the Flexible window kit –... - Page 14 Step 3: Attach the duct to the window kit using the duct window adaptor. • Connect the duct to section B. • After completing the assembly, fit and adjust sections A and C depending on the length you require, using the window kit screws provided.
- Page 15 Step 6: Extend the duct to the desired length avoiding any bends or kinks in the hose. Step 7: If using the air conditioner in Dry Mode or Heat Mode the drainage hose must also be connected (see page 17). Step 8: Plug the air conditioner into the mains and turn on using the power button.
-
Page 16: Operation
Operation Control Panel Note: the Heat LED will only show on the display if you have a CH (Cooling and Heating) model. When the air conditioner is plugged into the mains it will enter Standby mode. All lights on the display will turn on for one second and then switch off (apart from the power button which will continuously stay lit up). - Page 17 Timer: Use the timer button to set an ON or OFF timer. To remove either the ON or OFF timer, press the timer button until you reach ‘00 hrs’. Timer on When the air conditioner is in standby mode, use the timer button to move between 1 and 24 hours in which the air conditioner will turn on.
- Page 18 Cool The temperature can be set between 16°C and 32°C using the increase and decrease buttons. The air conditioner will run until the desired temperature is reached (the compressor will turn off, but the fan will continue to run). If the temperature in the environment increases above the target temperature, the air conditioner will automatically come back on.
- Page 19 Remote Control Before using the remote control, remove the plastic tab. The remote control has a range of approximately 3 metres. Automatic Defrost At low room temperature frost may build up at the evaporator during operation. The air conditioner will automatically start defrosting and the LED above the power button will flash.
- Page 20 Drainage When the air conditioner is used in Dry Mode the drainage hose needs to be attached continuously to the central drainage port in order to remove any collected water (Diagram 1). When the air conditioner is used in Heat Mode the drainage hose needs to be attached continuously to the lower drainage port in order to remove any collected water (Diagram 2).
-
Page 21: Maintenance
Maintenance To ensure your air conditioner is always performing at its best, it’s important to regularly clean it. • Always unplug your air conditioner from the mains before cleaning. • Do not allow the air conditioner to get wet. Cleaning the exterior Clean the exterior with a soft, dry cloth. -
Page 22: Storing
Remember the air conditioner can also be used as an air conditioner (above 15°C) and a heater during the winter months if required. Troubleshooting If you come across a problem with your air conditioner, check the table below and try the suggestions. If the problem persists, contact Meaco. Error Action - Plug in the air conditioner... -
Page 23: Meaco Customer Care
Contact Meaco Meaco customer care If you have a question about your Meaco air conditioner, contact our Customer Service team who will be happy to help. Make sure you have your serial number and details of where and when you purchased your air conditioner. -
Page 24: Specifications
Specifications 12,000 12,000 CH 14,000 14,000 CH 16,000 16,000 CH Dimensions 762 x 353 x 762 x 353 762 x 353 762 x 353 x 762 x 353 762 x 353 x (HWD) 470 mm x 470 mm x 470 mm 470 mm x 470 mm 470 mm... -
Page 25: Warranty Terms & Conditions
3. If your air conditioner has been opened or tampered with or not genuine components have been fitted by yourself or anyone other than a Meaco engineer, your warranty is invalid. 4. Components subject to normal wear and tear, the combined dust filter and case, HEPA filter and hose adaptor are not covered by the warranty. - Page 26 Version: UK301 Meaco (U.K.) Limited Meaco House, Parklands, Railton Road, Surrey GU2 9JX meaco.com...
Need help?
Do you have a question about the MeacoCool Pro Series and is the answer not in the manual?
Questions and answers