Advertisement
Quick Links
1
2
3
25/04/23
04/05/23
04/05/23
SV
SK
MD
EN IMPORTANT - These instructions are for your safety. Please read
through them thoroughly prior to handling the product and retain
them for future reference.
V10623_5059340756653_MAND1_2223
5059340756653_MNL_IN_V05.indd 1
5059340756653_MNL_IN_V05.indd 1
EAN: 5059340756653
4
5
07/06/23
16/06/23
Impala Ref: PRJ27918
SV
John
KNG: KNG-2471-0004
Page Size: A5
EN Side Entry
Flushing Kit
5059340756653
5059340756806
19 Jun 2023 16:19:36
19 Jun 2023 16:19:36
Advertisement

Related Manuals for Flomasta 5059340756653


Summary of Contents for Flomasta 5059340756653
- Page 1 EAN: 5059340756653 25/04/23 04/05/23 04/05/23 07/06/23 16/06/23 Page Size: A5 Impala Ref: PRJ27918 John KNG: KNG-2471-0004 EN Side Entry Flushing Kit EN IMPORTANT - These instructions are for your safety. Please read through them thoroughly prior to handling the product and retain them for future reference.
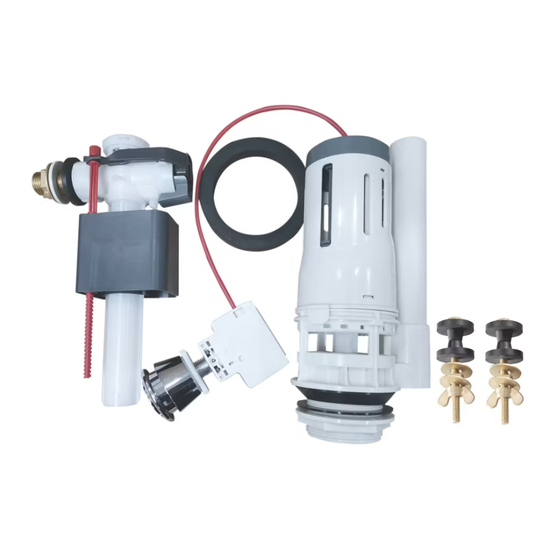
- Page 2 EN Parts 01. x1 02. x1 03. x1 04. x1 05. x2 EN You will need EN Contents Safety Guarantee Assembly Care & maintenance 5059340756653_MNL_IN_V05.indd 2 5059340756653_MNL_IN_V05.indd 2 19 Jun 2023 16:19:36 19 Jun 2023 16:19:36...
- Page 3 EN Safety Before you start • Remove the lid of the cistern along with any buttons that may be connected to this. • Ensure that this product is suitable for the • Remove all excess water from the cistern with installation you have and that all component a sponge.
- Page 4 Once all connections are removed, the cistern can be lifted from the pan and placed carefully on a X = ____mm suitable surface. Once all connections are removed, the cistern wall mounting can be removed. Take care as the cistern may be heavy.
- Page 5 This guarantee covers product failures and malfunctions provided the product was used for the purpose for which it is intended and subject to installation, cleaning, care and maintenance in accordance with the information contained in these terms and conditions, in the user manual and standard practice, provided that standard practice does not conflict with the user manual.
- Page 6 EN Assembly 01. x1 03. x1 Before installing the flush valve, we recommend that the installer adjusts the full and half flush settings to where they are felt to be most economical. These can be adjusted after installation so don’t worry if they are not to your liking post installation.
- Page 7 04. x1 Fit the new flush valve a into the cistern hole and make sure it is not in contact with the cistern wall or any other components already installed in your cistern. Fit the water seal to the underside of the cistern and secure the valve and seal in place with the backing nut. Tighten by hand force only.
- Page 8 Fit your cistern back to the toilet pan. Remember to install the doughnut seal [04] between the cistern and the pan. Secure the cistern screws with hand force. Do not over tighten. 25-32 mm With the flush valve fitted, now adjust the overflow height as per the measurement X if taken from the existing flush valve.
- Page 9 02. x1 Follow the steps below on how to correctly install With the fill valve installed and connected to the mains. the new fill valve. Open the water supply and fill the cistern. Adjust the fill valve float level as shown below, to get the desired water level.
- Page 10 EN Care & maintenance To correctly maintain the fill valve, we recommend cleaning the diaphragm every 6 months or sooner if you live in a hard water area. Follow the detailed instruction below on how to access the diaphragm for the fill valve. Follow instructions in reverse to reinstate the valve.
- Page 11 To correctly maintain the flush valve, we recommend cleaning the seal every 6 months or sooner if you live in a hard water area. Follow the detailed instruction below on how to access the flush valve seal for cleaning. Follow instructions in reverse to reinstate the valve. EN Troubleshooting If after the installation there is water continuously flowing into the bowl, first check that the fill valve is not overfilling the cistern.
- Page 12 Manufacturer: EN www.diy.com www.screwfix.com UK Manufacturer: www.screwfix.ie Kingfisher International Products Limited, To view instruction manuals online, 1 Paddington Square, London, W2 1GG, visit www.kingfisher.com/products United Kingdom EU Manufacturer: Kingfisher International Products B.V., Rapenburgerstraat 175E, 1011 VM Amsterdam, The Netherlands 5059340756653_MNL_IN_V05.indd 12 5059340756653_MNL_IN_V05.indd 12 19 Jun 2023 16:19:41 19 Jun 2023 16:19:41...
Need help?
Do you have a question about the 5059340756653 and is the answer not in the manual?
Questions and answers