Advertisement
Introduction
Scan the QR code or go to rockvillesupport.com/rpg2x10-v2 to access how-to video(s) and other important information you may need to get the most out of your item. If you prefer written instructions, please read ahead! With Rockville you get many options.

Missing items?
If you ordered a bundle that includes more than one product and you are missing part of your bundle then it just means your orders hipped from two different warehouses. You will receive the remaining items very soon. If you have any concerns or inquiries, feel free to call our customer support center at 1-646-758-0144, 24 hours a day/7 days a week.
Please read this manual carefully for proper use of your Rockville RPG2x10 V2 Portable PA System. Should you need assistance, please call our technical help line at 1-646- 758-0144, 24 hours a day/ 7 days a week.
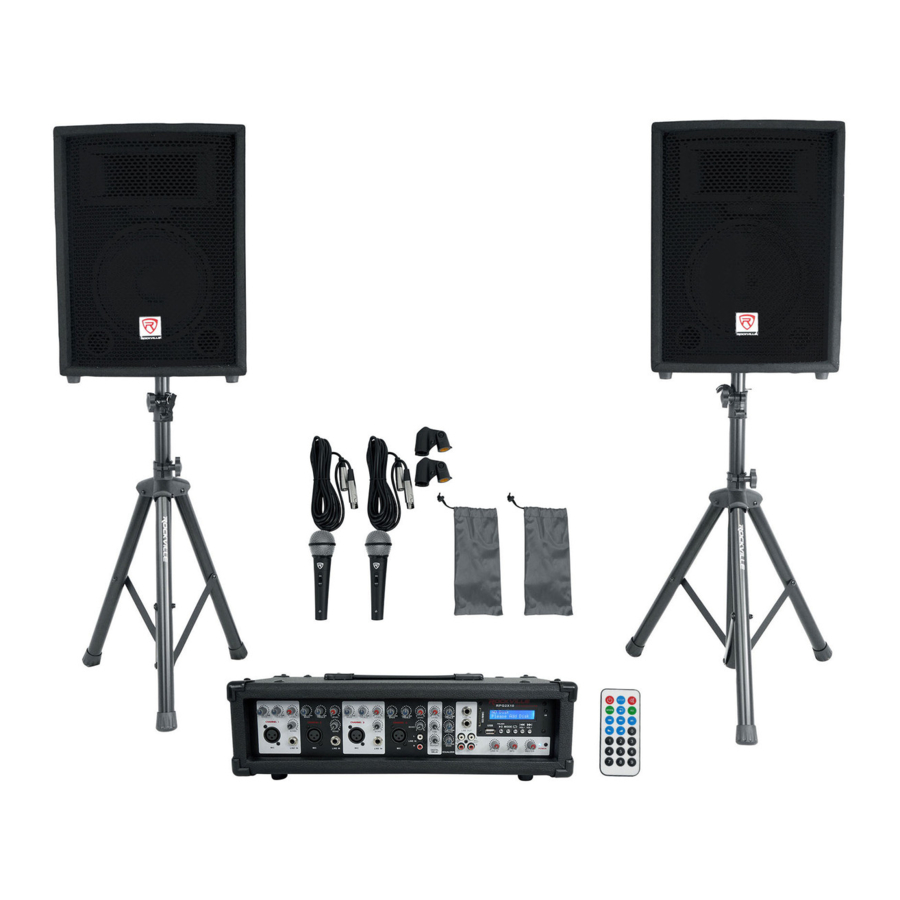
Includes:
(2) 10" ABS molded PA speaker
(1) 8-Channel powered mixer
(2) Foldable speaker stands (in separate box)
(2) 16 foot WTS to 1/4" T S right angle speaker cables (100% OFC Copper)
(2) Metal wired microphones with (2) Mic clips
(2) 10 foot XLR to XLR mic cables (100% copper)
SETUP GUIDE
SAFETY FIRST
Much of the setup of the Rockville RPG2xI OV2 is similar to the setup of other sound systems, and many aspects require plain common sense. Safety should always be your first concern. Always use grounded outlets and three-wire extension cords. Run sound system cables in a way to prevent the danger of tripping and tape them down if needed. Place the speaker stands and mixer on a solid, level surface. Following these guidelines will help prevent personal injury and equipment damage, ensuring years of trouble-free use.
Stands and Speakers
Remove the speaker stands from the case. Be sure the legs on the stand are fully extended to provide a stable base for the speakers and are positioned on a level surface. Tighten the thumbscrew on the base so that it is snug, but do not overtighten (figure I). Raise the speaker stands to the desired height, tighten the thumbscrew and install the safety pin as shown in figure 2.


Place speakers on stands and position them so that they will face toward the audience and away from the microphones. Connect speaker cables from the jack on the lower front of the speaker to the speaker outputs on the back of the mixer. Connect the left speaker to the LEFT OUTPUT and the right speaker to the RIGHT OUTPUT.

Only connect the included speakers to the mixer. The Rockville RPG2x10 V2's speakers provide optimal load for the powered mixer and using other speakers may result in equipment damage.
CONNECTIONS
Microphones and Line Inputs
The RPG2x10 V2's powered mixer is designed to work with any good-quality, balanced, dynamic or condenser microphone. Connect the included microphone(s) to the XLR (three-pin) input connectors as shown in figure 1. If using more than one microphone, connect them in the order they will be on stage for easy adjustment to each microphone. To connect a line level device such as a keyboard, use a 1/4"instrument cable and insert into the corresponding 1/4'" jack as shown in figure 2.


Media Playback Sources
The RPG2xI OV2's powered mixer will accept various media playback devices.
- To connect a turntable or a CD player use the CHANNEL 4 RCA inputs.
- To connect an MP3 player or smart phone with media playback capabilities use the 1/4" Line In jack or the RCA Line In inputs.
- To connect a USB memory stick or SD/MMC card use the corresponding inputs on the mixer panel. Use the screen and controls to navigate and playback audio files.
- To connect via Bluetooth, simply pair your device with the mixer.
Power
Connect the power cord to the receptacle on the back panel of the unit, and then to a suitable electrical outlet. If an extension cord is required, make sure it is a three-wire cord with an intact ground pin to preserve the safety ground.
GENERAL USE TIPS
Microphone Usage
When practical, a single microphone is preferred. Additional microphones pick up more sound from the speakers and each mic must then be turned down to prevent feedback. However, if you have difficulty balancing the level of different individuals with one mic or if you still cannot get sufficient gain, using more mics can offer an advantage. For example, giving several singers their own microphone allows placement of the microphones much closer to each singer. This increases the volume of the sound at the mic and far outweighs any detrimental effect from using multiple mics. It also allows the volume of each mic to be adjusted separately for proper balance.
Avoiding Irritating Feedback
The placement of your microphone is critical in avoiding feedback through the RPG2xIO V2. Never set up your microphone in front of the speaker. Always set up your microphone behind the speaker. When approaching the speaker to make any adjustments, we recommend approaching the speaker from the rear and not walking directly towards the front of the speaker.

BASIC OPERATION
Setting Controls and Turning Unit On
Before turning on power, make sure all speakers, microphones, and other input devices are connected. Set Master Volume con to the 12 0'clock position and all other controls all the way down. Turn power on by placing the ON/OFF switch located on the back of the mixer to the ON position.
Adjusting Gain and Volume Controls
The optimal setting for the powered mixer and included speakers is marked on the MASTER VOLUME control. Adjust the CHANNEL LEVEL control until the desired volume is achieved. If the desired volume is reached with the CHANNEL LEVEL turned down to one of the first three positions, turn the MASTER VOLUME down so you can turn the CHANNEL LEVEL up. If the desired volume is achieved when the CHANNEL LEVEL is close to max then raise the MASTER VOLUME so you can lower the CHANNEL LEVEL. These are the same as any basic mixer functions.
Adjusting Tone Controls
For each active channel adjust the BASS and TREBLE controls to achieve desired sound. Use moderation when making these adjustments, as extreme high settings of any of these controls can lead to a distortion of the sound and an increased chance of feedback on microphone inputs.
HIGH
This High EQ shelving type of active tone control varies the treble frequencies (±15dB at 12kHz) and is designed to remove noise or add brilliance to the signal, depending on the quality of the source.
LOW
A shelving type of EQ that varies the bass frequency levels (±15dB at 80Hz). Low EQ adds depth to thin-sounding signals or cleans up the muddy ones. As with any EQ, use sparingly. Too much of this EQ can give you a booming bottom end.
EQUALIZATION AND EFFECTS
Graphic Equalizer
Unlike the BASS and TREBLE controls on each channel that adjust only that specific channel's input signal, the three-band equalizer adjusts the tonal balance of all the signals going through the powered mixer. It offers control over LOW (BASS), MID, and HIGH (TREBLE) frequencies (±15dB) and offers flexibility in adjusting sound. This equalizer also helps reduce or eliminate acoustic feedback.

Effects
This unit has a built-in digital delay. It's a reverb effect and features REPEAT, TIME, and LEVEL controls. The effect affects all channels (fig. 1) and can be individually controlled at each channel using the EFFECT control (fig. 2).


BLUETOOTH AND MEDIA
Bluetooth Operation
To listen to the music via the Bluetooth wireless connection, you must first pair (link) your RPG2x10 V2 with your Bluetooth phone and/or music device. Turn off any Bluetooth devices previously paired with the RPG2x10 V2. Turn on the Bluetooth feature on your phone or music device. Make sure the RPG2x10 V2 is ready for a Bluetooth connection. The Bluetooth mode must be active. The LCD will say, "Bluetooth input". Place your phone or music device in Bluetooth search mode. The phone or music device will begin searching for the RPG2x10 V2. Select the unit, which should appear as Rockville, from the search results on your phone or music device. Select 0k or Yes to pair with your phone or music device.
Supported Audio File Types
.WAV
.MP3
.WMA
Media Source Playback
Hook up your media source device as mentioned previously. Which inputs are active will be displayed on the LCD screen. Use the controls on the source device for play, stop, forward and reverse functions. Adjust CHANNEL 4 controls on the mixer for desired sound. For media playback using an MP3 player, smartphone, or other similar device use the MODE button to navigate to the proper setting. Connect using a stereo 1/4"cable or a 3.5mm to RCA cable and use the source device for playback controls. When a device is connected to the 1/4"jack the RCA jacks are automatically disabled. For audio file playback from a USB memory stick, use the MODE button to navigate to the USB setting. Use the LCD screen and controls to navigate and playback supported audio files. Use the controls on the mixer for play, pause, forward and reverse. Follow the same procedure for SD/MMC input. If you do not choose to navigate or select a certain file the RPG2x10 V2 will play the files in the order they are stored on your USB or SD/MMC memory device. Non-audio files will show up in your navigation but will have no audio playback if selected. Only audio files can be selected for playback.
Note: The RPG2x10 V2 does not allow playback through all media inputs simultaneously.
FUNCTIONS

- Bass and Treble controls. Adjusts High and Low frequencies for the corresponding channel.
- Level control. Adjusts gain level for the correspoding channel.
- XLR microphone input. We recommend using profesional balanced dynamic, condenser or ribbon mics as they are least likely to be affected by interference. Low cost, high impedance mics can be used, however the level of background noise is higher since an unbalanced circuit is far more susceptible to interference.
- Digital Delay Effect (reverb) control
- Balanced 1/4"TRS input. It accepts signals from a variety of sources such as keyboards, electronic drums, tape recorders, mixers, etc. It will not process microphone input. When you use an unbalanced 1/4"TRS plug, the line input automatically turns the ring into ground.
- Digital delay effect (echo) control panel.
- The Repeat knob controls the rate of the delay.
- The Delay knob controls the time interval of the delay.
- The Level knob adjusts the mix level of the effect sound.
- 4 band equalizer. Adjust frequencies to ±15dB
- Balanced 1/4"TRS Line In / Out jacks.
- RCA Line In / Record Out jacks.
- Line In volume control.
- MP3 (USB / SD / MMC input) volume control.
- Master Volume control.
- SD / MMC port.
- LCD Screen.
- IR receptor.
- Power indicator LED.
- USB port.
- MP3 Player controls.
- Press Play button once to play track, press again to pause.
- Mode control switches between input modes: Bluetooth, USB, SD / MMC, and Radio.
- Repeat Button.
- Previous / Next track buttons also allow you to control the volume. For volume control quickly press button. To move between tracks press and hold the button for one second.
- Record button allows you to record input back to your USB drive or SD / MMC card.
- IEC AC power socket.
- Variable voltage selector switch (110v / 220v).
- Power switch.
- 1/4" s peaker outputs.
FEATURES and SPECIFICATIONS
- Portable PA system with 4 channel mixer
- Complete Portable Pro DJ System
- Compact and light weight system delivers distortion free sound even at extreme SPL
Speakers:
- Two 4 Ohm high power long-throw 10" woofers with 1.5" aluminum voice coils and 600z magnets provide incredibly deep bass and acoustic power
- 200 Watts RMS / 400 Watts Program Power / 800 Watts Peak
- State-of-the-art I.75" crystal piezo compression horn tweeter
- Versatile two-way trapezoidal cabinet architecture:
- Horizontal / Vertical position stage monitor
- Pole mountable
- Frequency range: 65Hz —20kHz
- Sensitivity: 92dB
- Maximum SPL: (110 watts) 109dB
- Transducer compliment: 10" woofer premium high frequency driver on an exponential horn
- Impedance: 8 Ohm
- Input connections: Two 1/4" j acks in parallel
- Two I Oft XLR speaker cables
- Enclosure materials and finish: Trapezoidal, black carpetcovered enclosure and a full length black powder-coated steel grill
Microphones
- Two Dynamic cardioid microphones designed for stand-mount application
- On/off switch
- Clean, natural sound
- Low pop and handling noise
- Includes two mic clips and two 6 meter XLR cables
- Frequency response: 80Hz —12kHz
- Sensitivity: -53dBV/PA (2.2mV/PA)
- Output impedance: 500 Ohm
Mixer
- LCD Display
- USB / SD Input
- MP3 Playback
- Bluetooth connectivity
- 200 Watts RMS / 400 Watts Program Power / 800 Watts Peak into 4 ohm (2 x 8 ohm) speakers
- 4 balanced XLR microphone inputs
- Tape/CD Line inputs
- 10 total inputs
- Master volume control
- Bass, trebel controls, and level controls on each channel
- Reverb effect level control on each channel
- Digital delay effect with independent level control
- Line Out for connection to external amplifiers
- Return input for connection of external effects processors
- Record Out for taping
- RF interference protection on all inputs
- Aux Send Output: -10 dBv nominal, 1k ohms
- Tape Rec Output: -10 dBv nominal, 1k ohms
- Input Impedance: Low-Z Mic: 1k ohms High-Z Line: 10k ohms Tape Input: 10k ohms
- Input Channel Equalization: ±15 dB @ 5 kHz
- 3 Band equalizer: Bass: ±15 @60 Hz Mid: @ 1 kHz Trebel: ±15 @ 10 kHz
- Protection Circuit: Power on Mute delay time: 2 seconds
- Two collapsible speaker stands
- Two 10ft speaker cables
TROUBLESHOOTING
| PROBLEM | CHECK | CORRECTION |
No sound (LCD not lit) | Is power switch on? Is line cord connected to live power outlet? | Turn power switch on. Connect power cord to live outlet |
| Are MASTER and CHANNEL GAIN controls up? | Adjust both MASTER and CHANNEL LEVEL controls upward to desired level. Check speaker connections. Turn mic switch on. Check mic or sound source connection. | |
No Effects | Are the channel EFFECT controls turned up? Are the master EFFECT controls turned up? | Make sure the channel effect control is turned up. Check the master effect controls. Adjust master effect controls until audio effect is heard. |
Files on USB memory device will not play back | Is the file cued for playback? Are the audio files the proper format? | Check that you are in the proper input mode. Make sure your audio files are the correct format. See the list of supported audio formats mentioned previously in this manual. |
Loud howling or squeal from speakers | If it goes away when the CHANNEL or MASTER LEVEL controls are turned down, then it is acoustic feedback. | Reduce microphone gain. Reposition microphone behind or farther from speakers. |
Sound is distorted | Is the CHANNEL LEVEL at a very high setting? | Reduce CHANNEL LEVEL and increase MASTER VOLUME |
IMPORTANT SAFETY INSTRUCTIONS


- To reduce risk of electric shock, never open the unit. There are no user serviceable parts, refer service to the Rockville service center.
- Do not expose this unit to any kind of moisture.
- Please ensure that the unit is situated in a properly ventilated area.
- Make sure the unit is placed on a level and stable surface.
Visit us at: RockvilleAudio.com
Documents / Resources
References
RPG2x10 V2 – Rockville
Welcome to Rockville - Buy Car Stereo, Pro Audio, Marine, Home Theater Manufacturer Direct
Download manual
Here you can download full pdf version of manual, it may contain additional safety instructions, warranty information, FCC rules, etc.
Advertisement


Need help?
Do you have a question about the RPG2X10 V2 and is the answer not in the manual?
Questions and answers