Table of Contents
Advertisement
Quick Links
E/S BUILT-IN GAS GRILL
Installation Guide
REGISTER TODAY
Register your gas grill and receive special content to make
you the ultimate backyard hero.
Scan the QR Code or register online at weber.registria.com
Keep this Owner's Manual for future reference, thoroughly read through it, and
if you have any questions please contact us today.
LP
8652240
031424
enUS
Advertisement
Table of Contents

Related Manuals for Weber SUMMIT 1500042


Summary of Contents for Weber SUMMIT 1500042
- Page 1 REGISTER TODAY Register your gas grill and receive special content to make you the ultimate backyard hero. Scan the QR Code or register online at weber.registria.com 8652240 031424 Keep this Owner’s Manual for future reference, thoroughly read through it, and enUS if you have any questions please contact us today.
-
Page 2: Important Safety Information
• For Built-in outdoor cooking gas appliances: appliance. site. Log onto www.weber.com. If appliance is installed under overhead combustible con- m WARNING: Do not let the cord hang over the edge of a struction, the appliance must be installed in conjunction •... -
Page 3: Configuration Options
Configuration Options “ISLAND” STRUCTURE CONFIGURATION OPTIONS Recommended Gas Supply Locations There are several configuration options for the grill and gas supply access of your Island structure. The 3 common options (A, B, C) are illustrated in the ‘Island’ Structure Configuration Options” table. If there are local codes that apply to “built-in”... -
Page 4: General Construction
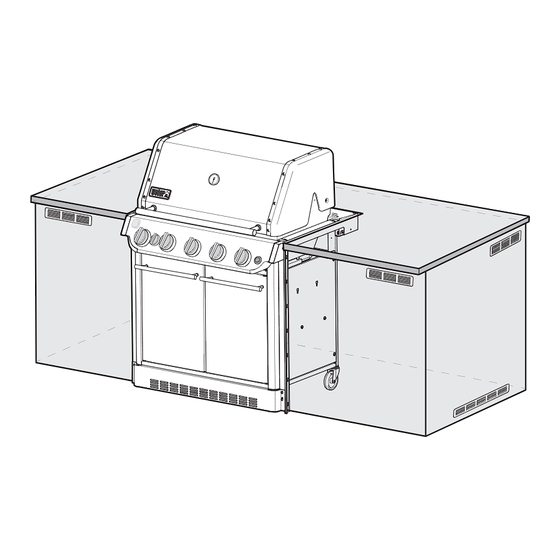
General Construction The SUMMIT Built-In unit should be on site before construction begins. For ease of installation, the grill will be pushed on its casters into the built-in structure. The installation of this grill requires a level floor pad surface (1) and countertop surface. The floor pad surface must be constructed from solid materials and must be level and smooth. -
Page 5: Clearances From Combustible Materials
Positioning Your Grill CLEARANCES FROM COMBUSTIBLE MATERIALS When determining a suitable location for your grill installation, give thought to concerns such as exposure to wind, proximity to traffic paths, and keeping any gas supply lines as short as possible. Never locate the grill in a garage, breezeway, or shed, under an unprotected overhang, or in any other enclosed area. - Page 6 Typical 20 lb Propane Gas Supply Installation The remote tank enclosure kit provided with your WEBER Built-In Grill shall be used for installations using a 20 lb LP cylinder, mounted in an “island” structure. The remote tank enclosure shall house the included...
- Page 7 Tank Stand Base - 1 materials only. WARNING: Only use the WEBER tank enclosure ⁄ " Flare Gasket - 2 kit outdoors in a well-ventilated area. Do not use in a garage, building, breezeway or any other enclosed area.
- Page 8 Mounting The LP Tank Bracket Mount the LP tank bracket to the left-hand side of the enclosure opening using non corrosive hardware. Mounting holes are provided on the sides and bottom of your LP tank bracket. Be sure to mount the bracket securely to the enclosure before use.
- Page 9 Mounting the Bulkhead Securely mount the bulkhead bracket to the top of the built-in cylinder enclosure using non-corrosive hardware. MOUNTING HARDWARE NOT INCLUDED. Built-In Gas Line Location BUILT-IN GAS LINE LOCATION A 58 inch (147 cm) main corrugated gas line is connected to the manifold of the barbecue.
- Page 10 BUILT-IN CUTOUT DETAILED DIMENSIONS - LOCATING THE STRUCTURE NEAR A COMBUSTIBLE WALL SB38 E/S 24" (610 mm) minimum* Minimum from cutout edge to combustible construction. 0" (0 mm) minimum** 12" (305 mm) 4" (102 mm) ⁄ " (673 mm) 36" (914 mm) maximum ⁄...
- Page 11 BUILT-IN CUTOUT DETAILED DIMENSIONS - LOCATING THE STRUCTURE NEAR A NONCOMBUSTIBLE WALL SB38 E/S 24" (610 mm) minimum* Minimum from cutout edge to combustible construction. 0" (0 mm) minimum** 12" (305 mm) 4" (102 mm) ⁄ " (673 mm) 36" (914 mm) maximum ⁄...
-
Page 14: Tools Included
m Assemble grill on a flat, level, and soft surface. TOOLS INCLUDED: TOOLS REQUIRED: m Remove protective film from stainless steel parts before installing. m Do not use power tools for assembly. - 7/16" m Three people required for assembly. m There may be visual differences between illustrations and model purchased. - Page 15 Hardware...
- Page 16 Micro USB...
- Page 18 Micro USB For information on using an external power bank, refer to “Connecting an External Power Bank” in the Owner’s Manual.
- Page 20 m Save hardware. Prepare Barbecue for Installation: Now that the barbecue cabinet and trim pieces have been assembled, check that all parts assembled up to this point are in place and fasteners are fully tightened. Place the barbecue directly in front of the cut-out opening of the built-in structure to prepare for installation.
- Page 21 Push barbecue into cutout opening and lock the front casters. Rotate the front casters to tuck them beneath the cabinet.
-
Page 22: Connection Chart
CONNECTION CHART Connect Gas Supply A 58 inch (147 cm) main corrugated gas line is connected to the manifold of the grill. A) Pass the main corrugated gas line through the “island” structure cavity to the bulkhead inside the gas supply enclosure (1). B) Connect the main corrugated gas line to the ⁄... - Page 23 The included filler strips may be used to fill any gaps at the countertop or front of the barbecue. Install as needed. Refer to your Weber Crafted Outdoor Kitchen Collection accessory instructions. Refer to Owner’s Manual for features and usage.
- Page 24 Refer to Owner’s Manual for features and usage. Refer to Owner’s Manual for features and usage. Refer to Owner's Manual for operating the rotisserie...
- Page 28 WEBER-STEPHEN PRODUCTS LLC www.weber.com © 2024 Designed and engineered by Weber-Stephen Products LLC, 1415 S. Roselle Road, Palatine, Illinois 60067 USA.
Need help?
Do you have a question about the SUMMIT 1500042 and is the answer not in the manual?
Questions and answers