
Related Manuals for Halsey Taylor SJ5


Summary of Contents for Halsey Taylor SJ5
- Page 1 SJ5Q_1H, SJ5Q_2H, SJ10Q_1K_MDN, SJ10Q_2K_MDN, SJ10Q_3K_MDN SJ5/SJ10 Refrigeration Packages INSTALLATION / USE & CARE MANUAL (630) 574-8484 Halsey Taylor Page 1 2000000531 (Rev. B - 08/22)
- Page 2 5. Ratings ........7 SJ5 / SJ10 Series ..... . 7 6.
-
Page 3: Think Safety
1.1 General injury. The signal word that CAUTION Halsey Taylor cannot anticipate every possible indicates a hazard with circumstance that might involve a potential hazard a low level of risk which, if not avoided, could result in during the installation of this product. The warnings minor or moderate injury. and instructions in this Installation / Use & Care... - Page 4 OFF. Placing fingers in or around the cutting blades could result in serious personal injury. Halsey Taylor (630) 574-8484 Page 4 2000000531 (Rev. B - 08/22)
-
Page 5: General Information
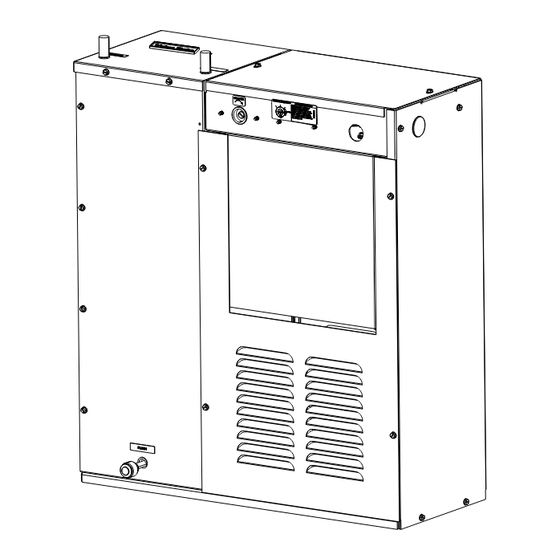
Phone: 800.476.4106 a properly ventilated, non-visible location. Email: CustCare@HalseyTaylor.com This manual contains Installation, Use & Care International Customer Care instructions for the SJ5 and SJ10 series Remote Phone: 630.575.4755 Chiller units. Followed carefully, these instructions will Email: IntlCare@HalseyTaylor.com result in trouble-free installation of this Halsey Taylor Installation Services product. - Page 6 For remote installation a minimum clearance of 6 inches (152 mm) to the front must be maintained, 1 inch (25 mm) each side, 3 inches (76 mm) to the rear above the unit. Wall grille EG-1 or EG-2 to be used when unit is inserted into an enclosure. Install unit as close as possible to wall grille. A 6 inch (152 mm) clearance beyond the front of the wall grille is required for adequate air circulation. Halsey Taylor (630) 574-8484 Page 6 2000000531 (Rev. B - 08/22)
-
Page 7: Tools And Supplies
John Guest Union Fitting warranty. 4.3 Tools/Items required but not provided. Description Qty. Safety glasses Protective gloves Hex driver 5. Ratings 5.1 SJ5 / SJ10 Series Description 7214052373 SJ10 7214102373 7214102473 Electrical 115V, 60Hz 220V, 50Hz 115V, 60Hz... -
Page 8: Installation: Electrical Connection
Water strainer is recommended to be installed in the supply line. 7. Connect chiller to building supply with a shut-off Ground valve and install a union connection between them. Screw Make sure the connection between the chiller and water dispenser is proper without leaks. Refer page 6 and page 9 for tubing connection. Halsey Taylor (630) 574-8484 Page 8 2000000531 (Rev. B - 08/22) -
Page 9: Service Adjustments
To remove the plug from Chiller, relieve the water pressure, pull the collar towards the fitting and then pull the fitting from the tube. To install the plug, push the fitting straight onto the tubing until it reaches a positive stop, which should be approximately 3/4”(19mm). Refer page 10 for quick connect fittings. (630) 574-8484 Halsey Taylor Page 9 2000000531 (Rev. B - 08/22) - Page 10 PULLING IT OUT HELPS TO RELEASE TUBE RELEASE TUBE Quick Connect Fittings Electrical Diagram Water Mains Connection 19, 7 18, 3, 4, 5, 6 Refer parts list on Page 11 for details Halsey Taylor (630) 574-8484 Page 10 2000000531 (Rev. B - 08/22)
- Page 11 SJ5Q_1H, SJ5Q_2H, SJ10Q_1K_MDN, SJ10Q_2K_MDN, SJ10Q_3K_MDN REPLACEMENT PARTS LIST 115/220V-50/60HZ 10 GPH 5 GPH ITEM PART NO. PART NO. DESCRIPTION SJ10, SJ5, 7214102373, 7214052373 7214102473 27666C 27666C Cover - Terminal Box 31513C Control - Cold 31513C 30664C Fan - Blade 30664C...
Need help?
Do you have a question about the SJ5 and is the answer not in the manual?
Questions and answers