Advertisement
Quick Links
ASSEMBLY INSTRUCTIONS
ZJZT-V 1
FTBFSD-0079
Pure & Easy
CONTACT US:
If you have any questions about the installation of YITAHOME products, just contact us at
+� (���) ���-���� from Mon-Fri �:�� AM-�:�� PM PST / Sat. �:�� AM-��:�� PM PST or e-mail
us at after-sale.cs@hotmail.com
Alternative method to contact us (amazon.com orders only)
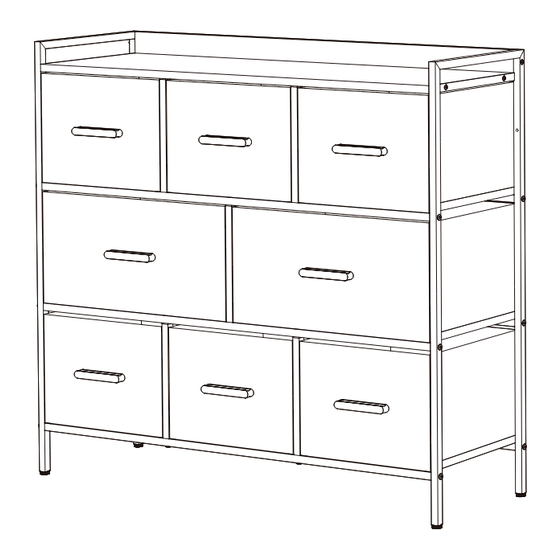
8 - D R A W E R S T R O R A G E C H E S T
�.Log into your Amazon account
�.Go to "Your Orders" and find the purchase
�.Click on "Contact Seller"
Advertisement

Subscribe to Our Youtube Channel
Related Manuals for YitaHome ZJZT-V1


Summary of Contents for YitaHome ZJZT-V1
- Page 1 Pure & Easy CONTACT US: If you have any questions about the installation of YITAHOME products, just contact us at +� (���) ���-���� from Mon-Fri �:�� AM-�:�� PM PST / Sat. �:�� AM-��:�� PM PST or e-mail us at after-sale.cs@hotmail.com Alternative method to contact us (amazon.com orders only)
- Page 2 ASSEMBLY INSTRUCTIONS ASSEMBLY INSTRUCTIONS Attention:For safety and stability, we suggest you have to secure the anti-tip accessories to the wall to prevent tipping, injury, and property Item no. Reference Image Qty. damage. 1. Periodically check that all components are tightly secured. 2.
- Page 3 ASSEMBLY INSTRUCTIONS ASSEMBLY INSTRUCTIONS Item no. Reference Image Qty. 2pcs The hole on part D that’s marked by a triangle should face upward when assembling parts E and D. Tool list M6x10mm M6x32mm M4x8mm ST4.8x45mm ST5.5X19mm ST5.5x34mm...
- Page 4 ASSEMBLY INSTRUCTIONS ASSEMBLY INSTRUCTIONS 2pcs 2pcs Please make sure that the iron frames are placed in the correct position and facing Confirm that the iron frames are well-placed and facing the correct direction. the correct direction. Per the below picture, the holes marked by triangles on Part A and Part C should face the same direction.
- Page 5 ASSEMBLY INSTRUCTIONS ASSEMBLY INSTRUCTIONS 2pcs 4pcs 2pcs 4pcs The frame should face the same direction as the circled details on part B, along Attention: Confirm the direction Part G should be facing during assembly. with parts A and C. As shown in below picture, Part G has two sides with mounting holes - the side with a small mounting hole in the center and two bigger adjacent holes should be facing upward.
- Page 6 ASSEMBLY INSTRUCTIONS ASSEMBLY INSTRUCTIONS 4pcs 2pcs The frame should face the same direction as the circled details on part B, along with parts A and C.
- Page 7 ASSEMBLY INSTRUCTIONS ASSEMBLY INSTRUCTIONS 4pcs 2pcs 2pcs Attention: Confirm the direction Part G should be facing during assembly. As shown in below picture, Part G has two sides with mounting holes - the side with a big mounting hole in the center and two smaller adjacent holes should be facing upward.
- Page 8 ASSEMBLY INSTRUCTIONS ASSEMBLY INSTRUCTIONS 2pcs 4pcs 2pcs 2pcs The frame should face the same direction as the circled details on part B, along with parts A and C.
- Page 9 ASSEMBLY INSTRUCTIONS ASSEMBLY INSTRUCTIONS 4pcs 4pcs...
- Page 10 ASSEMBLY INSTRUCTIONS ASSEMBLY INSTRUCTIONS 6pcs 6pcs 2pcs 2pcs Attention:For safety and stability, we suggest you have to secure the anti-tip accessories to the wall to prevent tipping, injury, and property damage.
- Page 11 ASSEMBLY INSTRUCTIONS ASSEMBLY INSTRUCTIONS 16pcs 8pcs 2pcs 2pcs I I1 I1 I...
- Page 12 ASSEMBLY INSTRUCTIONS ASSEMBLY INSTRUCTIONS I I Complete Installation...
Need help?
Do you have a question about the ZJZT-V1 and is the answer not in the manual?
Questions and answers