Table of Contents

Related Manuals for Daewoo mini DY-BGX09


Summary of Contents for Daewoo mini DY-BGX09
- Page 1 Wall Mounted Washer User Manual DY-BGX09 • Following testing after manufacturing, a small amount of water may remain in the machine. • Keep these instructions for future use. • Read the ‘Safety Instructions’ carefully before using the machine.
-
Page 2: Table Of Contents
CONTENTS Préparation IMPORTANT SAFEGUARDS ............4 PARTS DESCRIPTION ..............6 INSTALLATION METHOD .............. ATTENTION BEFORE US USING ..........8 BEFORE WASHING INSTRUCTIONS .......... 9 CONTROL PANEL ................11 MAINTENANCE ................12 TROUBLESHOOTING GUIDE ............14 NAME AND CONTENT OF PRODUCTS HAZARDOUS SUBSTANCE .. 16 PARAMETERS ................17 Utilisation Entretien... -
Page 3: Important Safeguards
IMPORTANT SAFEGUARDS 1. Please use a special power socket with good grounding, 220V ~ and above 10A. 2. Please take the plug to insert and unplug the power cord. Do not use damaged power cord. When there is dirt on the power cord insert, wipe it with a dry cloth in time. 3. - Page 4 IMPORTANT SAFEGUARDS 19. Do not operate the washing machine when gas leaks. 20. In any case, please confirm the water level in the barrel before opening the door. If the water level is high, please do not open the door to avoid unnecessary loss caused by water overflow.
-
Page 5: Parts Description
PARTS DESCRIPTION Wall installation Housing Washing machine door Inner barrel Power cord Control Panel Inlet tee joint Drain-pipe Water inlet pipe Accessoires Instruction manual Water inlet Expansion bolt Water supply connector (4 pc) Drain-pipe Installation guide Rubber mat (4 pc) -
Page 6: Installation Method
INSTALLATION METHOD Hold the connector in one hand and press the Loosen the four fixing screws on the connector snap ring in the other hand to pull down to and rotate the tightener so that there is sufficient separate the connector from the tee joint. distance between the tightener and the connector (the height of 3 threads) for screw installation. -
Page 7: Attention Before Us Using
ATTENTIONS BEFORE USING 1. Washing guide identification Check the washing guide logo on the laundry, the fabric with laundry on the logo and its suitable washing method. 2. Classified washing • In order to get the best washing effect, only the same kind of clothes are washed in the same washing cycle. -
Page 8: Before Washing Instructions
BEFORE WASHING INSTRUCTIONS Caution • Before you use this machine, please make sure that the machine has been properly installed according to the installation instructions. • For the first time, it is recommended that you complete a "tub cleaning" or other high-temperature washing procedures without clothes. - Page 9 Max load Program Clothes Type (kg) Rated Cotton fabrics/ Chemical fiber fabrics 18’Quick Cotton fabrics/ Chemical fiber fabrics Eco 40-60 Cotton fabrics/ Chemical fiber fabrics Kids wear Rated Infant cotton fabrics Steam wash Rated Infant cotton fabrics Rated Cotton fabrics/ Chemical fiber fabrics Spin Rated Cotton fabrics/ Chemical fiber fabrics...
-
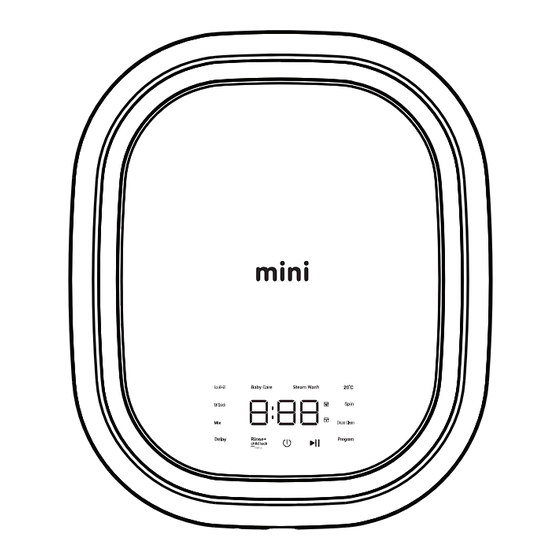
Page 10: Control Panel
CONTROL PANEL “PROGRAM” BUTTON “PROGRAM” BUTTON • Select the appropriate procedure according to the type • In order to prevent children from misoperation, this and stain degree of laundry. button can set the child lock function. • After setting the child lock function, other buttons do not work except the power button. -
Page 11: Maintenance
MAINTENANCE • After long-term use, the washing machine should be maintained in time. Good main- tenance habits will prolong the service life of the washing machine. • Befor e carrying out maintenance work, please unplug the power plug to prevent danger. - Page 12 Clean the barrel After the washing machine has been used for a period of time, there may be dirt in the washing cylinder. The purpose of cleaning the inner and outer barrel can be achieved by using the tub cleaning procedure. Note: do not put clothes and detergents into the barrel in tub cleaning mode.
-
Page 13: Troubleshooting Guide
Troubleshooting guide Problem Cause Solution Cannot start 1. Press the "POWER" Button or the 1. Press the "POWER" Button or the "START/PAUSE" button or not? "START/PAUSE" button. 2. Is the power cord unplugged? 2. Connect the power cord plug 3. Is there a power failure? 3. - Page 14 Note: The following conditions are not faults. Problem Cause The door won't open The program is running. Stink Due to the use of rubber parts, there will be a rubber smell at the beginning. Less water for The front loading washing machine only needs a small amount of water to wash. washing and rinsing Midway water inflow If the water level drops, the water will be replenished automatically.
-
Page 15: Name And Content Of Products Hazardous Substance
NAME AND CONTENT OF PRODUCTS HAZARDOUS SUBSTANCE Hazadous substances Part name PBDE Door Lock Computer Board Power Cord Bolt And Nuts Water Level Sensor Draining Valve Motor Belt And Belt Pulley Door Assembly Top Cover Assembly Control Panel Assembly Housing Assembly Inner Barrel Base Detergent Box... -
Page 16: Parameters
PARAMETERS Product Information Sheet COMMISSION DELEGATED REGULATION (EU) 2019/2014 with regard to energy labelling of household washing machines and household washer-dryers Supplier's name or trade mark: MINI Model identifier: DY-BGX09 General product parameters: Parameters Value Parameters Value Height Rated capacity (kg) Dimensions in cm Width Depth... - Page 17 English Português Disposal of Used Electrical & Electronic Equipment Eliminação de Equipamento Eléctrico e Electrónico Usado The meaning of the symbol on the product, its accessory O símbolo no aparelho, nos seus acessórios ou na or packaging indicates that this product shall not be embalagem indica que este aparelho não deve ser treated as household waste.
- Page 18 Italiano Trattamento del dispositivo elettrico od elettronico a Likvidace tých elektrických a elektronických ízení fine vita (Applicabile in tutti i paesi dell’Unione Tento symbol na výrobku, jeho íslušenství nebo obalu Europea e in quelli con sistema di raccolta ozna uje, e s tímto výrobkem nesmí být zacházeno jako s differenziata) domovním odpadem.
- Page 19 Svenska Dansk Omhändertagand e av gamla elektrisk a och Håndtering af udtjente elektriske og elektroniske elektroniska produkter (Användbar i den Europeiska produkter (Gælder for den Europæiske Union og andre Unionen och andra Europeiska länder med separata europæiske lande med separate indsamlingssystemer) insamlingssystem) Dette symbol på...
Need help?
Do you have a question about the mini DY-BGX09 and is the answer not in the manual?
Questions and answers