Table of Contents
Advertisement
Quick Links
Instructions for Use
Thank you for your trust and for buying this appliance. We hope it will
successfully serve the purpose for many years.
The upright freezer for domestic use is intended for freezing fresh
food and for long-term storing of frozen food (up to one year,
depending on the kind of food).
Upright Freezer
Instructions for Use
52-54
55
56-57
58-59
60-62
63
65-66
51
Advertisement
Table of Contents

Related Manuals for Smeg VI144B


Summary of Contents for Smeg VI144B
-
Page 1: Table Of Contents
Instructions for Use Upright Freezer Thank you for your trust and for buying this appliance. We hope it will successfully serve the purpose for many years. The upright freezer for domestic use is intended for freezing fresh food and for long-term storing of frozen food (up to one year, depending on the kind of food). -
Page 2: Before Putting Into Use
• Try not to open the door too often, especially when the weather is wet and hot. Once you open the door, mind to close it as soon as possible. This is especially important if you have an upright model. - Page 3 • Ice and frost layer increase energy consumption, so do clean the appliance as soon as the layer is 3-5 mm thick. • If the gasket is damaged or if it turns out that the sealing is poor, the energy consumption is substantially higher. To restore efficiency, replace the gasket.
- Page 4 • The rating plate is in the interior or on the rear wall of the appliance. Storing Time During Power Supply Interruption In the case of failure or electric cut out do not open the freezer, except if the cut out takes longer than 15/30 hours (with the appliances not having a chill storage battery).
-
Page 5: Placing And Installation
The appliance should be positioned at least 3 cm away from the electric or gas cooker and at least 30 cm away from the oil or coal stove. If this is not possible, use an appropriate insulation. Behind the appliance there should be free space at least 200 cm² wide... -
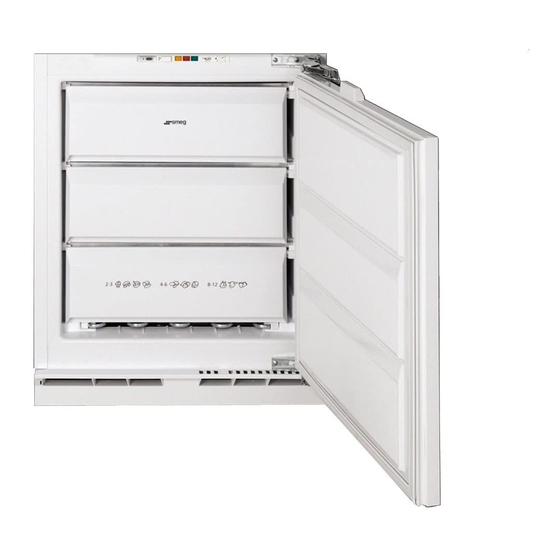
Page 6: Description Of The Appliance
Description of the Appliance Freezing Compartment (1) is used for freezing fresh foods. Storing Compartment (2) is used for storing packages of frozen foods. Control Panel (3) See Operation Controls Defrost Water Outlet (4) (See Cleaning and Maintenance). Instructions for Use... -
Page 7: Cold Accumulators
Cold accumulators (some models only) In the upper part of the freezing compartment there are two cold accumulators. Before switching on the freezer for the first time, remove the accumulators and insert them again after the red light is off. -
Page 8: Operation Control
Continuous operation - the yellow light is on. The cooling system operates continuously - the Super Function. This mode is selected when you want to freeze large amounts of fresh foods and in case you want to deep freeze already frozen foods. - Page 9 Red Control Light The red light is on when there is something wrong with the temperature in the freezer (See Trouble Shooting Guide). Instructions for Use...
-
Page 10: Use
Switch the appliance on and set the thermostat knob to the position for continuous operation. (Red and yellow control light are on). When the red light goes off, wait for a couple of hours and load the freezer with packages of fresh foods. -
Page 11: Storing Frozen Foods
• Some 24 hours after the last load, set the thermostat knob to the position for automatic operation (yellow light is off). • There is no need to set the thermostat knob to the position for continuous operation if you intend to freeze smaller amount of fresh foods (1-2 kg). - Page 12 Defrosting of Frozen Food Partially thawed or defrosted foods should be used as soon as possible. Cold air preserves the food but it does not destroy microorganisms which rapidly activate themselves after defrosting and make foods perishable. Partial defrosting reduces the nutritional value of foods, especially of fruits, vegetables and ready-made meals.
-
Page 13: Maintenance And Cleaning
Maintenance and Cleaning Freezer Defrosting Frost and ice layer, depositing on the inner walls of the freezer should be defrosted when 3-5 mm thick. • 24 hours before defrosting set the thermostat knob to the position for continuous operation (the yellow light is on) so that the food packages are well cooled. - Page 14 Switch Off the Appliance When Not in Use If you do not intend to use the appliance for a longer period of time, disconnect the power supply, empty the appliance, defrost it and clean it. Leave the door slightly open.
-
Page 15: Trouble Shooting Guide
The Door is Hard to Open If you want to open the door that has just or recently been closed, you may find it hard to open. The reason why this happens is, that when you open the door, warm air gets into the appliance and when it is cooling, the underpressure seals the door. - Page 16 This noise is often a consequence of inadequate placing. (The appliance shall be placed and levelled firmly on solid base and it should not touch the wall or kitchen units standing next to it.) WE RESERVE THE RIGHT TO ALTER THE SPECIFICATIONS WITH NO INFLUENCE ON THE OPERATION OF THE APPLIANCE.
- Page 17 Freezing Appliances Mounting instructions for refrigerating and freezing appliances are for qualified technicians only. Appliance should be mounted and installed in compliance with these instructions, current standards and regulations. Mounting instructions were prepared for various types/models of appliances, therefore they may describe some procedures that do not apply to your appliance.
- Page 18 200 cm² free space, for adequate air circulation. On the upper part of the appliance the air is coming out, so try not to cover the opening for the outflow air. A (mm)
-
Page 19: Changing The Direction Of Opening The Door
Plug the remaining holes with decorative caps. Check the gasket, it shouldn't be creased and it should seal well. In case it does not fit perfectly, pull it out and rotate for 180°. In certain models it is not possible to replace the door gasket. - Page 20 1 Cover for the upper hinge 6 Lower hinge fastener 2 Upper hinge 7 Lower hinge 3 Upper rail 8 Corner without a hole 4 Slide guide 9 Corner with a hole 5 Lower hinge washer 10 Low temperature compartment...
-
Page 21: Mounting The Appliance
Fix the appliance into the kitchen unit. On the upper side, fix the three screws A 4 x 12 through the rail and on the lower side with two screws A 4 x 16, through the lower hinges. Drill holes, ø... - Page 22 Fig. 1 Fig. 2 Fig.3 Fig. 4 Fig. 5 Fig. 6 Mounting Instructions...
Need help?
Do you have a question about the VI144B and is the answer not in the manual?
Questions and answers