Advertisement
Quick Links
Models/Modelos/Modèles
PTT24047
PTT24147
PTT24247
PTT24447
Series/Series/Seria
Write purchased model number here.
Escriba aquí el número del modelo comprado.
Inscrivez le numéro de modèle ici.
Rough-in R10000 & R11000 required for installation
Rough-in R10000 y R11000 necesario para la instalación
Rough-in R10000 et R11000 requis pour l'installation
Register Online
Regístrese en línea
S'enregistrer en ligne
www.peerlessfaucet.com/register
To reference replacement parts and access additional technical
documents and product info,
visit www.peerlessfaucet.com
Para referencia sobre las piezas de repuesto y acceder a documentos
técnicos adicionales e información del producto, visite www.
peerlessfaucet.com
Pour obtenir la référence des pièces de rechange ainsi que pour
avoir accès à d'autres documents techniques et renseignements sur
le produit, allez à www.peerlessfaucet.com
?
1-800-438-6673
www.peerlessfaucet.com
Read all instructions prior to installation.
!
Failure to read these instructions prior to installation may result in personal injury,
property damage, or product failure. Manufacturer assumes no responsibility for
product failure due to improper installation.
Lea todas las instrucciones antes de hacer la instalación.
ADVERTENCIA
!
El no leer estas instrucciones de instalación puede resultar en lesiones personales,
daños a la propiedad, o falla en el funcionamiento del producto. El fabricante no
asume ninguna responsabilidad por la falla del producto debido a una instalación
incorrecta.
Veuillez lire toutes les instructions avant l'installation.
AVERTISSEMENT
!
L'omission de lire les présentes instructions avant l'installation peut entraîner des
blessures, des dommages matériels ou le bris du produit. Le fabricant se dégage
de toute responsabilité à l'égard d'un bris du produit causé par une mauvaise
installation.
You may need:
Usted puede necesitar:
Articles dont vous pouvez avoir besoin :
12/22/2023
CAUTION
ADA TUB SHOWER AND HAND SHOWER
113465
DUCHA DE BAÑERA ADA Y DUCHA DE MANO
X00113465
ADA BAIGNOIRE DOUCHE ET DOUCHE À MAIN
3/32"
(2.38 mm)
1
PTT24047
PTT24247
PTT24147
PTT24447
113465 Rev. B
Advertisement

Related Manuals for PEERLESS PRECEPT PTT24147 Series


Summary of Contents for PEERLESS PRECEPT PTT24147 Series
- Page 1 ADA TUB SHOWER AND HAND SHOWER 113465 DUCHA DE BAÑERA ADA Y DUCHA DE MANO Models/Modelos/Modèles X00113465 ADA BAIGNOIRE DOUCHE ET DOUCHE À MAIN PTT24047 PTT24147 PTT24247 PTT24447 Series/Series/Seria Write purchased model number here. Escriba aquí el número del modelo comprado. Inscrivez le numéro de modèle ici.
- Page 2 THREE DIVERTER TRIM INSTALLATION When the diverter is ready for trim remove bonnet (1) and test cap (2) Place escutcheon (1) over diverter. Thread trim sleeve (3) onto from the body. threaded sleeve (2) until escutcheon is secure against wall. Do not overtighten.
- Page 3 Water Flow For 3 Function Diverter / Flujo de agua para Desviadores de 3 posiciones / Écoulement de l’eau pour les inverseurs à 3 positions Outlet 1 1st Position 2nd Position Outlet 1 3rd Position Outlet 1 Salida 1 Salida 1 posición posición posición...
- Page 4 TUB & SHOWER VALVES INSTALLATION THREE DIVERTER TRIM INSTALLATION RECOMMENDED VALVE CONFIGURATIONS ON STRINGERS OR FRAMING LAS CONFIGURACIONES QUE SE RECOMIENDAN PARA LAS VÁLVULAS EN LAS VIGAS O EN ENTRAMADOS CONFIGURATIONS RECOMMANDÉES DE LA SOUPAPE SUR LES TRAVERSES OU LA CHARPENTE SHOWER ONLY TUB/SHOWER REGADERA SOLAMENTE...
- Page 5 FLUSH SYSTEM / CHECK FOR LEAKS. FOR SHOWER ARM INSTALLATION Prior to testing, remove cover, bonnet nut and cartridge. Flush system by slowly Connect top outlet (1) to shower arm (2) with proper fittings. turning on hot and then cold water supplies to flush system of debris. To prevent damage to finish on shower arm, insert wall end of After flushing, reinstall cartridge, bonnet nut.
- Page 6 1"~3" 25mm ~ 76mm SLIP-ON INSTALLATION: SLIP-ON INSTALLATION: The copper tube (1) must be 1/2” nominal copper. Important: If it is necessary to cut the Slide spout over copper tube flush with the finished tub or wall surface. copper tube, the end must be chamfered free of burrs to prevent cutting or Tighten set screw (1), but do not overtighten.
- Page 7 WARNING: This system/device must be set by Rotational Limit Stop the installer to insure safe, maximum temperature. Any HOTTER COOLER Tope de Limite de Girar change in the setting may raise the discharge temperature MÁS CALIENTE MÁS FRÍA Butée anti-échaudage above the limit considered safe and may lead to scald PLUS CHAUD PLUS FROID...
- Page 8 Cleaning and Care Maintenance SHUT OFF WATER SUPPLIES Care should be given to the cleaning of this product. Although its finish is extremely durable, it If faucet leaks from around tub spout/showerhead: can be damaged by harsh abrasives or polish. To clean, simply wipe gently with a damp cloth Replace Seats and Springs (1) Repair Kit RP4993, or Valve Cartridge (3) Repair Kit RP46074.
- Page 9 GRAB BAR INSTALLATION 1. Remove the parts and products from package. Move cover plates away from mounting holes. (Fig. A) 2. Determine the location of the product and where you want to install it. A stud finder should be used to verify there are studs behind the marked locations.
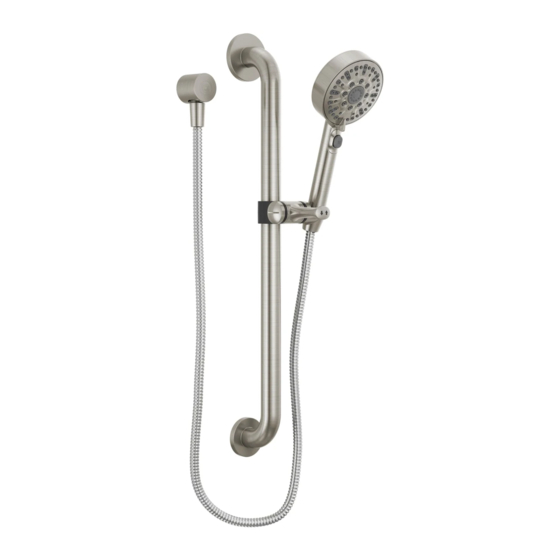
- Page 10 SHOWER MOUNT INSTALLATION Unscrew threaded cap assembly (1), slide hand shower holder (2) and grab bar collar (3) out of assembly. Slip the correct collar around your bar. With the collar around your bar, insert the hand shower holder (2) through the openings in the grab bar collar (3) and paddle (4). Ensure the flat areas on the end of the hand shower holder align with the flat sections in the opening of the collar.
- Page 11 HAND SHOWER INSTALLATION 5/8" (9.5mm) Max. 5/8 po (9.5mm) Max. SUPPLY ELBOW INSTALLATION Minimum diameter for hole is 1" (25 mm) with a maximum of 1 1/2" (38 mm). Connect hose Apply Plumber tape to threaded ends of 1/2" (13 mm) pipe nipple (not supplied) and Ensure gasket (1) is inserted into the hose (2).
- Page 12 WARNING GRAB BAR MAY NOT PROVIDE DESIGNED AMOUNT OF SUPPORT UNLESS THESE INSTALLATION THE FOLLOWING STEPS REQUIRE DRILLING INTO THE WALL. When drilling into the INSTRUCTIONS ARE STRICTLY FOLLOWED. For proper installation, at least one end of Grab Bar wall, exercise care to avoid any electrical wiring or plumbing that may be located behind the MUST be positioned over a wall stud.
- Page 13 Notes / Notas / Notes 113465 Rev. B...
- Page 14 Peerless Faucet Company may elect to refund the purchase price in exchange for the return of the product. These are your exclusive remedies. What Is Not Covered: Any labor charges incurred by the purchaser to repair, replace, install or remove this product are not covered by this warranty. Peerless Faucet Company shall not be liable for any damage to the faucet resulting from reasonable wear and tear, outdoor use, misuse (including use of the product for an unintended application), freezing water, abuse, neglect or improper or incorrectly performed installation, maintenance or repair, including failure to follow the applicable care and cleaning instructions.
- Page 15 Peerless Faucet Company puede, a su exclusivo criterio, utilizar piezas o productos nuevos, reacondicionados o recertificados para dicha reparación o reemplazo. Si la reparación o el reemplazo no son prácticos, Peerless Faucet Company puede optar por reembolsar el precio de compra a cambio de la devolución del producto. Estos son sus remedios exclusivos.
- Page 16 Ce que nous ferons: Peerless Faucet Company réparera ou remplacera gratuitement, pendant la période de garantie applicable (décrite ci-dessus), toute pièce ou tout fini qui présentera une défectuosité de matériau et/ou un vice de fabrication pour autant que le produit ait été installé, utilisé et entretenu normalement. Peerless Faucet Company peut, à sa seule discrétion, utiliser des produits neufs, remis à neuf ou recertifiés ou des pièces neuves, remises à...
Need help?
Do you have a question about the PRECEPT PTT24147 Series and is the answer not in the manual?
Questions and answers