
Related Manuals for 3D LabPrint Fairchild Republic A-10 Thunderbolt II


Summary of Contents for 3D LabPrint Fairchild Republic A-10 Thunderbolt II
- Page 1 ... print your plane | www.3DLabPrint.com User Guide rev. 2024/04 Fully 3d printable Fairchild Republic A-10 Thunderbolt II scale 1:11, wingspan 1.56m / 61.4 inch page...
- Page 2 ... print your plane | www.3DLabPrint.com Fairchild Republic A-10 Thunderbolt II fully printable R/C plane for your desktop 3Dprinter Fully 3D printable RC model of a living legend, designed in 100% clean vase mode, esential for printing with PolyLight 1.0 LW-PLA...
-
Page 3: General Specifications
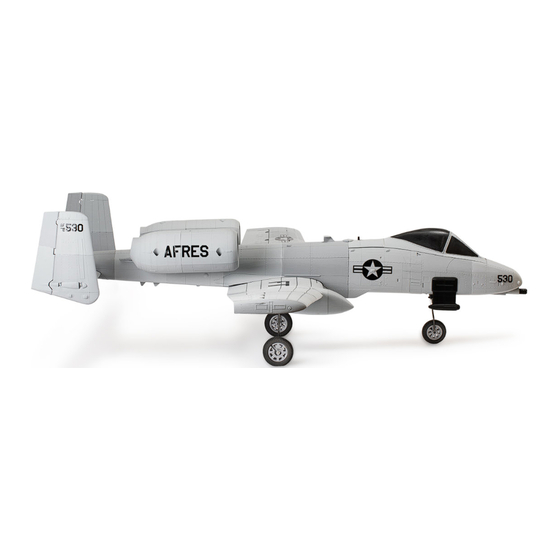
... print your plane | www.3DLabPrint.com General specifications: Wingspan: 1560 mm / 61.4 inch Lenght: 1450 mm / 57.1 inch Height: 410 mm / 16.2 inch Wing area: 38,2 dm2 / 4.09 square feet Wing loading: 91.6 g/dm2 Center of gravity: 85 mm / 3.3 inch from leading edge Airfoil: LHK508 modified by 3DLabPrint... - Page 4 ... print your plane | www.3DLabPrint.com Fairchild Republic A-10 Thunderbolt II Single-seat, twin-turbofan, straight-wing, subsonic attack aircraft developed by Fairchild Republic for the United States Air Force (USAF). In service since 1976, it is named for the Republic P-47 Thunderbolt, but is commonly referred to as the "Warthog" or simply "Hog".
- Page 5 ... print your plane | www.3DLabPrint.com Included: 1. 3MF 3D files Prusa Slicer Used instead of STL files 3MF files can be used instead of standard STL files, but also include information about slicing in the new version of Prusa Slicer (since version 2.4).
- Page 6 ... print your plane | www.3DLabPrint.com 2. 3MF 3D files for Bambu Studio For Bambulab users we also prepared a set of 3MF files to be opened in Bambu Studio. The files contains multiple plates grouped by common printing mode (usually vase/non-vase). Each model has the correct modifiers set according to the Prusa Slicer settings.
- Page 7 ... print your plane | www.3DLabPrint.com 4. Scale markings PDF You could print and cut the PDF in scale (100%) from thin self adhesive advertisement foil and place it on the model as needed. it is good to contact an advertising/graphic workshop in your area, we have good experience with UV printing on thin film page...
- Page 8 ... print your plane | www.3DLabPrint.com 85mm Center of Gravity page...
- Page 9 ... print your plane | www.3DLabPrint.com page...
- Page 10 ... print your plane | www.3DLabPrint.com Step By Step PDF/VIDEO userguide Choose airplane at www.3Dlabprint.com, visit our Facebook 3DLPPA group- for latest info. Basic requirments for A-10 Thunderbolt are 200/200/210 volume, nozzle 0.4mm. Heated bed recommended. Designed to be printed with Polylight LW-PLA filament by 3DLabPrint.
- Page 11 ... print your plane | www.3DLabPrint.com Prusa Slicer 3mf files Please follow the guide in the Help section of our website about Prusa Slicer setup. Drag and drop the 3mf file to the Prusa Slicer window and open it as a Project. It will create a Generic 3DLabPrint printer, printing profile and materials.
- Page 12 ... print your plane | www.3DLabPrint.com 4. Print it Save the Gcodes to the SD card and insert into your printer, or send it to your printer. Prepare your printer and start printing. Scaling the model will lead to unusable result! Check your first layer to ensure good bed adhesion (tune your Z height).
- Page 13 ... print your plane | www.3DLabPrint.com How to print PolyLight LW-PLA? The basic print setup is almost the same as we use for standard PLA. The only difference is in extrusion multiplier set to 0.5 and turning off the retractions completely. This results in parts with half the weight and still suitable mechanical properties, this model is designed mainly in VASE mode, even that expect some stringing inside and outside in...
- Page 14 ... print your plane | www.3DLabPrint.com A-10 Thunderbolt II, list of printed parts (weights): fuselage tail elevator L1 F front (PolyLight LW PLA) (PolyLight LW PLA) elevator L2 23 g (PolyLight LW PLA) (PolyAir strong PLA) elevator L3 41 g (PolyLight LW PLA) (PolyLight LW PLA) elevator R1, 2, 3...
-
Page 15: Wing Assembly
... print your plane | www.3DLabPrint.com Wing assembly Glue main wing parts 1-6 together. Glue both halves of the wing together (insert carbon tube as a option). Use medium CA glue, and use activator to speed up the glue curing. Press in and glue a piece of 1.75 filament into the top and bottom openning to create a wing spar and (if you don't have one, use a medium) improve the rigidity of the wing, than add thin CA... -
Page 16: Fuselage Assembly
... print your plane | www.3DLabPrint.com Fuselage assembly You can use snap knife for cleaning the surface of printed parts, but mostly it is not necessary. Glue fuselage parts with CA glue together. Press in and glue a piece of 1.75 filament into the inner fuselage space. -
Page 17: Tail Assembly
... print your plane | www.3DLabPrint.com Tail assembly Glue parts of the V, H C, stabilizer, elevator and rudder, do not glue C and H parts together. Press in and glue a piece of 1.75 filament into the top and bottom openning to create a wing spar and improve the rigidity of the stabilizer. - Page 18 ... print your plane | www.3DLabPrint.com Servos installation Check the servos with servotester or your RC system, set central position. Install the prepared servos in servo bays add servo extensions. Use a 1.2mm steel wire with Z bends as a linkage between the servos and control horns. Video guide A-10 servo installation you will need: 7-11x HXT900 or any similar sized 9g servos...
-
Page 19: Channel Count
... print your plane | www.3DLabPrint.com Channel count (6-15) For full functionality and independent setting of all servos you will need up to 15 chanels (including decelerons), on the other hand you can go to the minimum setting of 6 channels and still enjoy this RC airplane perfectly using servo reversal and at the cost of taking off and landing without retracted flaps (which is not a big problem with this light airframe). - Page 20 ... print your plane | www.3DLabPrint.com Minimal setting (6 ch): 1ch: L+R EDF 2ch: L Aileron 3ch: R Aileron 4ch: L Elevator+R Elevator (reverse) 5ch: L Rudder+R Rudder (reverse) + Nose steering 6ch: Landing Gear Nose steering L Aileron R Aileron L EDF R EDF R Rudder...
-
Page 21: Main Landing Gear Assembly
... print your plane | www.3DLabPrint.com Main Landing Gear assembly In this step screw in main retracts to LG socket and glue it in to LG gondola. Choose suitable LG socket for your retracts or you can createown sockets for your case. LG gondola L2 and R2 should be printed with PolyAir strong PLA and 5% infill for better durability. - Page 22 ... print your plane | www.3DLabPrint.com LG gondola L2 PolyAir PLA LG gondola LG gondola LG Socket L main LG tyre (FlexiLight LW Rubber) main LG disc Main LG disc Insert the prepared main leg with wheel, properly tighten the side screws, you can make seating pads with dremel (likewise the included ones) and use thread locker (Loctite) here.
- Page 23 ... print your plane | www.3DLabPrint.com main LG tyre (FlexiLight LW Rubber) main LG leg pattern Main LG disc 5mm Alternatively you can shape own legs with the 5mm steel rod using table vice, (you can add fire) and hammer according to the 3D printed template, cut the ends, slide in main wheel and secure it with Wheel Stop Colar.
- Page 24 ... print your plane | www.3DLabPrint.com Nose Landing Gear assembly In this step screw in main retracts to LG socket and glue it in to front fuselage. Choose suitable LG socket for your steerable retract. We recomend use of spring/damping oleo legs. Nose LG socket printed with PolyLight LW PLA infill 30% .
- Page 25 ... print your plane | www.3DLabPrint.com Front Landing Gear assembly Nose LG gear is similar, proceed the same way as with main LG, but here is the difference. Install steering servo and clevis with wire. nose LG socket nose LG tyre nose LG disc page...
- Page 26 ... print your plane | www.3DLabPrint.com Alternatively you can shape own legs with the 5mm steel rod using table vice. Nose LG gear is similar, proceed the same way as with main LG, but here is the difference. Don‘t remove the 5mm LG pin, but use a shaft coupler to connect the LG leg. Depending on a coupler used, glue it with epoxy, tighten the screws or make a solder joint.
- Page 27 ... print your plane | www.3DLabPrint.com EDF Setup Create a Y power cable between the battery and both ESC. Inser EDF to engine gondola and secure with self-tapping screws. Pull the cables through the fuselage (steel wire can help you. Check rotation, add a angeled adapter to the outlet this is mandatory and complete the gondola with upper part and Video guide A-10 EDF setup you will need:...
- Page 28 ... print your plane | www.3DLabPrint.com Painting/marking decals Another advantage of Polylight LW-PLA is that it can be dyed with almost anything. The surface for self-adhesive decals is ideally treated with a clear acrylic spray varnish. Use your imagination and send us photos of your aircraft on social networks. You could print and cut the PDF in 100% scale from thin self adhesive advertisement foil and place it on the model as needed.
- Page 29 ... print your plane | www.3DLabPrint.com Final assembly/setting Refer to your R/C system userguide for setup information. you will need: Your own Rx/Tx system (6-15ch) Velcro strip for securing battery Install your reciever, connect battery, setup servos and etc. with your trasmitter, check servo position.
- Page 30 ... print your plane | www.3DLabPrint.com Pilots Please Attention! Increasing expo settings on your transmitter for elevator and ailerons to 80 % calms response from your stick inputs. Make sure the battery is well fixed in proper possition. If it moves during flight it will cause shifting of CoG aft and will result in uncontrolable flight behavior.
-
Page 31: Shopping List
... print your plane | www.3DLabPrint.com Shopping list Printing material: Polylight LW-PLA (1250g) PolyAir strong PLA (250g) FlexiLight LW Rubber (33g) EDF: 2x 70mm/12 blade/6s, opt1, opt2CW+!choose CW+CCW!(combo with ESC) ESC: 80-100A/6s or similar suitable for your EDF Battery: 1x5500mAh/6s (aprox 760g) Y power cable: 2x80cm 12AWG (4mm2) (blck, red) connectors XT90 male,3x4,5mm m+f...
Need help?
Do you have a question about the Fairchild Republic A-10 Thunderbolt II and is the answer not in the manual?
Questions and answers