Table of Contents
Advertisement
Advertisement
Table of Contents

Related Manuals for Smeg PL8605X8


Summary of Contents for Smeg PL8605X8
- Page 1 INSTRUCTION MANUAL DISHWASHER...
-
Page 2: Table Of Contents
Cleaning and maintenance Troubleshooting Thank you for choosing this product. We advise you to carefully read all the instructions contained in this manual, in order to understand how to operate your dishwasher safely and correctly. The manual is divided into paragraphs, which provide a step by step description of the dishwasher functions, with clear instructions accompanied by detailed illustrations. -
Page 3: Safety And Operating Instructions
THE NAME PLATE FEATURING THE TECHNICAL DATA, SERIAL NUMBER AND MARKINGS IS VISIBLY POSITIONED ON THE INNER EDGE OF THE DOOR. THE NAME PLATE ON THE INNER EDGE OF THE DOOR MUST NEVER BE REMOVED. DO NOT LEAVE THE DISCARDED PACKAGING MATERIALS UNSUPERVISED WITHIN THE HOME. - Page 4 DO NOT INTRODUCE SOLVENTS SUCH AS ALCOHOL OR TURPENTINE WHICH MAY CAUSE AN EXPLOSION. DO NOT LOAD DISHES THAT ARE SOILED WITH ASH, WAX OR PAINTS. LEANING OR SITTING ON THE DISHWASHER DOOR WHEN OPEN MAY CAUSE THE APPLIANCE TO OVERTURN, PUTING PEOPLE AT RISK.
- Page 5 WARRANTY, AS WELL AS POSING A POTENTIAL HAZARD TO THE USER. The manufacturer declines all responsibility for damage to persons or property resulting from failure to observe the above precautions, from tampering with even a single component of the appliance, or from the use of non original spare parts.
-
Page 6: Installation And Hook-Up
Make sure to tighten the locking ring-nut once the pipes have been placed in the direction required. A hole at least 8 cm in diameter is required to allow the power supply cable and pipes to pass. -
Page 7: Drain Connection
The free end should be positioned at a height of between 30 and 100 cm, and should never be submerged in water. If a horizontal drain extension hose is used (for a maximum of 3 m) the drain hose can be placed at a maximum height of 85 cm from the ground. - Page 8 DO NOT USE ADAPTORS OR SHUNT CONNECTIONS IN ORDER TO AVOID THE POSSIBILITY OF OVERHEATING OR BURNING. In the event of damage to the supply cord, have it replaced by the manufacturer or an Authorized Technical Service Centre in order to...
-
Page 9: User Instructions
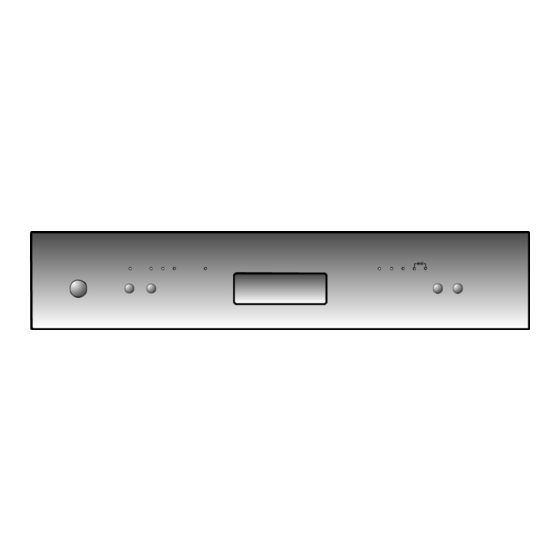
User instructions 3. Description of the controls 3.1 Front panel All the dishwasher control are grouped on the front panel. Programming and option selection are only possible with the door closed. ON/OFF BUTTON START/PAUSE BUTTON SELECTION PROGRAMS BUTTON PROGRAMS LIGHTS ½... - Page 10 " program terminate with an anti-bacteria rinse that ensures a EXTRA HYGIENE further reduction in the bacteria level. If the temperature falls during this stage of the program (e.g. because the door is opened or due to a power blackout), the program lights (4) flash to warn that the anti-bacteria effect is not guaranteed.
- Page 11 10g of cleaner on to the appliance door Amount of detergent and 20g into the dispenser Rinse aid setting At the end of the cycle, you MUST open the door approximately 50 mm to improve the drying performance. AS/NZS 2007 cycle test conditions: The upper basket must be set in the low position.
- Page 12 User instructions In the front there are one or two supports (depending on the models) for small plates (B). To use them, they have to be turned towards the front of the dishwasher.
-
Page 13: Washing Programs
3.2 Washing programs The dishwasher is equipped with a control panel, described in chapter "3. Description of the controls", from which it is possible to carry out all the power switch-on, switch-off and programming operations. Before starting a washing program make sure that: •... - Page 14 To start the dishwasher, press the START/PAUSE button (2) for a few seconds, until the light of the selected program starts to flash (confirmation beep). The light will flash as long as the program is in progress, to indicate that it is being performed. END OF PROGRAM...
- Page 15 4 and 5 (marked "end") come on. The water in the tank will be pumped out and the program will end at the point where it was interrupted. In case that the door is opened during the operation, to the next door closing it is going to be necessary to start the program as shown in paragraph “...
- Page 16 (available in all programs except the soak program) The PROGRAM DELAY button (7) can be pressed to delay the start of the washing program by 3, 6 or 9 hours. This function allows you to set the dishwasher to work at your preferred time of day.
- Page 17 User instructions To set the delay once the program has started, proceed as follows. If the program you wish to carry out is the same as the one already in progress: • press the START/PAUSE button (2) for a few seconds, until the program lights 4 and 5 (marked "end") come on;...
- Page 18 REMOVING THE DISHES At the end of the washing program, wait at least 20 minutes before removing the dishes, to allow them to cool down. To prevent any water droplets on the upper basket from falling on the dishes in the lower basket, it is advisable to unload the lower basket first, and then the upper basket.
-
Page 19: Operating Instructions
• Replace the cover and turn it in a clockwise direction. • Use a cloth to remove any spillage of rinse aid which might lead to the formation of excess foam. - Page 20 The amount of rinse aid must be increased if the washed dishes appear dull or feature circular stains. • If, on the other hand, the dishes are sticky or have white streaks, it is necessary to reduce the rinse aid setting. ADDING THE DETERGENT To open the detergent dispenser cap, lightly press the button P.
- Page 21 If performance problems (e.g. a white coating on the tank or dishes, poor drying, dirt on dishes at the end of the wash) are noted, users are advised to return to conventional products (granular salt, powder detergent and liquid rinse aid).
-
Page 22: General Warnings And Recommendations
User instructions 4.2 General warnings and recommendations Before using the dishwasher for the first time, it is advisable to read the following recommendations concerning dish types to be washed and their loading. There are generally no constraints on the washing of domestic dishes, but in certain cases it is necessary to take their characteristics into account. - Page 23 If in doubt as to the fastness of the colours, it is advisable to wash just a few items at a time for approximately one month.
- Page 24 The rear of the basket is fitted with a rack to take large plates (A). To use it, simply lift it until it locks in place.
- Page 25 The cutlery should be arranged in an orderly manner inside the basket, with the handles pointing downwards. Take care during loading to avoid injury from the knife blades. The basket is suitable for all types of cutlery, except those long enough to interfere with the upper spray arm. Ladles, wooden spoons and cooking knives can be placed in the upper basket, making sure that the knife blades do not protrude from the basket.
- Page 26 It is recommended to load the upper basket with small- or medium-sized items such as glasses, small plates, tea or coffee cups, shallow bowls and light objects made from heat resistant plastic. If the upper basket is used in the lowermost position, it can also be loaded with serving dishes, provided they are only slightly soiled.
- Page 27 The upper basket can be adjusted in three different positions on both sides. The rack must be level on both sides. To raise the basket lift it, pulling on the front edge (1), to the first or second catch depending on the height required. To lower it, pull the release lever (2).
-
Page 28: Cleaning And Maintenance
CLEANING THE WATER INTAKE FILTER The water intake filter A located at the outlet of the water supply tap needs to be cleaned periodically. After having closed the water supply tap, unscrew the end of the water intake hose, remove the filter A and clean it delicately under running water. -
Page 29: Cleaning The Filter Unit
CLEANING THE FILTER UNIT • It is advisable to periodically inspect the centre filter C and, if necessary, to clean it. To remove the filter, grip the tabs, turn them anticlockwise and lift upwards; • push the centre filter D from the underside to remove it from the micro-filter: •... -
Page 30: Before Starting
DISUSE: • Check that there are no deposits of sludge or rust inside the water pipe: if there are, allow the water to run from the water supply tap for a few minutes. • Plug the power cord back into the socket. - Page 31 If there are visible traces of rust inside the tank: • the tank is made of steel, and therefore any rust marks are due to external elements (fragments of rust from the water pipes, pots, cutlery, etc.). Special products are commercially available to remove such marks;...
-
Page 32: Troubleshooting
User instructions 6. Troubleshooting The dishwasher is capable of signalling a number of faults through the simultaneous illumination of several indicator lights, with the following meanings: FAULT DESCRIPTION Acquastop failure The anti-flooding system has been activated. The system is tripped in case of water leaks. Contact the after-sales service. - Page 33 To “reset” an alarm is necessary: • Open and close the door, or turn off and on the machine. At this point is possible to program the dishwasher again. If the malfunction persists, contact your authorised Service Centre.
-
Page 34: Assembly
Misurarel’altezzadelpannellocomandi;farecoinciderel’indicerelativo a talevaloreconilprofilosuperiored ellaporta inlegno;tracciare ilposizionamentodegliagganciporta. Measurethe height ofthecontrolpanel;bringthemarkrelatingtothisvalueintolinewiththetopedgeofthewoodendoor;markthepositionsofthedoorconnections. Measurerlahauteurdupanneaudecommandes;fairecoïnciderl’index relatifàcettevaleuravecleprofilsupérieur delaporteenbois;tracerlepositionnementdescrochetsdelaporte. DieHöhedesBedienfeldsmessen;DiediesemWertentsprechendeMarkierungmitdemoberenProfilderHolztürzurDeckungbringen;DiePositionderTüraufhängungenanzeichen. Meetdehoogtevanhetbedieningspaneel;laatdemarkeringdiebijdiewaardehoortovereenstemmenmethetbovensteprofielvandehoutendeur;tekendepositievandedeurhengselsaf. Medir laalturadelpaneldemandos;hacercoincidirelíndicecorrespondienteadichovalorconelperfilsuperiorde lapuertademadera;trazarelposicionamientodelasbisagrasdelapuerta. Meçaaalturadopaineldecomandos;façacomqueoindicadorrelativoaestevalorcoincida comoperfilsuperiordaportademadeira;marqueaposiçãodosganchosparaporta. Solosualcunimodelli Certainmodelsonly Seulementsurcertainsmodèles nurbeieinigeModellen Sóloenalgunosmodelos alleenindienvantoepassing LATOSUPERIORE SUPERFICIEINTERNA BORDSUPERIEURE SURFACEINTERNE WICHTIG: ATTENZIONE: INNERSURFACE UPPEREDGE OBERKANTE INNENFLACHE Tür montieren, Türfedern vor Einbau Montare la porta e regolarelatensione delle einstellen.
Need help?
Do you have a question about the PL8605X8 and is the answer not in the manual?
Questions and answers