
Related Manuals for Itm SPORT C-99


Summary of Contents for Itm SPORT C-99
- Page 1 USER MANUAL ITM SPORT C-99 Note: Some small modifications may have been made to the machine so you may notice small difference in the manual compared to your actual treadmill. These are all negligible.
- Page 2 CONTENTS 1. Product Brief ................... 1 2. Safety Precautions and Warnings ............3 3. Assembly Instructions ................5 4. Instructions for Use ................. 6 5. Routine Maintenance Instructions ............12...
-
Page 3: Product Brief
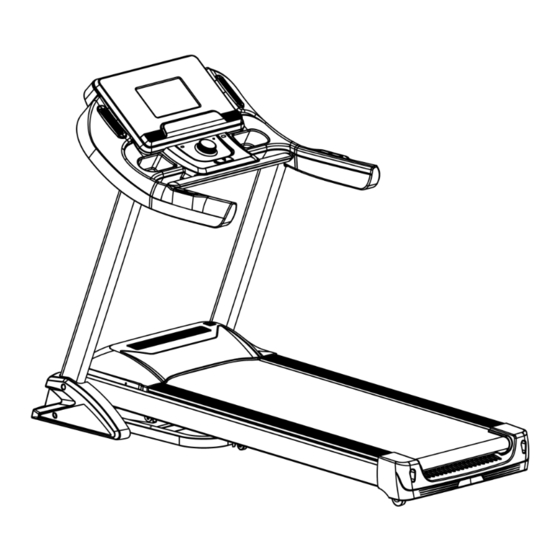
1. Product Brief Motorised Treadmill Main Parameters and Parts List Main Technical Features Features Description Rated voltage 220-240V Rated peak power 3.5HP Speed 1.0-20 km/h Running surface 1450*580 mm Max user weight 150 kg Dimensions 2040*930*1440 mm Packing list Name unit Name unit Qty... - Page 4 Inner hexagon spanner 5mm MP3 Cable Inner hexagon spanner 6mm Combination wrench Power line Safety key 2. Security Precautions and Warning Tip: Before folding the treadmill, ensure that the gradient is set at Zero. Please read the instructions carefully before use. Notice: ◆...
- Page 5 ◆ Don't damage or bend the power cord. Don’t place heavy objects on the machine. Do not clamp the power line. This could cause an electrical fire. ◆ No more than one person should use the machine at any given time. ◆...
-
Page 6: Installation Instructions
3. Installation Instructions Firstly open the box, which should be on a flat surface. Remove the M8*28 screws, as shown in figure (1). Lock the monitor and the column (the vertical arms), connect the communication wire of the column and the monitor (as shown in figure 1); Then carefully lift the machine out of the box, position it flat on the ground. - Page 7 5.Silicon oil needs to be added before using the treadmill. See details below. A. Open the cover of the silicon oil reservoir on the front motor cover. B. Cut the upper part of the silicon oil bottle. C. Squeeze the silicon oil into the oil reservoir (not more than 90ml, otherwise it will overflow), and then close the cover of the oil reservoir.
- Page 8 7..Put the safety key on the picture showing place and press the start button to start the treadmill. Safety key is red in color. You will find it in the accessory bag. NOTE: Please ensure that all screws are locked uniformly and fully tightened, once assembled, before use and check that no part is left out before plugging in.
- Page 9 safety cord that connects to the console, magnetically. 3. Please put the silicon oil bottle in places children cannot reach. If it gets into someone’s eye somehow, please use water to wash it carefully and consult a doctor immediately. 4. Safety key Introduction IMPORTANT: The treadmill will only start when the safety key is put on the yellow area of the console.
- Page 10 Press the START button to start the treadmill 5.2 Number of Programs 3 manual modes, 12 automatic programs, 1 FAT program. 5.3 Safety lock function Disconnect the security lock, "E7" is shown on the screen. The treadmill stops immediately, and it makes a beep noise. Put the safety key back and all of the data will be cleared in 2 seconds.
- Page 11 no sound, please press volume+ for a while and the volume will be turned on. 5.4.9 The Infinite Knob 1.Speed adjusting knob: Adjust the speed 2.When the power is on, press the knob, the treadmill starts. When the treadmill is in a running state, press the knob and all of data will be cleared and the treadmill gradually comes to a complete stop and returns to the Manual Mode.
- Page 12 SPEED INCLINE SPEED INCLINE SPEED INCLINE SPEED INCLINE SPEED INCLINE SPEED INCLINE Meaning of Error Codes Fault code Failure Description fault handling Communication Error: when Possible Cause: the communication between the lower controller and the power is on, the connection console is not connecting.
-
Page 13: Routine Maintenance
Safety Key Not Attached Put the safety Key on the yellow part of the console. 6. Routine Maintenance Warning: Before cleaning or maintaining the treadmill, please ensure that the power plug of the treadmill is pulled out. Cleaning: Comprehensive cleaning will extend the using life of the electric treadmill. Remove dust periodically in order to keep the parts clean. - Page 14 Picture A Picture B Multi-wedge Belt Tension Adjustment When you use the treadmill for a long time, the multi-wedge belt becomes loose because of abrasion. Should this occur, you must do some minor adjustment. Judgment: the feeling of running with the occasional pause phenomenon, which indicating that the treadmill belt or multi-wedge belt are a little loose and further affirmation need to be made.
Need help?
Do you have a question about the SPORT C-99 and is the answer not in the manual?
Questions and answers