Advertisement
Quick Links
Advertisement

Related Manuals for Itm C-88


Summary of Contents for Itm C-88
- Page 1 C-88 Treadmill Manual...
- Page 3 CONTENTS 1. Product Brief 2 2. Security Precautions and Warning 3 3. Installation Instructions 5 4. Usage Instructions 9 5. Routine Maintenance and Instructions 1 9...
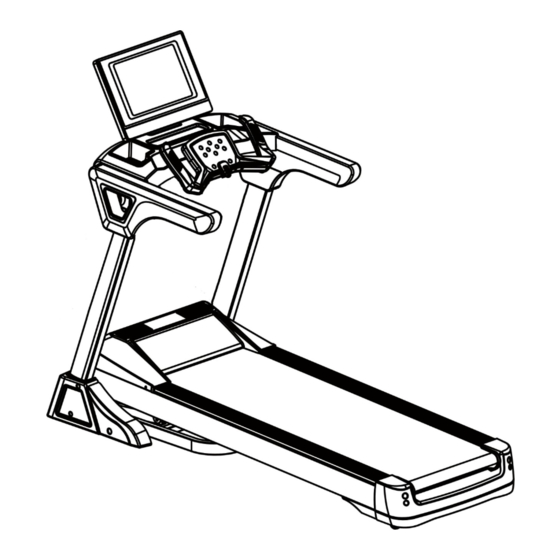
- Page 4 1. Product Brief Motorised Treadmill Main parameters and parts list Main technical parameters Parameters Names Description Input power voltage AC 220V-240V...
- Page 5 Rated Frequency 50/60Hz Rated power 3.5HP Speed 1.0-18 km/h Running surface 520*1400 mm Max user weight 140KG Dimensions 1985*855*1500mm Packing list No. Name units Complete machine Accessory Bag Accessory bag list NO. Name QTY NO. Name Inner Hexagon spanner 6mm Base corner cover 1 set Inner Hexagon spanner 5mm...
- Page 6 Tip: Before folding the treadmill, make sure that the gradient is ‘zero’. . Security Precautions Notice Please read the instructions carefully before use. Store indoors and keep away from water and/or moisture. Please wear suitable clothes and shoes when using. Do not use the treadmill barefoot. ...
- Page 7 Danger Do not use the machine if the frame or motor cover is damaged or cracked (the internal structure exposed) ---- Otherwise an accident or injury may happen. Don't jump up and down when using ---- This may result in injury Don't keep the machine in a high moisture space such as a bathroom.
- Page 8 Avoid drinking water. Use a sports bottle for drinks. ---- This may cause electric shock issues. People who seldom do exercise shouldn't suddenly do intense exercise. Do not use straight after eating and do not eat on the machine. ---- Food crumbs may get into the machine.
- Page 9 This product is equipped with a power plug with a grounding conductor. Completely insert the plug into a standard socket. If the equipment earthing conductor’s connection is faulty, it can cause electric shock. If you have doubts about whether your product is earthed correctly or not, please have it checked by a qualified electrician.
- Page 10 heavy, please ensure that people there lift it). First, use #6 Allen key to put M10 * 50 screws through the underframe and column. Then use #5 Allen key to fix M8 * 20 screws on the column and then lock them after fixing the left and right sides: 3.
- Page 11 4. After locking the console, put the decorative handle covers on both sides of the corresponding position of the handles. 5. Take out the console and connect the signal lines, one by one (A). Put the extra exposed lines into the case and then put the console on the console slot (please be careful not to snag the lines). Adjust the position until it fits into place and use screw M8*20 to lock it tightly.
- Page 12 6.Take out the console and connect the signal lines one by one (A). Put the extra exposed lines into the case and then put the console on the console slot (please be careful and do not snag the lines). Adjust the position and use screw M8*20 to lock it tightly.
- Page 13 Cylindrical Head Screw Use a screwdriver and screw M5*14 to lock the base corner decorative covers on both sides of the base. Above are the steps for the assembly。 8.Silicone oil needs to be added before using the treadmill, as follows: A.
- Page 14 B. Cut the upper part of the silicone oil bottle and remove any internal plastic covers. C. Squeeze the silicone oil from the hole (not more than 90ml, otherwise it will overflow), and then press the cover back. This oil will be distributed on the treadmill every 30km.
- Page 15 9. Please insert the power cord as shown below:...
- Page 16 10.Put the red Safety Magnet, see in the picture below, in place and press the Start button to start the treadmill. NOTE: the Treadmill will not work without the Safety Magnet, so keep it safe.
- Page 17 NOTE: please ensure that all of the screws are locked securely after assembly and check that no part is left out before plugging in the electricity. 4. Usage Instructions Using Your Treadmill 1. Insert the power plug correctly and turn on the Power switch (red in colour) (1). When the light is on, there will be a “Di”, soundnd then the screen will light up.
- Page 18 How to Open the Motor Cover 1. Take the screwdriver from the tools bag that came with your Treadmill. 2. Remove the four screws on the motor cover (please keep these safe as they will be needed after lubrication is completed). 3.
- Page 19 To extend the lifespan of your treadmill, we advise that you cut the power and let the machine rest for ten minutes after every two hours of usage. Display instructions Sticker Start-up The treadmill starts after pressing the Start button. Amount of programs...
- Page 20 There are 3 Modes and several Automatic Programs. Safety Lock Function Disconnect the security lock. Error, "E7" shows on the screen and the treadmill stops immediately. Put the Safety Magnet back on. All data will be cleared in 2 seconds. Button Instructions Start button, Stop button:...
- Page 21 In running mode or set value, this displays the distance and the value, (in mode setting and program setting, displays the countdown distance and countdown calories); 2. Heart Rate Display In running mode and standby mode, displays the heart rate value and the heart icon flashes while testing.
- Page 22 SPEED INCLINE SPEED INCLINE SPEED INCLINE SPEED INCLINE SPEED INCLINE SPEED INCLINE SPEED INCLINE 12 9 10 9 SPEED 10 5 INCLINE SPEED INCLINE 10 6 Error Code Meaning Error Code Description Solution Remark 1.Cable broken or poor connection 1. Check to make sure all cables and lines are Connection well connected.
- Page 23 2. Malfunction of the console or PCB 2. Replace the console or PCB 1. The power line of the motor is not well connected. 1. Check to make sure the power line and the carbon brush of the motor are well Problem with connected.
- Page 24 Running belt specialised lubricant This electric treadmill’s running board and running belt has been lubricated in the factory when you receive it. Friction between the running belt and running board has a great influence on the life span and the performance of your electric treadmill. Therefore regular application of lubricant is required.
- Page 25 If the running belt is closer to the left, rotate the left adjusting bolt with 1/2 turn counter- clockwise, then rotate the right adjusting bolt with 1/2 turn clockwise. (Picture B) Picture A Picture B Multi-wedge Belt Tension Adjustment When you use the treadmill for a long time, the multi-wedge belt becomes loose because of the usage.
- Page 26 Add lubricating oil to the machine before the first use of the treadmill. The lubricating oil method is as follows: Step 1:Open the lube oil cover at the front end of the motor cover (figure 1); Step 2:Cut the top of the silicone oil bottle and remove any internal coverings (Figure 2) Step 3: Aim the oil bottle at the hole position and squeeze the oil into the lubricating reservoir of the treadmill (Figure 3)
- Page 27 Step 4: (fill 90ml for the first time (do not exceed 90ml. See figure 4. Otherwise the oil will overflow). Then put the cover back on. Thank You for Buying from InTheMarket.ie!
- Page 28 5% discount. Feel free to share with family and friends. We hope that you have many happy years with your new C-88 Treadmill. Please note that even outside of your warranty, we carry spares and we also have a repair service available, so your product will last for many, many years.
Need help?
Do you have a question about the C-88 and is the answer not in the manual?
Questions and answers