Table of Contents
Advertisement
Available languages
Available languages
Quick Links
Advertisement
Table of Contents

Related Manuals for KNOVA KN DP-2500L


Summary of Contents for KNOVA KN DP-2500L
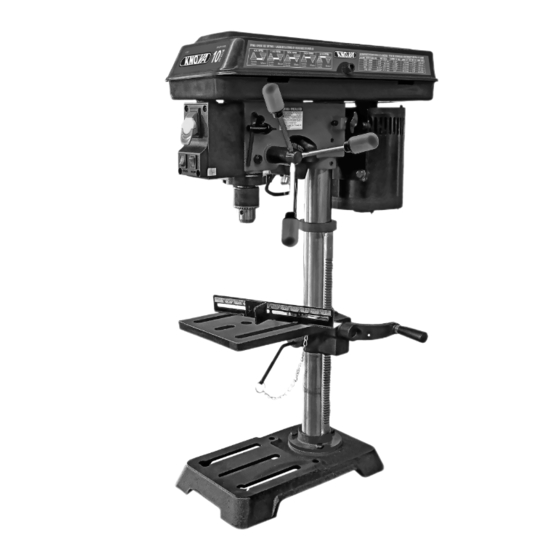
- Page 1 ” Benchtop drill press with laser Taladro de columna de banco con láser We invite you to read the user manual before operating your equipment KN DP-2500L Le invitamos a leer el manual de usuario antes de operar su equipo...
-
Page 2: Table Of Contents
Table of contents ............... 1 Operating instructions ............4 Warning symbols and definitions ........1 Maintenance and servicing ..........7 Product specifications KN DP-2500L ........ 1 Troubleshooting ..............7 Important safety information ..........1 Parts list ................8 Grounding instructions ............2 Assembly diagram ............. -
Page 3: Grounding Instructions
IMPORTANT SAFETY INFORMATION 10. WEAR PROPER APPAREL. Do not wear loose clothing, 17. USE RECOMMENDED ACCESSORIES. Consult gloves, neckties, rings, bracelets, or other jewelry which the owner’s manual for recommended accessories. may get caught in moving parts. Nonslip footwear is The use of improper accessories may cause risk of recommended. -
Page 4: Setup - Before Use
SETUP - BEFORE USE Read the ENTIRE IMPORTANT SAFETY 3. Assemble the Table (87) to the Table Support with INFORMATION section at the beginning of this the Angle Bolt (88). manual including all text under subheadings therein Worm gear (84) before set up or use of this product. -
Page 5: Operating Instructions
SETUP - BEFORE USE Head assembly Head Assembly to Column Installing/Removing the Chuck 1. Loosen the Set 1. Loosen the Lock Handle and slide the Table up Screw (32) on each the Column to within 6” of the Spindle (71). side of the Head Tighten the Lock Handle. - Page 6 OPERATING INSTRUCTIONS CAUTION! To prevent injury from unexpected Changing Drill Speed Table movement, tighten Angle Bolt and Lock Before changing drill speeds, make sure the machine Handle after adjustment. is switched OFF and UNPLUGGED. 1. Open the Pulley Cover. Lock Handle Column (81) 2.
- Page 7 OPERATING INSTRUCTIONS WOOD ALUMINUM / ZINC / BRASS IRON / STEEL Speed range (RPM) inch inch inch 7/32 3/32 2000 - 3500 1400 - 2000 16.0 11/32 8.75 5/32 1000 - 1400 22.0 15/32 12.0 800 - 1000 1-1/4 31.75 11/16 17.5 1-5/8...
-
Page 8: Maintenance And Servicing
OPERATING INSTRUCTIONS General Operating Instructions 8. To lock Drill Press in the OFF position, remove the safety key from Power Switch and store key in a safe place 1. Plug the Power Cord into an electrical outlet. until next use. 2. -
Page 9: Parts List
TROUBLESHOOTING PROBLEM POSSIBLE CAUSES LIKELY SOLUTIONS Excessive noise 1. Internal damage or wear. (Carbon 1. Have technician service tool. or rattling. brushes or bearings, for example.) 2. Belt (if equipped) too loose (slipping) 2. Properly tension belt. or too tight (bearing damage). Overheating. - Page 10 PARTS LIST Part D e s c r i p t i o n Qty. Part D e s c r i p t i o n Qty. Switch box cover Wrench On/off switch Wrench Laser switch Lock handle Circuit board Table support Quill set screw Inner gear...
-
Page 11: Assembly Diagram
ASSEMBLY DIAGRAM (254 mm) - Page 12 Instrucciones de operación ..........15 Símbolos de advertencia y definición ....... 11 Mantenimiento y servicio ..........18 Especificaciones del producto KN DP-2500L ....11 Solución de problemas ............18 Información de seguridad importante ....... 11 Lista de partes ..............19 Instrucciones de puesta a tierra ........
- Page 13 INFORMACIÓN DE SEGURIDAD IMPORTANTE 9. UTILICE UN CORDÓN DE EXTENSIÓN ADECUADO. 15. DESCONECTE LAS HERRAMIENTAS antes de realizar Asegúrese de que su cable de extensión esté en buenas el mantenimiento; cuando cambie accesorios, como condiciones. Cuando use un cable de extensión, cuchillas, brocas, cortadores y similares.
- Page 14 INSTRUCCIONES DE PUESTA A TIERRA Seguridad contra vibraciones 2. No fume durante el uso. La nicotina reduce el suministro de sangre a las manos y los dedos, lo que aumenta Esta herramienta vibra durante el uso. La exposición el riesgo de lesiones relacionadas con las vibraciones. repetida o prolongada a vibraciones puede causar lesiones 3.
- Page 15 CONFIGURACIÓN - ANTES DE USAR Montaje de la cabeza Mesa (87) Soporte de mesa (82) Mecanismo de engranaje (92) Tornillo de ajuste 4. Mientras sostiene la rejilla de engranajes y el soporte de (32) la mesa ensamblados, deslícelos hacia abajo sobre la columna hasta que la parte inferior de la rejilla de engranajes esté...
- Page 16 CONFIGURACIÓN - ANTES DE USAR 6. Examine el mandril desde todos los lados para asegurarse de que esté correctamente alineado con el husillo. 7. Con las manijas de alimentación, inserte el husillo completamente en el mandril, presionando con fuerza la punta del mandril contra el trozo de madera sobrante en la mesa para asegurar el mandril en su lugar.
- Page 17 INSTRUCCIONES DE OPERACIÓN Puntero Láser (M) (63) Cubierta de (en ambos lados) Motor Tuerca de polea (24) (104) ajuste (65) Scala Varilla de tope (64) Parada de perforación Cambiar la velocidad de perforación Perilla de tensión Antes de cambiar las velocidades de perforación, asegúrese del motor (42) de que la máquina esté...
- Page 18 INSTRUCCIONES DE OPERACIÓN 2. Antes de apretar el mandril, asegúrese de que la broca 10. PARA MATERIALES PEQUEÑOS que no se puedan esté centrada dentro de las mordazas. sujetar a la mesa, use un tornillo de banco. Asegúrese de que el tornillo de banco esté sujeto o atornillado a la mesa. 3.
- Page 19 MANTENIMIENTO Y SERVICIO Los procedimientos que no se explican 2. DESPUÉS DEL USO, limpie las superficies externas específicamente en este manual deben ser de la herramienta con un paño limpio. realizados únicamente por un técnico calificado. 3. Periódicamente, use gafas de seguridad aprobadas por ANSI y protección respiratoria aprobada por NIOSH ADVERTENCIA y sople el polvo de las rejillas de ventilación del motor...
- Page 20 SOLUCIÓN DE PROBLEMAS PROBLEMA POSIBLES CAUSAS SOLUCIONES PROBABLES Calentamiento 1. Obligar a la máquina a trabajar 1. Permita que la máquina funcione a su propio ritmo. excesivo. demasiado rápido. 2. Accesorio desafilado o dañado. 2. Mantenga afilados los accesorios de corte. Reemplace según sea necesario.
- Page 21 LISTA DE PARTES Parte D e s c r i p t i o n Cantidad Parte D e s c r i p c i ó n Cantidad Tapa de la caja de interruptores Llave Interruptor de encendido/apagado Llave Interruptor láser Manija de bloqueo Placa de circuito...
- Page 22 DIAGRAMA DE MONTAJE (254 mm)
-
Page 23: Notes
NOTES / NOTAS... - Page 24 www.knova.com.mx...
Need help?
Do you have a question about the KN DP-2500L and is the answer not in the manual?
Questions and answers