Table of Contents

Related Manuals for KNOVA KN RO-1321


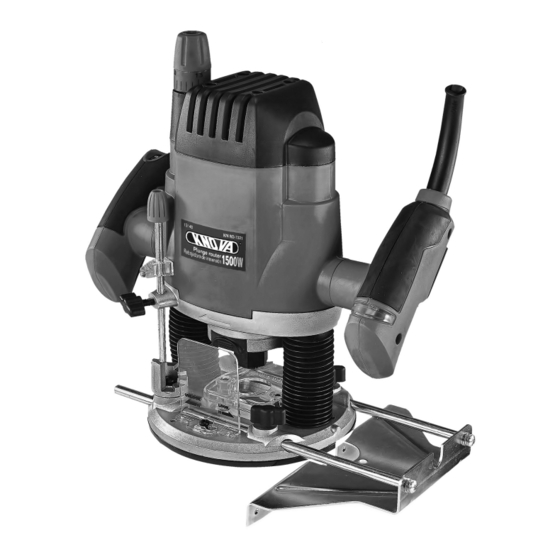
Summary of Contents for KNOVA KN RO-1321
- Page 1 1500W Plunge router Rebajadora de inmersión We invite you to read the user manual before operating your equipment. KN RO-1321 Lo invitamos a leer el manual del usuario antes de operar su equipo.
-
Page 2: Technical Data
More than 0, Less than 6 TECHNICAL DATA More than 6, Less than 10 More than 6, Less than 12 Model KN RO-1321 More than 6, Less than 16 NOT RECOMMENDE Voltage - Frequency: 120 V ~ 60 Hz PERSONAL SAFETY Collet capacity: 1/4”... -
Page 3: Specific Safety Rules
TOOL USE AND CARE • Maintain the power tool. Check for misalignment or • Always keep the chip shield clean and in place. binding of moving parts, broken parts, and any other • Stay alert and clear the router cutting-bit path of any condition that may affect the operation of the power tool. -
Page 4: Know Your Tool
SPECIFIC SAFETY RULES • Avoid “climb cutting.” See the OPERATlON section In this manual. “Climb cutting” increases the chance for Ioss of control resutting in possible serious injury. WARNING Use of this product can generate dust containing chemicals known to cause cancer, birth defects or other reproductive harm. -
Page 5: On/Off Switch
OPERATION INSTRUCTIONS “ON/OFF” SWITCH VARIABLE SPEED CONTROL Your router motor is turned “ON” and “OFF” by the toggle The electronic speed control feature allows router motor speed switch located on the posterior part of the right handle (from to be matched to cutter size and workpiece-material hardness the front side). - Page 6 OPERATION INSTRUCTIONS LED WORKLIGHTS NOTE: The collet/nut is self-releasing; it is not necessary to strike the collet/nut to free the router cutting bit. If the The router motor has 3 built-in worklights located around the cutting bit seems stuck after use, loosen the collet/nut a collet/nut for high visibility of workpiece when cutting.
- Page 7 OPERATION INSTRUCTIONS MAKING CUTS 2. Turn the router motor “ON” and allow the router motor to reach the selected speed, being careful not to allow DEEP CUTS the cuttlng bit to contact the workpiece. The proper cutting depth for each pass is always determnined 3.
- Page 8 OPERATION INSTRUCTIONS NOTE: A core-box bit or V-groove bit is often used tor WARNING Always securely clamp the workpiece in routing letters and engraving objects. Straight bits and ball place, and keep a firm grip on the router base with both mills are often used to make relief carvings.
- Page 9 OPERATION INSTRUCTIONS DIRECTION OF FEED - INTERNAL CUTS RATE OF FEED When making and internal cut, such as a groove, dado, or slot, The proper rate of feed depends on several factors: the the edge guide, straight edge, or board guide must always be hardness and moisture content of the workpiece, the depth of positione on the right-hand side of the router as you make the cut, and the cutting diameter of the bit.
-
Page 10: Routine Maintenance
OPERATION INSTRUCTIONS CHIP SHIELDS WARNING The chip shield deflectors help keep dust and chips away from the operator; they will not stop WARNING Always wear eye protection. The chip objects larger than woodchips thrown from the bit. shields are not intended as salety guards. CAUTION: Always have the chip shield deflector in WARNING place on the base when operating the router. -
Page 11: Troubleshooting
MAINTENANCE 4. Insert new brush assemblies into the guide channels with WARNING For your safety, always tum off the switch the carbon part going in first. being certain to fit the two and unplug the router motor from the power source metal “ears”... - Page 12 PART LIST Part name Part name Part name Screw Thread Forming Screw Brush Holder Base Plate Collet Snailed Spring Slotted Shoulder Screw Collet Nut Carbon Brush Chip Shield Upper Cover Nameplate Bottom Support Hexagon Nut PCB Assembly Long Plunge Rod Lower Cover Right Handle Plunge Rod...
- Page 13 EXPLOSIVE DIAGRAM...
-
Page 14: Datos Técnicos
DATOS TÉCNICOS • Si es necesario un cable de extensión, debe ser usado un Model KN RO-1321 cable con el tamaño adecuado de los conductores. La tabla de la siguiente página, muestra el tamaño correcto para VoltaJe - Frecuencia:... -
Page 15: Uso Y Cuidado De La Máquina
USO Y CUIDADO DE LA MÁQUINA • Use mordazas o alguna otra manera práctica para asegurar • Sujete firmemente el router con ambas manos para y apoyar la pieza de trabajo a una plataforma estable. contrarrestar el torque que se genera al encender la Sostener la pieza de trabajo con las manos o contra su herramienta. - Page 16 NORMAS ESPECÍFICAS DE SEGURIDAD • Desconecte la máquina de la fuente de poder antes de CARACTERÍSTICAS realizar cualquier tipo de ajuste o cambio de brocas. CONOZCA SU HERRAMIENTA • Si trata de cambiar la broca inmediatamente después de haber realizado un corte, tenga cuidado, ya que el calor Antes de intentar usar este producto, familiarícese con todas generado por la fricción del corte se concentra en la broca sus características de operación y requerimientos de seguridad.
-
Page 17: Instrucciones De Operación
CARACTERÍTICAS router. 7. Mangos diseñados ergonómicamente con gomas antiderrapantes para un mayor confort y un máximo control con menos vibración. 8. Base durable que no se atasca con la pieza de trabajo, se desliza suavemente sobre la pieza de trabajo. La sub-base tiene una abertura para brocas de 1 1/4”... - Page 18 INSTRUCCIONES DE OPERACIÓN 4. Coloque la llave en la tuerca y gire al contrario de las Diámetro de broca de corte Velocidad Máx. manecillas del reloj para aflojar un poco el collet/tuerca Hasta 1” 25 mm y así poder insertar el zanco de la broca. 1-1/4”...
- Page 19 INSTRUCCIONES DE OPERACIÓN AJUSTE DE LA PROFUNDIDAD DE CORTE COLOCANDO EL ROUTER EN LA PIEZA DE TRABAJO Y COMENZANDO EL CORTE ADVERTENCIA Este router jamás debe ser encendido ADVERTENCIA o conectado a la fuente de poder mientras esté Antes de operar el router, siga todas ensamblando partes, realizando ajustes, instalando o las instrucciones de seguridad indicadas en este manual.
- Page 20 INSTRUCCIONES DE OPERACIÓN NOTA: No se recomienda hacer un solo pase que sea profundo. Fig. 1 Puntas de corte con un diámetro pequeño se rompen fácilmente al aplicarle mucho empuje y torque. Puntas grandes podrían causar un mal corte y puede ser difícil de controlar y guiar. Por estas razones no exceda 1/8”...
- Page 21 INSTRUCCIONES DE OPERACIÓN Si la guía esta posicionada de tal manera que quede al ras de la El contragolpe puede causar daños a la pieza de trabajo y orilla de la pieza de trabajo, la broca de corte realizará un corte podría ocasionarle la perdida de control del router, causando completo.
- Page 22 INSTRUCCIONES DE OPERACIÓN Si fuese a elegir, la opción de la Fig. 16 es la más fácil de Fig. 8 Encastre utilizar, pero existe la posibilidad de que haya un “corte irregular” en las curvas. En cualquiera de los dos casos, la fuerza de corte debe ser Corte contra la guía.
-
Page 23: Mantenimiento
INSTRUCCIONES DE OPERACIÓN CONECTORES PARA EXPULSIÓN DE POLVO Para instalar la conexión de expulsión de polvo a la base, alinee el cople del conector con el del orificio en la base, gire en el sentido de las manecillas del reloj. ADVERTENCIA Siempre apague el motor y desconectelo de la fuente de alimentación antes de... -
Page 24: Solucionador De Problemas
MANTENIMIENTO ADVERTENCIA SOLUCIONADOR DE PROBLEMAS Por su seguridad apague y desconecte el router de la fuente de poder cuando realice cualquier tipo de mantenimiento y limpieza. Problema: No puede operar el router. - Verifique que el router esté conectado a la fuente LUBRICACIÓN de poder. - Page 25 LISTA DE PARTES Nombre de la pieza Cant. Nombre de la pieza Cant. Nombre de la pieza Cant. Tornillo Tornillo formador de roscas Portaescobillas Placa base Pinza Resorte de caracol Tornillo de hombro ranurado Tuerca de boquilla Escobilla de carbón Escudo de viruta Cubierta superior Placa de identificación...
- Page 26 DIAGRAM DE PARTES...
-
Page 27: Notes / Notas
NOTES / NOTAS... - Page 28 www.knova.com.mx...
Need help?
Do you have a question about the KN RO-1321 and is the answer not in the manual?
Questions and answers