Advertisement
Available languages
Available languages
Quick Links
Montage- und
DE
Be die nungs an lei tung
Instructions de
FR
montage et d'entretien
Instrucciones de montaje y
ES
funcionamiento
FB-FNK-D Multicode
Funk-Fernbedienung für Deckenventilatoren
Radio remote control for ceiling fans
Télécommande radio pour ventilateurs de plafond
Radiocomando per ventilatori a sof tto
Mando a distancia por radio para ventiladores de techo
3 - 8
GB
15 - 20
IT
27 - 32
Mounting and
operating manual
Istruzioni per il
montaggio e l´uso
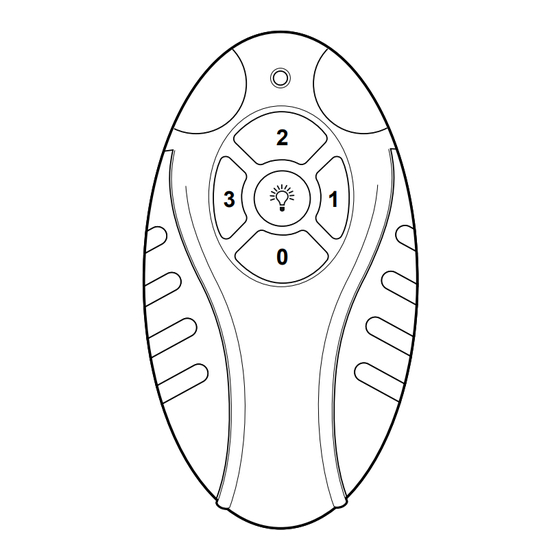
3
H
9 - 14
21 - 26
2
M
1
L
0
OFF
200311v15
Advertisement

Related Manuals for CasaFan FB-FNK-D Multicode


Summary of Contents for CasaFan FB-FNK-D Multicode
- Page 1 Instrucciones de montaje y 27 - 32 funcionamiento FB-FNK-D Multicode Funk-Fernbedienung für Deckenventilatoren Radio remote control for ceiling fans Télécommande radio pour ventilateurs de plafond Radiocomando per ventilatori a sof tto Mando a distancia por radio para ventiladores de techo...
- Page 3 SICHERHEITSHINWEISE: - Lesen Sie vor Beginn der Installation diese Anleitung sorg- fältig durch. Falsche elektrische Verbindungen können die Empfangseinheit beschädigen, einen Stromschlag verursa- chen und/oder eine Brandgefahr darstellen. - Wartung und Reparaturen an der Empfangseinheit dieser Fernbedienung darf nur ein ausgebildeter Elektriker, eine Elektrofachkraft oder eine enstprechend qualifizierte Person durchführen.
- Page 4 Über diese Montage- und Bedienungsanleitung Bevor Sie das CasaFan Produkt benutzen, lesen Sie bitte diese Montage- und Bedienungsanleitung aufmerksam durch. Bewahren Sie die Anleitung griffbereit auf. Geben Sie das CasaFan Produkt nie ohne Montage- und Bedienungsanleitung an andere Personen weiter. Zeichenerklärung GEFÄHRLICHE ELEKTRISCHE SPANNUNG...
- Page 5 HINWEIS Prüfen Sie zunächst, ob Ihr Deckenventilator zum Betrieb mit einer Fern- bedienung geeignet ist. Stellen Sie vor Beginn der Montage sicher, dass ein eventuell vorhandener Zugschalter des Decken- ventilators auf höchster Stufe und der Zugschalter einer eventuell vorhandenen Leuchte auf „an“ steht.
- Page 6 Stecken Sie nun den 4-poligen Stecker des Kabels, das von der Montagehalterung und Stromzufuhr Ihres Deckenventilators kommt (E2), mit dem eingangsseitigen Kabel der Fernbedienung (E1) zusammen. Danach stecken Sie den 4-poligen Stecker des Kabels, das aus der Deckenstange Ihres Deckenventila- tors kommt (A2) mit dem ausgangsseitigen Stecker des Kabels des Empfängers der Fernbedienung (A1) wie in Abb.
- Page 7 ACHTUNG: Unbedingt die Beschriftung am Empfänger der Fernbedienung beachten! Die Belegung des Steckers ist für CasaFan-AC-Deckenventilatoren vorgesehen. Bei anderen Fabrikaten (Hunter/Fanimation usw.) prüfen Sie bitte die Belegung der Stecker! DC/EC-Deckenventilatoren können mit der FB-FNK-D Multicode nicht gesteuert werden! Einlegen der Batterie in den Handsender Abb. 6 Öffnen Sie das Batteriefach (Abb.
- Page 8 Bedienung und Funktionen der Fernbedienung FB-FNK-D Multicode WICHTIG: Nach Abschluss der Installation und Wiedereinschalten der Netzspannung Drücken Sie bitte die Taste „3“ für die höchste Ventilator-Geschwindigkeit am Handsenders, um die höchste Stufe einzuschal- ten. Ziehen Sie nun an der Zugkette Ihres Ventilators, bis dieser auf höchster Geschwindigkeit läuft.
-
Page 9: Safety Instructions
SAFETY INSTRUCTIONS: - Read these instructions carefully before starting the instal- lation. Incorrect electrical connections could damage the receiver unit, cause an electric shock and/or constitute a fire hazard. - The electrical connection and maintenance of this remote control may only be performed by a trained electrician, a qualified electrician, or a suitably qualified person. - Page 10 About this installation and operating instructions Before using the CasaFan product, please read these installation and operating instructions carefully. Keep the manual handy. Never pass on the CasaFan product to other persons without the installation and operating instructions. Explanation of symbols: DANGEROUS ELECTRIC VOLTAGE Warns the user of the dangers caused by electricity.
- Page 11 NOTICE First check whether your ceiling fan is suitable for operation with a remote control. Before starting installation, make sure that any pull switch on the ceiling fan is set to the highest position. Damage to the electronics of the receiver unit of the remote control and the fan will not be covered by the warranty if this is not observed! If a possibly existing lamp is to be dimmed (only possible with dimmable lamps), please set the micro switch A in the battery compartment to „DIM“...
- Page 12 Now connect the 4-pin plug of the cable coming from the mounting bracket and power supply of your ceiling fan (E2) to the input cable of the remote control (E1). Then connect the 4-pin connector of the cable coming from the ceiling rod of your ceiling fan (A2) to the output connector of the remote control receiver cable (A1) as shown in Fig.
- Page 13 CAUTION: It is imperative to observe the labeling on the receiver of the remote control! The pin assignment of the plug is only intended for CasaFan AC ceiling fans. For other brands (Hunter/Fanimation etc.) please check the pin assignment of the connectors!
- Page 14 Operation and functions of the remote control FB-FNK-D Multicode IMPORTANT: After completing the installation and switching the mains voltage back on, please press the „3“ button for the highest fan speed on the handheld transmitter to switch on the highest speed. Now pull on the pull chain of your fan until it runs at maximum speed.
-
Page 15: Consignes De Sécurité
CONSIGNES DE SÉCURITÉ : - Lisez attentivement ces instructions avant de commencer l‘installation. Des connexions électriques incorrectes peuvent endommager le récepteur, provoquer un choc électrique et/ou constituer un risque d‘incendie. - Le raccordement électrique et l‘entretien de cette télécommande ne doivent être effectués que par un électricien qualifié, un élec- tricien qualifié... - Page 16 Avant d‘utiliser le produit CasaFan, veuillez lire attentivement cette notice d‘installation et d‘utilisation. Gardez le manuel à portée de main. Ne jamais transmettre le produit CasaFan à d‘autres personnes sans la notice de montage et d‘utilisation. Explication des symboles: TENSION ÉLECTRIQUE GRATUITE...
- Page 17 AVIS Vérifi ez d‘abord si votre ventilateur de plafond est adapté au fonctionnement avec une télécommande. Avant de commencer l‘installation, assurez-vous que tout interrupteur à tirette du ventilateur de plafond est réglé sur la position la plus haute. Les dommages à l‘électronique du récepteur de la télécommande et du ventilateur ne sont pas couverts par la garantie si cela n‘est pas respecté...
- Page 18 Branchez maintenant la fiche à 4 broches du câble provenant du support de montage et de l‘alimentation de votre ventilateur de plafond (E2) au câble d‘entrée de la télécommande (E1). Branchez ensuite le connecteur à 4 broches du câble provenant de la tige de plafond de votre ventila- teur de plafond (A2) sur le connecteur de sortie du câble du récepteur de la télécommande (A1) comme indiqué...
- Page 19 L‘affectation des broches de la fiche est prévue pour les ventilateurs de plafond CasaFan AC. Pour les autres marques (Hunter/Fanimation etc.), veuillez vérifier le brochage des connecteurs ! Les ventilateurs de plafond DC/EC ne peuvent pas être contrôlés avec le FB-FNK-D Multicode ! Mise en place de pile dans l‘émetteur portatif Fig.
- Page 20 Fonctionnement et fonctions de la télécommande FB-FNK-D Multicode IMPORTANT : Après avoir terminé l‘installation et remis la tension secteur, veuillez appuyer sur la touche „3“ de l‘émetteur portatif pour la vitesse de rotation la plus élevée du ventilateur afin de mettre en marche la vitesse la plus élevée.
-
Page 21: Istruzioni Di Sicurezza
ISTRUZIONI DI SICUREZZA: - Leggere attentamente queste istruzioni prima di iniziare l‘installazione. Collegamenti elettrici errati possono danneg- giare l‘unità ricevente, causare scosse elettriche e/o costi- tuire un pericolo d‘incendio. - Il collegamento elettrico e la manutenzione di questo te- lecomando possono essere eseguiti solo da un elettricista qualificato, da un elettricista qualificato o da una persona qualificata. - Page 22 Prima di utilizzare il prodotto CasaFan, leggere attentamente queste istruzioni per l‘installazione e l‘uso. Tenere il manuale a portata di mano. Non consegnare mai il prodotto CasaFan ad altre persone senza le istruzioni per l‘installazione e l‘uso. Chiave per i simboli: TENSIONE ELETTRICA PERICOLOSA Avverte l‘utente dei danni causati dalla tensione elettrica.
- Page 23 AVVISO Verifi care prima di tutto se il ventilatore a soffi tto è adatto al funzionamento con un telecomando. Prima di iniziare l‘installazione, assicurarsi che l‘eventuale interruttore a strappo sul ventilatore a soffi tto sia posizionato nella posizione più alta. I danni all‘elettronica dell‘unità ricevente del teleco- mando e del ventilatore non sono coperti da garanzia se questo non viene rispettato! Se una lampada eventualmente esistente deve essere dimmerata (possibile solo con lampade dimmer- abili), impostare il microinterruttore A nel vano batterie su „DIM“...
- Page 24 Collegare ora la spina a 4 poli del cavo proveniente dalla staffa di montaggio e dall‘alimentazione del ventilatore a soffitto (E2) al cavo di ingresso del telecomando (E1). Quindi collegare il connettore a 4 pin del cavo proveniente dall‘asta del ventilatore a soffitto (A2) al connettore di uscita del cavo del ricevitore del telecomando (A1) come mostrato in Fig.
- Page 25 L‘assegnazione dei pin della spina è destinata ai ventilatori a soffitto CasaFan AC. Per altre marche (Hunter/Fanimation ecc.) si prega di controllare la piedinatura dei connettori! I ventilatori da soffitto DC/EC non possono essere controllati con il FB-FNK-D Multicode! Inserimento delle batterie nel trasmettitore portatile Fig.
- Page 26 Funzionamento e funzioni del telecomando FB-FNK-D Multicode IMPORTANTE: Dopo aver completato l‘installazione e aver riacceso la tensione di rete, premere il pulsante „3“ per la massima velocità del ventilatore sul trasmettitore portatile per accendere la velocità più alta. Ora tirate la catena di trazione del vostro ventilatore fino a quando non funziona alla massima velocità.
-
Page 27: Instrucciones De Seguridad
INSTRUCCIONES DE SEGURIDAD: - Por favor, lea este manual cuidadosamente antes de co- menzar la instalación. Las conexiones eléctricas incorrec- tas pueden dañar la unidad receptora, causar una descar- ga eléctrica y/o presentar un riesgo de incendio. - El mantenimiento y las reparaciones de la unidad recep- tora de este mando a distancia sólo deben ser realizadas por un electricista cualificado, un electricista experto o una persona con la cualificación adecuada. - Page 28 Antes de usar el producto CasaFan, por favor lea estas instrucciones de instalación y operación cuida- dosamente. Mantenga el manual al alcance de la mano. Nunca dé el producto CasaFan a nadie sin las instrucciones de instalación y operación.
- Page 29 AVISO: Primero compruebe si su ventilador de techo es adecuado para su funciona- miento con un mando a distancia. Antes de comenzar la instalación, asegúrese de que cualquier interruptor de tracción del ventilador de techo esté ajustado al nivel más alto. Los daños en la electrónica de la sección receptora del mando a distancia y en el ventilador no están cubiertos por la garantía si no se respetan.
- Page 30 Conecte ahora el conector de 4 pines del cable procedente del soporte de montaje y de la alimentación de su ventilador de techo (E2) con el cable del lado de entrada del mando a distancia (E1). A continuación, conecte el enchufe de 4 polos del cable procedente de la varilla del techo de su ventila- dor de techo (A2) con el enchufe de salida del cable del receptor del mando a distancia (A1), tal y como se muestra en la Fig.
- Page 31 ATENCIÓN: ¡Es imprescindible observar el etiquetado del receptor del mando a distancia! La asignación de clavijas del enchufe está pensada para los ventiladores de techo de AC CasaFan. Para otras marcas (Hunter/Fanimation etc.) por favor compruebe el pinout del enchufe! Los ventiladores de techo DC/EC no pueden ser controlados con el FB-FNK-D Multicode! Colocación de la pila en el transmisor de mano...
- Page 32 Manejo y funciones del mando a distancia FB-FNK-D Multicode IMPORTANTE: Después de completar la instalación y de volver a conectar la tensión de la red, por favor, pulse el botón „H“ para la velocidad más alta del ventilador en el transmisor de mano para conectar la velocidad más alta.
- Page 33 Altbatterien vorgenannter Art können Sie daher entweder ausreichend frankiert an uns zurücksenden oder sie direkt an unserem Versandlager unter der folgenden Adresse unentgeltlich abgeben. Rücksendungen/Rückgabe von Batterien/Akkus sind zu richten an: CasaFan GmbH Senefelderstr. 8 63594 Hasselroth Deutschland Batterien sind mit dem Symbol einer durchgekreuzten Mülltonne (s.
- Page 34 DE - ACHTUNG Dieses Gerät entspricht der EU-Richtlinie 2012/19/EU. Das Symbol mit der durchgestrichenen Abfall- tonne am Gerät bedeutet, dass das Gerät nach seiner Aussonderung nicht im Haushaltsmüll entsorgt werden darf, sondern an einer Sammelstelle für Elektro- und Elektronikgeräte oder beim Kauf eines gleichwertigen Neugerätes beim Händler abzugeben ist.
- Page 35 Handelsmarke/ trademark: CasaFan Modell Artikelnummer weitere Angaben model article-no further details FB-FNK-D Multicode #85238 (MR192A-1+TR32B-L) die grundlegenden Anforderungen der aufgeführten EU-Richtlinien erfüllt: 2014/53/EU Funkgeräterichtlinie (RED) 2011/65/EU Richtlinie zur Beschränkung bestimmter gefährlicher Stoffe in Elektro- und Elektronikgeräten meets the essential requirements of the following EU-Directives:...
- Page 36 CasaFan se réserve d´apportertous changements susceptibles d´améliorer les produits en vente. CasaFan si riserva di apportare tutte le varianti migliorative ai prodotti in corso di vendita. Nos reservamos el derecho de hacer cambios en el producto que sirvan para mejorarlo sin previo aviso.
Need help?
Do you have a question about the FB-FNK-D Multicode and is the answer not in the manual?
Questions and answers